
Can you freeze green beans? Yes, you can…and they taste amazing! Learn how to freeze green beans in no time with this easy step by step tutorial!

One of the ways that I save quite a bit of money on groceries is by preserving lots of fruits and vegetables.
While we live in the city and don’t have room for a big garden, we’re blessed to live in an area where we can get lots of beautiful, homegrown produce for great prices. So I simply buy large amounts from local growers and then preserve them for us to enjoy all year long.
I know that canning and freezing produce sounds really daunting to many people, so I’ve done a number of step by step canning and freezing tutorials to show you just how simple the process really is.
Today I’m going to show you how to freeze green beans. Not only are they super easy to preserve by freezing, they also taste so much better than store-bought!
In fact, recently I saw a great deal on some frozen beans at the store and decided to buy a couple of bags thinking it would help stretch our supply since I hadn’t frozen as many this year as I probably should have.
I made them for dinner and after one bite my husband commented, “It’s no wonder so many people don’t like vegetables!”
And I had to agree. They just were nowhere near as tasty as the green beans that I freeze!
The benefits of freezing green beans vs. canning them
There are affiliate links in this post. As an Amazon Associate, I earn from qualifying purchases. Please read my full disclosure policy.
You can preserve your beans by canning or freezing them. If you choose to can them, you need to use a pressure canner![]() since using a regular canner doesn’t reach high enough temps to kill the bacteria that causes botulism.
since using a regular canner doesn’t reach high enough temps to kill the bacteria that causes botulism.
I find the pressure canning process rather time-consuming and tedious plus it also makes the beans less nutritious. Did you know that frozen veggies and fruit have almost as much nutritional value as when they are fresh?
So, I prefer to simply freeze our green beans. And once you see how amazingly easy it is to do, I think you’ll understand why!
Supplies for freezing green beans
- Dishpan or container to put the beans in
- Paring Knife (love this one!)
– You can also use your fingers to do this, but I find it harder and it doesn’t look as nice either. - Blancher
– You can use a big pot instead but it gets a bit complicated when it comes time to drain the beans and cool them quickly
(Don’t have a blancher and don’t want to buy one? See if you can find a friend that has one that you could borrow.) - Freezer bags or freezer-safe containers to store the beans
– I like using these freezer boxes.
How to Freeze Green Beans

1. Trim the bean ends
Remove the ends of the beans and any defective spots. If you have true “string” beans, remove the strings too.
Technically you don’t have to remove the tail end of the bean, just the end that was attached to the stalk. However, I don’t like the look of leaving them on so I remove them too.

2. Cut the beans into smaller pieces
Break or cut the beans into 1 to 1 ½ inch pieces.
If you have children, this is a step that even little children can help with. In fact, they often think it is fun!

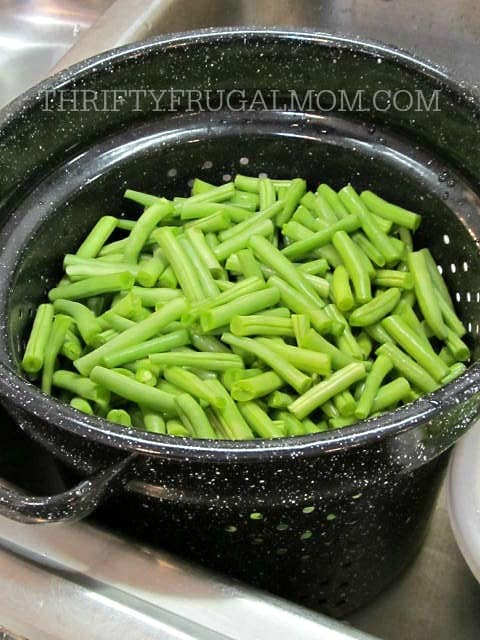
3. Wash the beans.
Wash the beans thoroughly in cold water. I like to put a dishpan full of beans in my sink and then just fill it with water.
Swish the beans around really well to work any dirt loose.
4. Fill the blancher’s colander
Move the beans over to the colander insert of your blancher![]() , filling it to just below the ridge.
, filling it to just below the ridge.
You want the beans to not go above the top row of holes so that they will be covered with water during the blanching process.

5. Fill the blancher with water
Fill the kettle part of the blancher about 2/3 to 3/4 full of water. You don’t want it too full because the water level will rise once you put the colander full of beans into it.
Bring the water to a full, rolling boil.
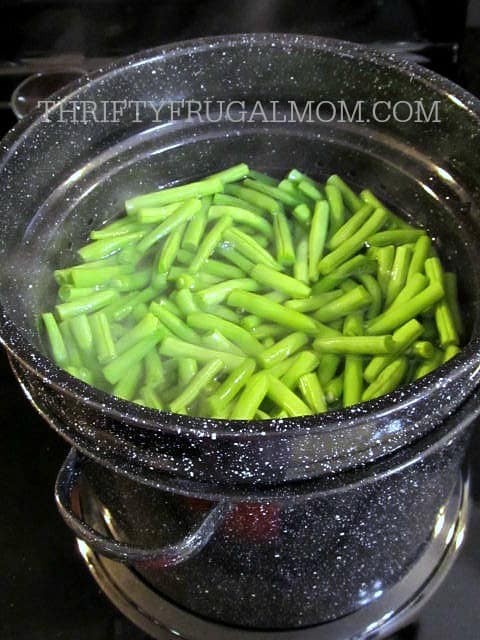
6. Insert the colander into the boiling water
Slowly (this is important so that the water doesn’t go splashing out!) insert the colander full of beans into the boiling water. Once you put the beans in, the water will stop boiling.

7. Bring the pot to a rolling boil
Watch the pot carefully and once the water comes to a rolling boil again, remove the beans immediately. You just want to slightly cook the beans.
(In the picture above I wasn’t watching the pot closely enough and it had been boiling for a bit when I noticed it. You don’t want that much of a boil! It isn’t tragic, but the beans just won’t taste quite as good.)

8. Cool the beans
While you are waiting for the beans to boil, fill a dishpan or sink with cold water- the colder the better.
Once you remove the beans from the boiling water, immerse the colander in the cold water, making sure that all the beans are submerged.
Cool the beans down as fast as possible. It helps to swish the colander around in the water, keep the water running, use your hands to move the beans around and even change the water if necessary.

9. Drain the beans
Once the beans are nice and cool, drain the water off of them.

10. Transfer beans to freezer-safe containers
Put the blanched beans in freezer bags or freezer-safe containers and freeze immediately.
I typically use these freezer boxes![]() to freeze our food just because I like the way they store and it’s also cheaper in the long run since you can use them over and over again.
to freeze our food just because I like the way they store and it’s also cheaper in the long run since you can use them over and over again.
And that’s all there is to freezing green beans! So easy, but it produces such tasty beans.
Also, while we’re on the subject of green beans, I highly recommend this amazing Cheesy Ham, Potato and Green Bean Casserole. It’s made totally from scratch and is total comfort food!

How to Freeze Fresh Green Beans
Equipment
- Dishpans or containers to put the beans in
- Paring Knife
- Blancher
- Freezer bags or freezer safe containers to freeze the beans in
Ingredients
- Green Beans
Instructions
- Remove the ends of the beans and any defective spots. If you have true “string” beans, remove the strings too. Technically you don’t have to remove the tail end of the bean, just the end that was attached to the stalk. However, I don’t like the look of leaving them on so I remove them too.
- Break or cut the beans into 1 to 1 ½ inch pieces.
- Wash the beans thoroughly in cold water. I like to put a dishpan full of beans in my sink and then just fill it with water. Swish the beans around really good to work any dirt loose.
- Move the beans over to the colander insert of your blancher, filling it to just below the ridge. Basically you want the beans to not go above the top row of holes so that they will be covered with water during the blanching process.
- Fill the kettle part of the blancher about 2/3 to 3/4 full of water. You don’t want it too full because the water level will rise once you put the colander full of beans into it. Bring the water to a full, rolling boil.
- Slowly (this is important so that the water doesn’t go splashing out!) insert the colander full of beans into the boiling water. Once you put the beans in, the water will stop boiling.
- Watch the pot carefully and once the water comes to a rolling boil again, remove the beans immediately. You basically just want to slightly cook the beans.
- While you are waiting for the beans to boil, fill a dishpan or sink with cold water- the colder the better. Once you remove the beans from the boiling water, immerse the colander into the cold water, making sure that all the beans are submerged. Cool the beans down as fast as possible. It helps to swish the colander around in the water, keep the water running, use your hands to move the beans around and even change the water if necessary.
- Once beans are nice and cool, drain the water off of them.
- Put the blanched beans in freezer bags or freezer-safe containers and freeze immediately.


Ashley
This seems fairly easy so I’m excited to give it a go especially since I am a newbie. Ordered the containers because my local store doesn’t carry them. My mother was mentioning to make sure I get all the air out? You have no mention of this. I’m assuming that they will be fine. Thoughts?
Lydia Beiler
The lids to freezer boxes/containers like this typically are a softer plastic and you can kind of “burp” them to get most of the extra air out. The bit that is left has never been an issue for me. You can also use freezer bags too of course. The beans don’t make them very dirty, so they are easy to wash and reuse, allowing you to save money. Although the boxes definitely save more over time! I hope it goes well and that you can enjoy your own green beans all year long!
Lynn
How would you suggest freezing squash and zucchini?
Lydia Beiler
The only way that I have frozen either of these is to grate/shred it and then use it in baked items like cakes or breads etc.
Glenda
My mom froze green beans every summer when I was growing up. Your tutorial made the process so simple. I’m actually looking forward to having fresh beans so I can try it. Thanks for the great information!
Susie
My grandpa always said all the vitamins were in the tail, so he never trimmed them. Lol
ThriftyFrugalMom
That’s too funny, Susie! It definitely can’t hurt anything to keep them on, that’s for sure!
Donna
I just froze a ton of snap beans. I snapped and washed them but froze them without blanching first. Will they be ok?
Lydia Beiler
They will be okay, Donna, but I would just use them fairly soon. Blanching simply stops the enzyme action that breaks down the bean and eventually leads to spoilage. Over time, if unblanched, the beans will lose quality in taste, texture, color and nutrition. However, they should be fine for a while.
Lori
I froze mine last summer without blanching and in the middle of the winter when I cooked them as usual they tasted like a rubber, disgusting.
Tina Hamblin
Have u roasted the beans after the freezing process? Do they stay crispy and crunchy? We always roast in the oven after we buy them. (With EEVO and garlic salt from aldis).
ThriftyFrugalMom
I haven’t ever tried roasting them but I just Googled to see if you can roast frozen beans and it looks like you can- just for less time than you do fresh ones since they are already partially cooked. Hope that helps!
Cindy
I freeze beans every year this way. When I am ready to eat some I don’t put them in water because it takes out some of the nutrients. So I put butter in a sauce pan melt it and then add the green beans cover and cook until done. My mother worked for the University of Illinois and she took classes on how to freeze and cook all kinds of vegetables. I’m glad I payed attention when I was a kid. You can save money by freezing your home grown vegetables.
ThriftyFrugalMom
Thanks for that tip, Cindy! I assume the beans produce a little bit of water simply because of being frozen? And what temp do you cook them at? I really like the fact that nutrients wouldn’t be cooked away, as you mentioned.