
Canning tomato juice is so easy! This step-by-step photo tutorial will show you how to can homemade tomato juice in no time.

Preserving your own fruits and vegetables is such a great way to save money! Plus, it’s often healthier because you have the ability to control what goes into your canned food.
I love to can, and one of the things I enjoy making with tomatoes is homemade tomato juice.
I use a lot of tomato juice to make my Mom’s old-fashioned homemade Cream of Tomato Soup.
I also use homemade tomato juice in various other recipes, such as this delicious Tomato Basil Parmesan Soup and this favorite Speedy Spanish Rice and Ground Beef Skillet.
And of course, you can always just drink it as is, too!
Want to try making your own tomato juice? Let me walk you through the process of making it and canning it!
Supplies for Canning Tomato Juice:
There are affiliate links in this post. As an Amazon Associate, I earn from qualifying purchases. Please read my full disclosure policy.
- Tomatoes (obviously!)
- Salt (optional, but recommended for best flavor)
- Citric Acid or bottled lemon juice
- Dishpan or containers to put the tomatoes in
- Knife (this brand is my favorite)
- Large kettle
- Long spoon to stir tomatoes
- Ladle for transferring tomatoes and juice
- Food Mill or Victorio Strainer or blender and strainer
- Wide Funnel
- Damp rag to wipe tops of jars
- Small pan to boil jar lids in
- Fork or Lid Wand
- Canner (or this Canning Rack may work, depending on what size pot you already own)
- Canning jars with lids and bands
- Jar lifter
- Old towels or rags to set the hot jars on
How to Can Tomato Juice (a step-by-step tutorial)

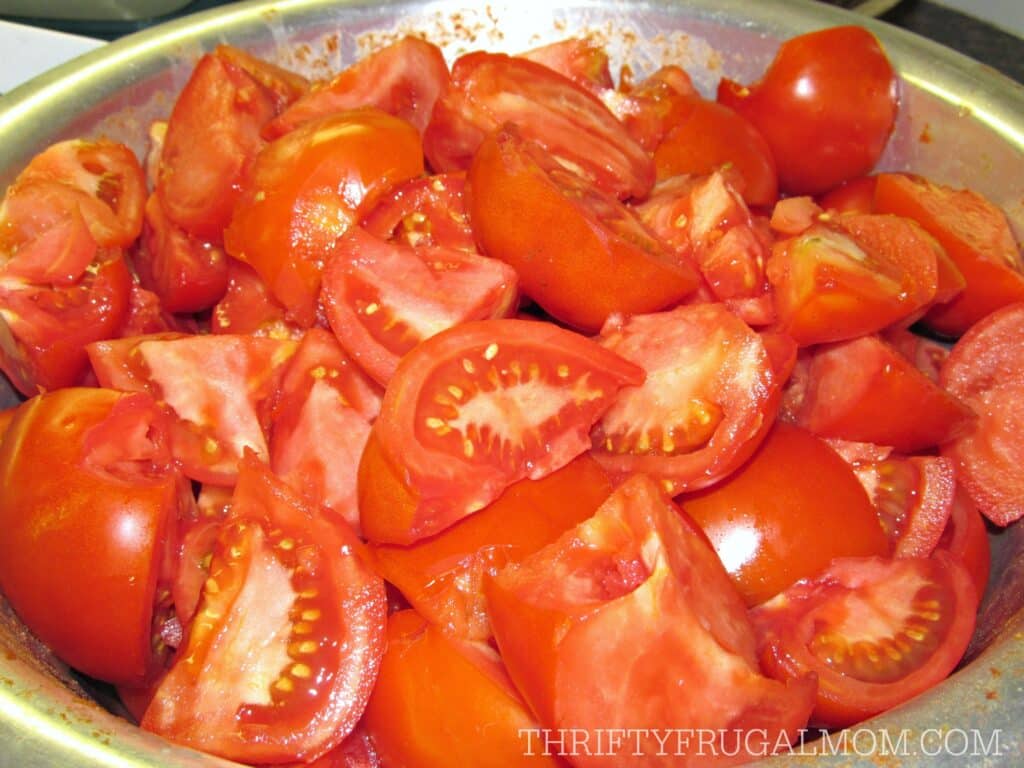
1. Wash tomatoes thoroughly.
Cut out the stem and any defects or blemishes.
There is no need to peel the tomatoes. Yay, for keeping things easy!
2. Cook the tomatoes.
Cut the tomatoes into chunks for quicker cooking, then dump them into a kettle.
Use your hand (or a potato masher) to squish a few tomatoes in the bottom of the kettle. This helps create enough tomato juice to keep the tomatoes from sticking to the bottom of the kettle as they start to cook.
As the tomatoes cook, they will start to juice themselves and you’ll soon have more liquid.
Cook on medium heat, stirring several times, being sure to move the tomatoes on the bottom to the top for even cooking.
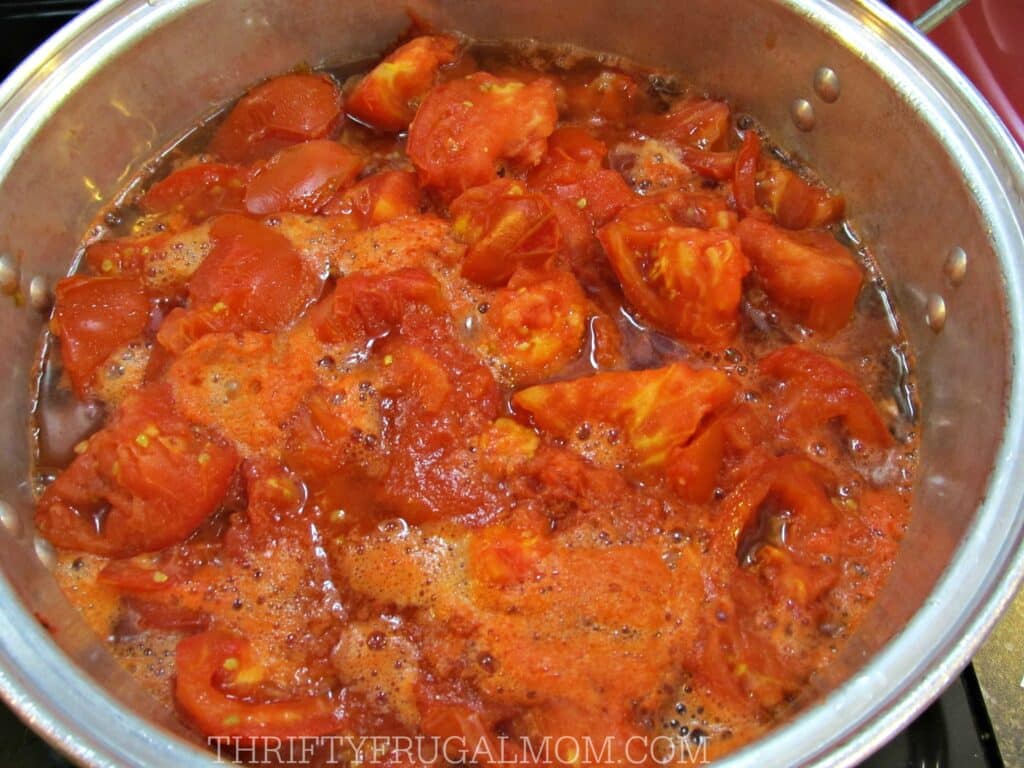
3. Cook until soft.
Cook the tomatoes until soft– this usually takes about 10 minutes.
4. Make the Tomato Juice.
At this point, you have several options for turning the cooked tomatoes into juice. I’m going to explain the process I use and then include details for other methods at the end of the instructions under “Notes”.
Fill the “pan” part of the Food Mill with cooked tomatoes and then turn the handle to juice them.
Continue turning, occasionally reversing the direction to clean the tomatoes off the bottom.

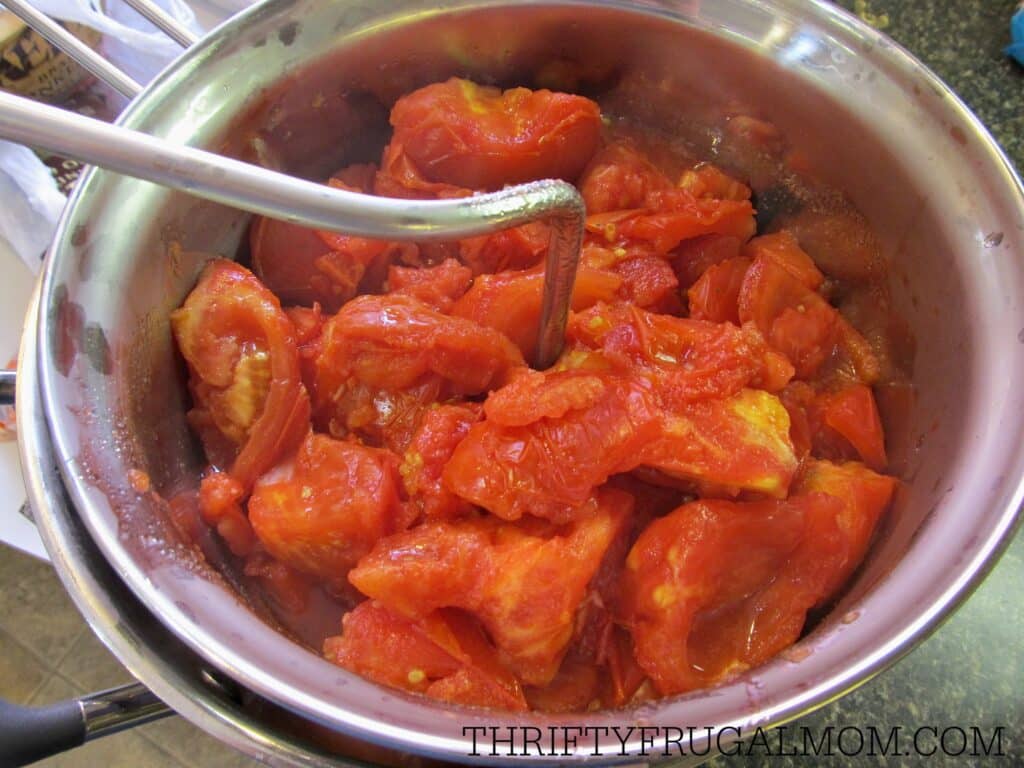
5. Discard the scraps.
Once there is no tomato juice coming out anymore and you have very little peel and seeds left in the food mill pan (it should look something like what I show above), discard the scraps.
I actually often pour the scraps into a cake pan, and after it’s full, I’ll run them all through the food mill again.
I like really thick, pulpy juice, and I’ve found that by doing this, I get a pulpier juice. But it is definitely just personal preference. You can always just toss the scraps immediately if you prefer!
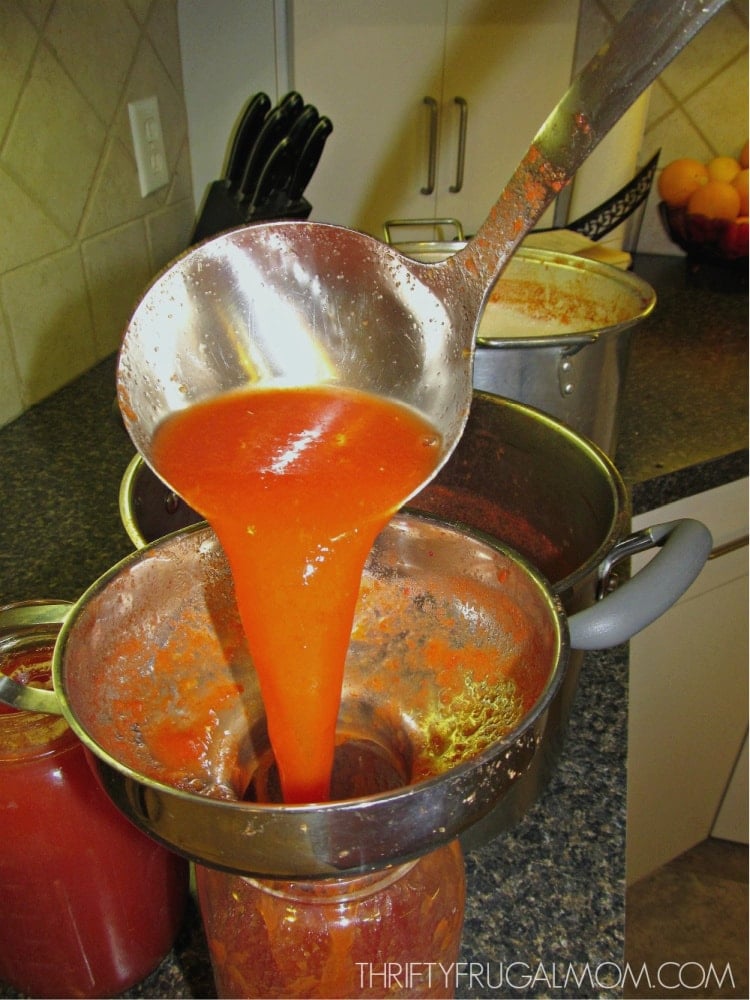
6. Pour the tomato juice into canning jars
Fill clean canning jars with tomato juice- a wide funnel makes this super easy. The jars should be filled just to the base of the neck.
7. Add Salt and Citric Acid or bottled Lemon Juice
For the salt, use ½ tsp. per pint and 1 tsp. per quart. You do not need to add salt when canning tomatoes, but I recommend it because I think it helps enhance the flavor.
Add Citric Acid (¼ tsp. per pint or ½ tsp. per quart) or bottled lemon juice (1 Tbsp. per pint or 2 Tbsp. per quart) to each jar to create a safe level of acidity.
Once the salt and citric acid/lemon juice are added to the jars, wipe the rim of each jar with a clean, damp cloth to remove any tomato residue. (If there is even a slight bit of tomato juice on it, it may not allow it to seal properly.)
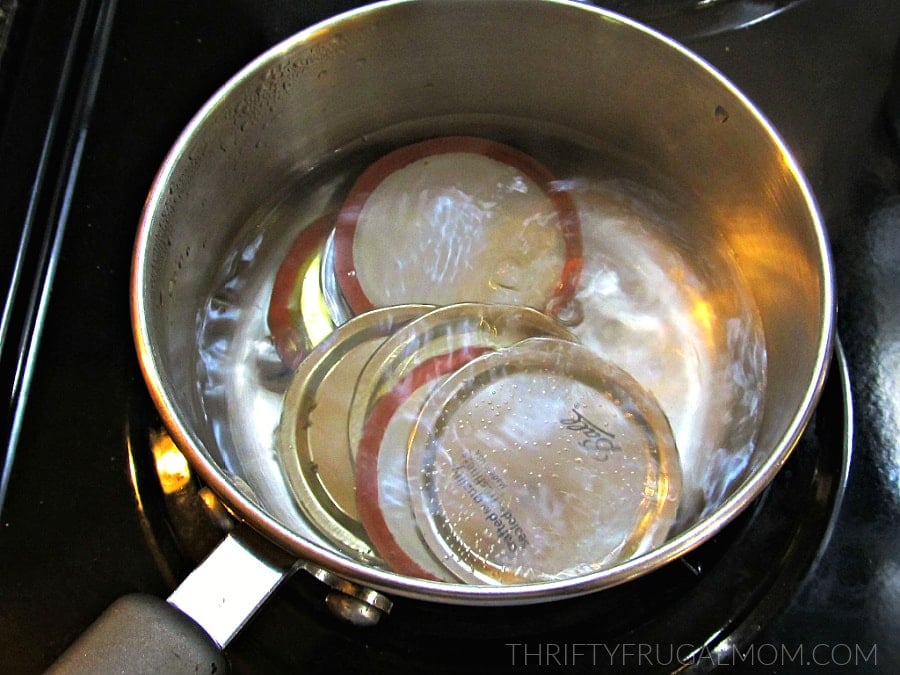
8. Prepare the canning lids.
Once you have 7 jars filled, place 7 metal canning lids in a small pan. Cover with water; bring to a boil.
When the water boils, use a fork or lid lifter to lift the jar lids out of the water and place them on the jars. Be careful not to burn yourself!
Secure each lid with a jar band/ring.
(Heating the lids softens the rubber, allowing for a better seal. However, I read recently that some of the newer lids recommend that you don’t boil them, so you double check the instructions on your box of lids before doing this step.)
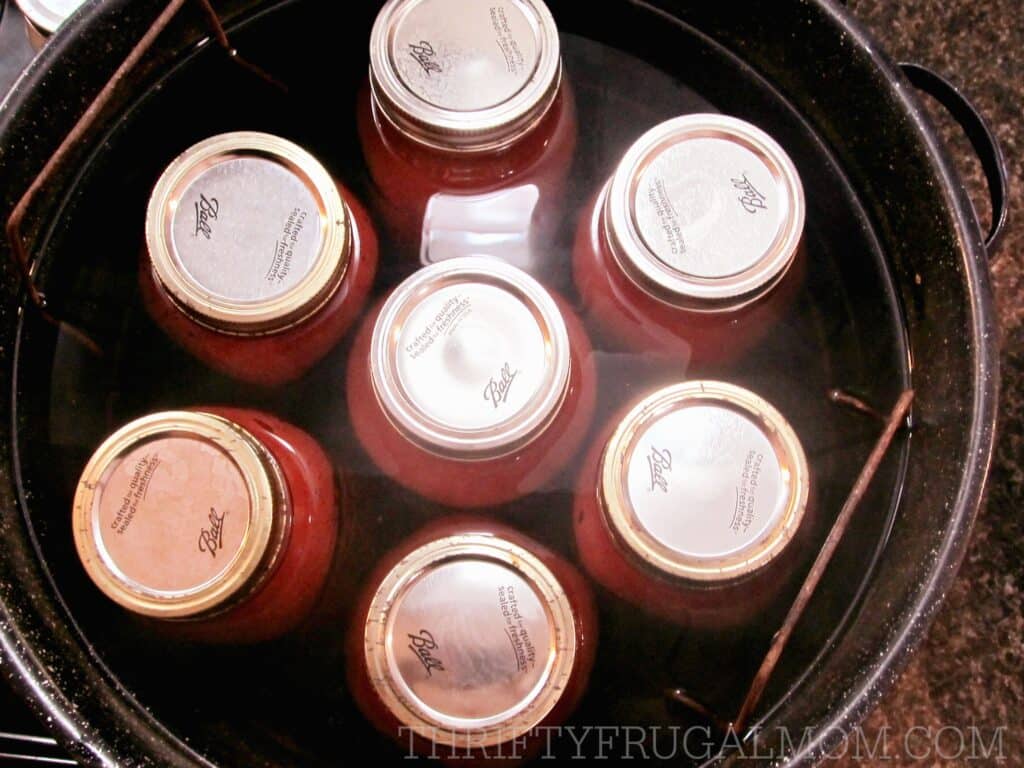
9. Place the filled jars of tomato juice into the canner.
Once the jars are full and have the rings and lids on them, place the jars into the canner.
Then add hot water to the canner, enough to cover the jars by 1 to 2 inches. Turn the burner on medium-high heat.
Once the water starts to boil, reduce the heat slightly and process: 35 minutes for pints and 40 minutes for quarts.
Make sure the water is boiling gently and steadily the whole time. (You may need to adjust the heat to keep the boil going nicely, but really, as long as it is boiling, you are fine.)
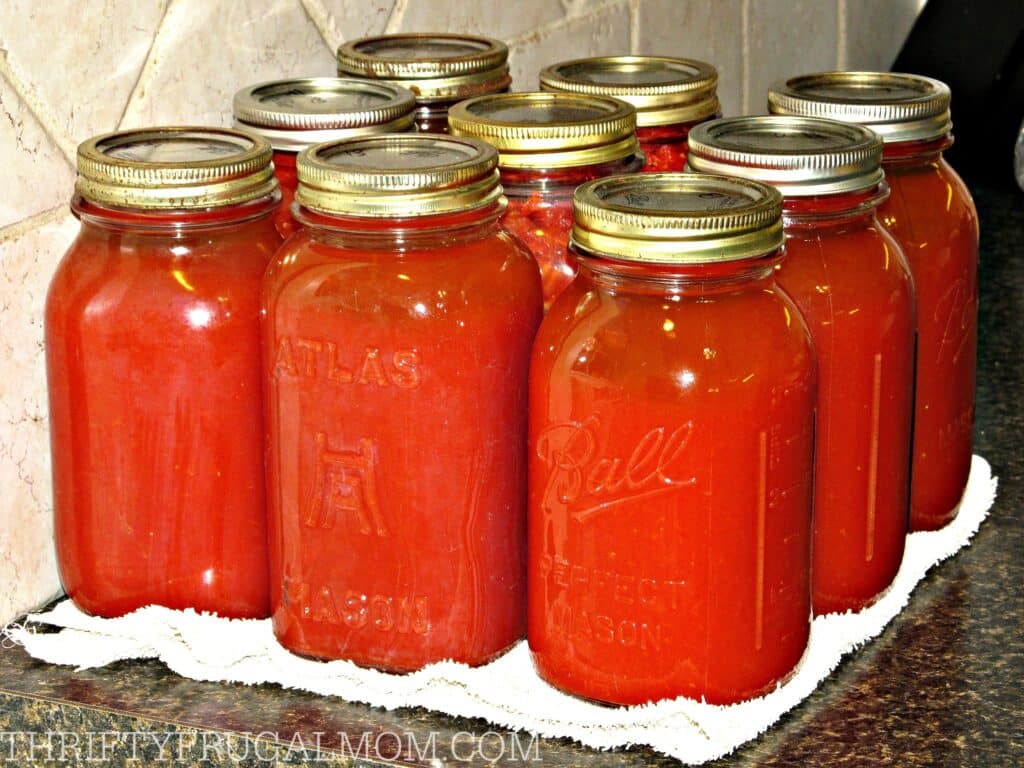
10. Remove the jars of canned tomato juice.
After processing is complete, turn the burner off.
Remove jars using the jar lifter– you may want to have a dishrag in your other hand to catch any hot water that drips from the jars as you remove them- and place on an old towel, blanket or another padded surface. (This protects your countertop from the super hot jars.)
Allow at least a little bit of air space around each jar, making sure not to have jars close enough to touch. Do not move jars again until they are completely cool.
Jars should seal as they cool and you will typically hear a snap or pinging sound as the vacuum seal is formed. Lids will be slightly concave when sealed.
To test the seal, allow the jar to cool completely, then lightly tap the center of the cooled jar lid. If it is firm and does not move, it should be sealed. If it pushes in, it didn’t seal properly. You can still use unsealed jars, just put them in the refrigerator and use them as soon as possible.
After the jars are completely cool, you can remove the rings. Jars should be wiped clean before storing.
Enjoy!
Tomato Juice Recipe Notes:
- You can also make juice by putting the cooked tomatoes through a Victorio Strainer. (Victorio Strainers also makes great homemade applesauce!) This is the method my mom used when I was a child, and it helped her make tomato juice. It’s faster than using a Food Mill, but it also splatters a lot and since the counter that I have to clamp it onto is white (as well as the cupboards surrounding it), I opted to not go this route.
- You can also use the blender and strainer method. To do this, simply blend about a quart of cooked tomatoes at a time until pureed and then pour through a strainer to remove seeds and remaining bits of peel. I have never tried this method but I would imagine it would work well, although it might be more time-consuming and may possibly make a thinner tomato juice.
- If, for some reason, you open a jar of home-canned tomato juice and don’t need to use the full amount, simply put the remainder in a freezer-safe container and freeze it to use later.
More home canning and freezing recipes:
- How to Can Diced Tomatoes
- How to Can Dill Pickles
- How to Can Peaches
- How to Make and Can Applesauce
- How to Freeze Green Beans
- How to Freeze Blueberries
- How to Freeze Rhubarb
Canning Tomato Juice
Equipment
- Dishpan or containers to put the tomatoes in
- Knife
- Large kettle
- Long spoon to stir the tomatoes
- Ladle for transferring the tomatoes and juice
- Food Mill, Victorio Strainer or blender and strainer
- Wide Funnel
- Damp cloth to wipe tops of jars
- Small pan to boil jar lids in
- Fork or lid wand
- Water bath canner
- Canning jars with lids and bands
- Jar lifter
- Old towels or rags to set hot jars on
Ingredients
- fresh tomatoes (approx. 23 lb. of tomatoes makes 7 qts. juice)
- salt (optional)
- bottled lemon juice or citric acid
Instructions
- Wash tomatoes thoroughly. Cut out the stem and any defects or blemishes, but there’s absolutely no need to peel them!
- Cut tomatoes into chunks for quicker cooking, then dump into a kettle.Use your hand (or a potato masher) to squish a few tomatoes in the bottom of the kettle. This helps create enough juice to start cooking the tomatoes without having them stick to the bottom of the kettle.As the tomatoes cook, they will start to juice themselves and you’ll soon have more liquid. Cook on medium heat, stirring several times being sure to move the tomatoes on the bottom to the top for even cooking.
- Cook until soft, about 10 minutes.
- At this point, you have several options for turning the cooked tomatoes into juice. I’m going to explain the process I use and then include details for other methods at the bottom of this post in the Notes.Fill the “pan” part of the Food Mill with cooked tomatoes and then turn the handle to juice them. Continue turning, occasionally reversing the direction to clean the tomatoes off the bottom.
- Once there is basically no tomato juice coming out anymore and you have very little peel and seeds left in the food mill pan (take not of the picture on my blog), discard the scraps.I actually often pour the scraps into a cake pan and after it’s full, I’ll run them all through the food mill again. I like really thick, pulpy juice and I’ve found that by doing this, I get a pulpier juice. But it is definitely just personal preference and you always can toss the scraps immediately if you prefer!
- Pour the tomato juice into clean canning jars- a wide funnel makes this super easy. The jars should be filled just to the base of the neck.
- Add Citric Acid (¼ tsp. per pint or ½ tsp. per qt) or bottled lemon juice (1 Tbsp. per pint or 2 Tbsp. per quart) to each jar of tomato juice to create a safe level of acidity.
- Add ½ tsp. salt per pint and 1 tsp. salt per quart. (optional, but recommended for best flavor)
- Wipe the rim of each jar with a clean, damp cloth to remove any tomato residue that may be there. (If there is even a slight bit of tomato juice on it, it may not allow it to seal properly.)
- Once you have 7 jars filled, place 7 metal canning lids in a small pan. Cover with water; bring to a boil. Once the water boils, use a fork or lid lifter to lift the jar lids out of the water and place them on the jars. Be careful not to burn yourself!Secure each lid with a jar band/ring. (Heating the lids softens the rubber, allowing for a better seal, although I read recently that some of the newer lids actually recommend that you don’t boil them, so double check the instructions on your box of lids before doing this step.)
- Place 7 jars in the canner. Fill the canner with enough hot water to cover the jars by 1 to 2 inches. Turn the burner on medium high heat. Once water starts to boil, reduce heat slightly and process: 35 minutes for pints and 40 minutes for quarts.Make sure the water is boiling gently and steadily the whole time. (You may need to adjust heat to keep the boil going nicely, but really, as long as it is boiling, you are fine.)
- After processing is complete, turn the burner off. Remove jars using the jar lifter– you may want to have a dishrag in your other hand to catch any hot water that drips from the jars as you remove them- and place on an old towel, blanket or another padded surface. (This protects your countertop from the super hot jars.) Allow at least a little bit of air space around each jar, making sure not to have jars close enough to touch. Do not move jars again until they are completely cool.
- Jars should seal as they cool and you will typically hear a snap or pinging sound as the vacuum seal is formed. Lids will be slightly concave when sealed.To test the seal, allow the jar to cool completely, then lightly tap the center of the cooled jar lid. If it is firm and does not move, it should be sealed. If it pushes in, it didn’t seal properly. You can still use unsealed jars, just put them in the refrigerator and use them as soon as possible.
- After jars are completely cool, you can remove the rings. Jars should be wiped clean before storing them.
Notes
- Using a Victorio Strainer: This is the method my mom used when I was a child. It’s faster than using a Food Mill but it also splatters a lot. Since the counter I have to clamp it onto is white (as well as the cupboards surrounding it), I opted to not go this route. (The Victorio Strainer also makes great homemade applesauce!).
- Blender and Strainer Method: To do this, simply blend about a quart of cooked tomatoes at a time until pureed and then pour through a strainer to remove seeds and remaining bits of peel. I have never tried this method but would imagine it would work well, although it might be more time-consuming and may make a thinner tomato juice.
- Freezing Leftover Juice: If you open a jar of home-canned tomato juice and don’t need to use the full amount, simply put the remainder in a freezer safe container and freeze it to use later.
- Shelf Life: Home canned tomato juice is good for at least 2 years, as long as the lid is still tightly sealed. It is best if you can store it in a cool, dry place.

Candy Humber
Good morning! Do you by any chance have the ingredients for a spicy tomato juice? Thank you
Lydia Beiler
I’m sorry, but I’m afraid I don’t.
Michael Tibke
What’s the shelf-life of these once sealed?
Thanks,
Michael
Lydia Beiler
Great question! As long as the jars are stored in a cool, dry place and still sealed, they should be fine for up to 2 years.
Kris Howell
i would love your soup recipe also! Thank you!
Lydia Beiler
I just emailed it to you, Kris!
Judy Peterson
I would like your tomato soup reipe
Lydia Beiler
Sent!
Susan Brown
Soup recipe please?
Lydia Beiler
I just emailed it to you, Susan!
Carol Lett
Just took 7 quarts of tomato juice out of canner! And now I need a good tomato soup recipe in which to use the juice. Since your recipe seems to be very popular would you please send it to me. Thank you in advance and also for good advice on making tomato juice.
Lydia Beiler
Yay for home canned tomato juice, Carol! Glad the recipe was helpful. I’ll send over the tomato soup recipe via email.
Janet Shumaker
Could you send me the tomato soup recipe also via email?
thank you so much!
Lydia Beiler
Of course, Janet! I just sent it over.