
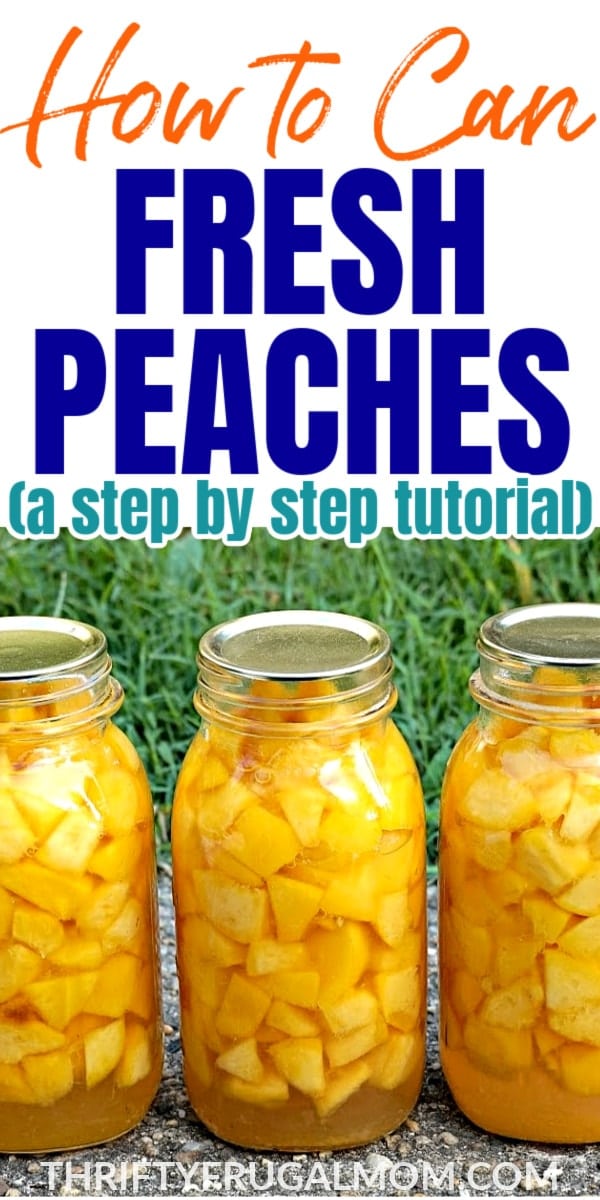
This easy step-by-step recipe is perfect for beginners and will teach you how to can peaches in no time! Who knew canning peaches could be so easy?
Every summer when I was a child, my mom and grandma both did lots of canning and freezing of fruits and vegetables. It was just the norm and at the time, I had no idea what a gift it was to grow up experiencing that art!
And now that I have a home of my own, I enjoy carrying on the tradition. Although, I’ll be the first to admit that I do nowhere nearly as much of it as what they did!
After home-canned diced tomatoes, peaches are my favorite thing to can- partly because they are so easy to do, and partly because they taste 100 times better than store-bought canned peaches!
How do you can peaches? Let me show you!
Pro tips for canning fresh peaches:
- When selecting your peaches, choose a freestone/cling-free variety. These are the best because they peel the easiest and it’s easier to remove the pit/stone.
- If you end up with a non-free stone variety, this little pitting spoon makes removing the peach pit super easy (although still harder than if your peach was a freestone variety!).
- If you buy or pick a large number of peaches, it’s a good idea to lay them out in a single layer on newspaper or cardboard. This helps keep your fruit from squashing each other as they ripen.
- When you’re ready to can your peaches, select slightly soft peaches. Any that are still really firm are not quite ripe enough yet! Let them go for a day or two and check them again.
Supplies for Canning Peaches:
Disclosure: There are affiliate links in this post – please read my full disclosure policy. As an Amazon Associate, I earn from qualifying purchases
- Peaches of course!
- Sugar
- Paring Knife (this brand is my absolute favorite)
- Pitcher or measuring cup to mix the simple syrup in
- Wide Funnel (optional)
- Clean damp dishcloth to wipe jar rims
- Small kettle to boil jar lids in
- Fork or Lid Wand
- Waterbath Canner (or this Canning Rack may work depending on what size pot you already own)
- Freshly washed canning jars with lids and bands
- Jar lifter
- Old towels or rags to set the hot jars on
How to Can Peaches- step by step
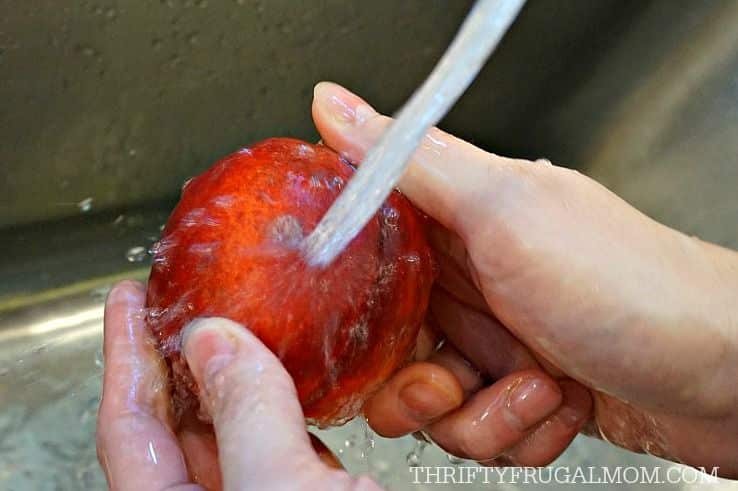
1. Wash peaches thoroughly
Under running water, wash peach by gently rubbing to remove any peach fuzz and dirt.
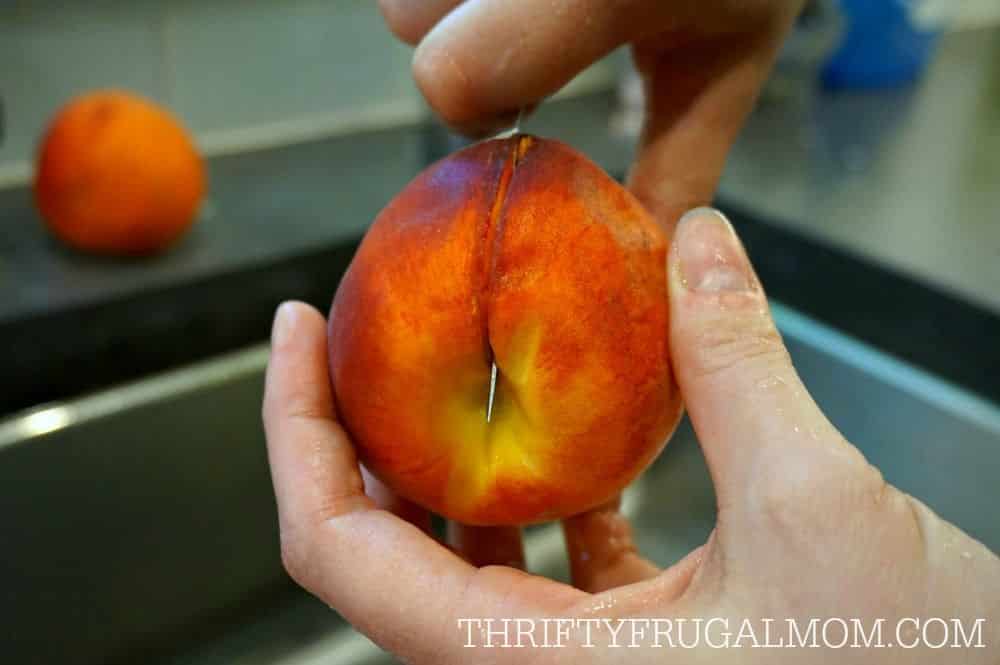

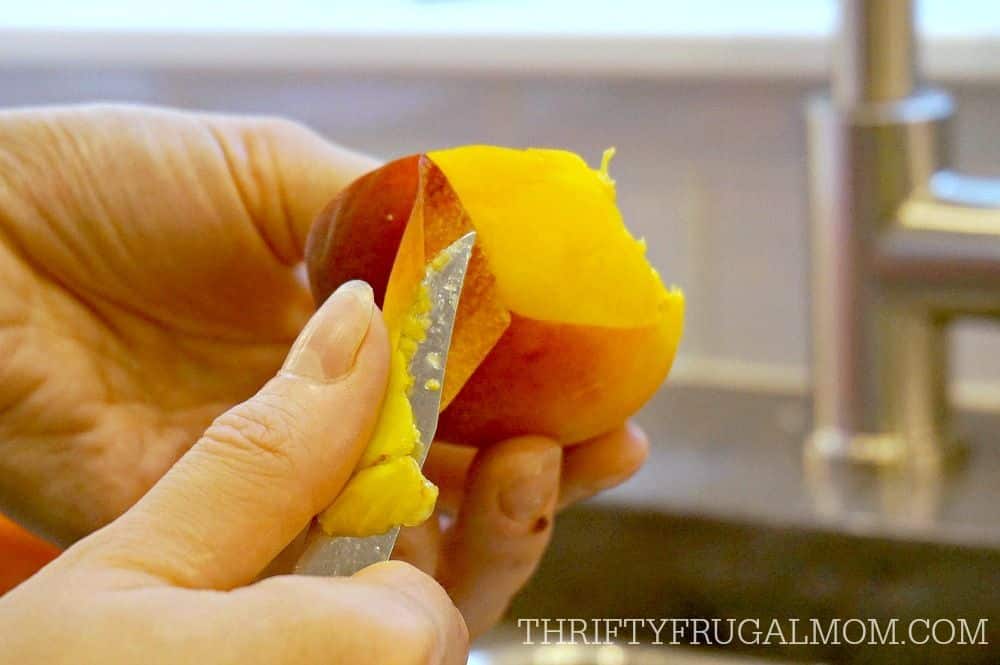
2. Cut and peel
Take the peach and slice in half, following the “seam” on the peach. Gently twist both pieces and pull them apart.
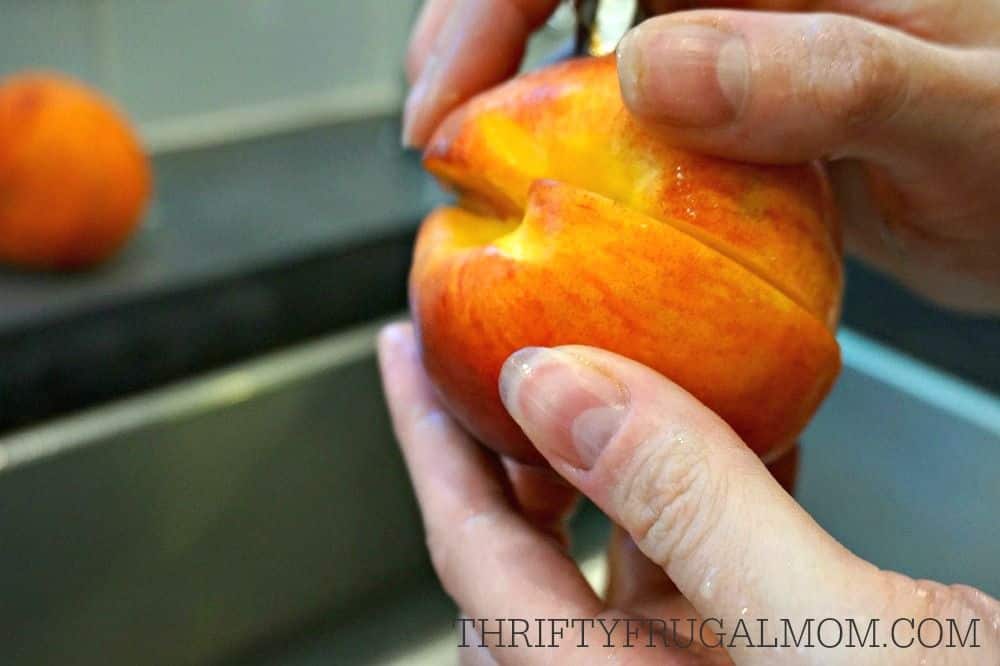
Remove the seed by putting the tip of your knife under the peach pit and pulling it upwards toward yourself. Then peel the peach.
Some people like to blanch their peaches by dipping them in boiling water to help remove the peel, but I’ve found that if your peaches are nice and ripe, generally they are easy to peel without needing to do that.
Just start at the top of the peach where the stem would be and carefully grab the skin with your knife. Pull gently and often you’ll get most of the skin in one try.
The upside is that your peach stays fresher because it isn’t cooked at all by the boiling water.


3. Slice/Dice (optional)
Cut your peaches into whatever size pieces you prefer.
Traditionally, people canned peaches in halves. But I like to cut them into smaller bite-sized pieces both because I can get more peaches in each jar (which saves me time and uses fewer canning jars!) and also because the bite-sized pieces are easier to eat, especially for my children.
If you decide to dice your peaches, a fast way to do it is to cup half of a peach in the palm of one hand, and with the other cut the peach first in half and then each of those two pieces in half again. This will leave you with 4 long pieces. Then just cut across those pieces two or three times to create nice, bite-sized pieces.
Update: A few readers have also recommended using an apple corer as a way to quickly dice the peaches.

4. Put Peaches in Canning Jars
Place fresh peaches into freshly washed canning jars. Be sure to check the opening of the jar for any nicks, cracks or rough edges, since any of these things may prevent your jar from sealing!
If you choose to can your peaches in halves or quarters, layer them in the jar with the cavity side down and overlap the peaches in whatever way you can to fill your jar as full as possible.
If you’ve diced your peaches, simply dump them into the jar. A funnel makes this super easy!
Once a canning jar is full, carefully shake it to settle the contents so you can fill it completely. I often put a dishcloth underneath the jar and then gently pound the jar against the dishrag a bit. It always amazes me how much extra space this creates!
Add more peaches as needed to fill each jar to the base of the neck.

5. Fill Jars with Sugar Syrup
To preserve the flavor and texture of the canned peaches, you need to cover them with a simple sugar syrup made by combining sugar and water. I prefer a medium syrup and the ratio for making that is 2:1, so 2 cups water to 1 cup sugar.
Combine the sugar and water and stir until the sugar is completely dissolved. I like doing this in a pitcher or measuring cup for easy pouring. Pour the syrup over the peaches in each jar and fill to the base of the threaded neck.
Wipe the rim of each jar with a damp cloth to remove any peach/syrup residue that may be there. (If there is even a slight bit of peach or juice on it, it may not allow it to seal properly.)
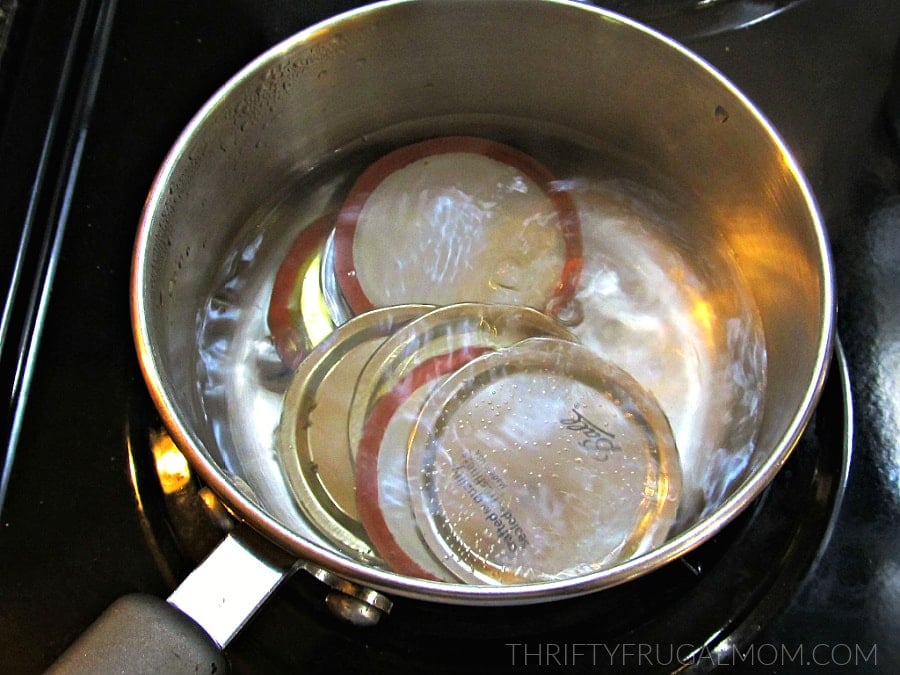
6. Sanitize and Top the Jars with Lids
Once you have 7 canning jars filled, place 7 metal canning lids in a small pan. Cover with water; bring to a boil.
Once the water boils, use a fork to lift the jar lids out of the water- be careful not to burn yourself!- and place them on the jars. Secure each lid with a jar band/ring.
(Heating the lids softens the rubber, allowing for a better seal. However, I read recently that some of the newer lids actually recommend that you don’t boil them, so you double check the instructions on your box of lids before doing this step.)
NOTE: I say 7 jars because that is the amount a typical water bath canner holds. If you don’t want to can 7 jars, obviously just adjust the number to however many jars you are doing.
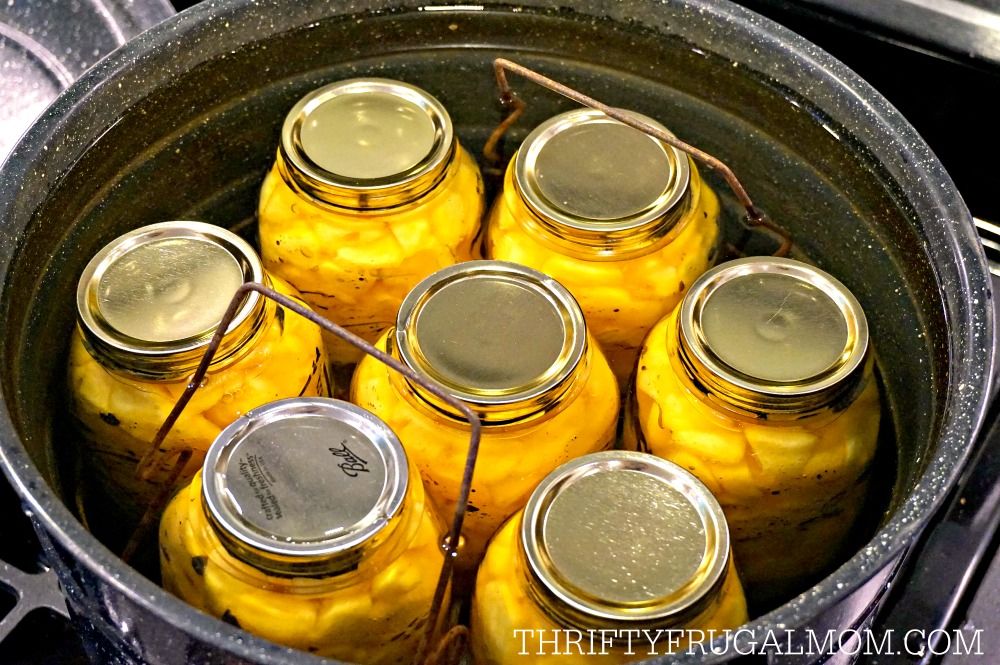
7. Can the Peaches for 30 min.
Place the jars into the canner. Fill with enough hot water to cover the jars by 1 to 2 inches. Turn the burner to medium-high heat.
Once the water starts to boil, reduce the heat slightly and process for 30 minutes as per the National Center for Home Food Preservations guidelines, making sure the water is boiling gently and steadily the whole time. (You may need to adjust the heat to keep the boil going nicely, but really, as long as it is boiling, you are fine.)

8. Remove from the canner….let cool.
After processing for 30 minutes, turn the burner off.
Remove jars of canned peaches using a jar lifter- you may want to have a dishrag in your other hand to catch any hot water that drips from the jars as you remove them- and place them on an old towel, blanket or other padded surface. (The reason for doing this is to protect your countertop from the super hot jars.)
Allow at least a little bit of air space around each jar, making sure not to have jars close enough to touch. Do not move until the jars are completely cool.
Jars should seal as they cool and you will typically hear a snap or pinging sound as the vacuum seal is formed. Lids will be slightly concaved when sealed. To test the seal, lightly tap the center of the completely cooled jar lid. If it is firm and does not move, it should be sealed.
If it pushes in, it didn’t seal properly. You can still use unsealed jars, just put them in the refrigerator and use them as soon as possible.
After the jars are completely cool, you can remove the rings. Jars should be wiped clean before storing.
Enjoy! You now know how to can peaches like a pro!

How to Can Peaches
Equipment
- Paring Knife
- Pitcher or measuring cup to mix the simple syrup in
- Wide Funnel (optional)
- Clean damp dishcloth to wipe jar rims
- Small kettle to boil jar lids in
- Fork or lid wand
- Waterbath canner
- Canning jars with lids and bands
- Jar lifter
- Old towels or rags to set the hot jars on
Ingredients
- Peaches
- Sugar
Instructions
- Wash peaches under running water, gently rubbing to remove any peach fuzz and dirt.
- Take the peach and slice in half, following the “seam” on the peach. Gently twist both pieces and pull apart. Remove the seed by putting the tip of your knife under the peach pit and pull upwards toward yourself. Then peel the peach.
- Cut your peaches into whatever size pieces you prefer.Traditionally, people canned peaches in halves. But I like to cut them into bite-sized pieces both because I can get more peaches in each jar (which saves me time and uses less canning jars!) and also because the bite-sized pieces are easier to eat, especially for my children.
- Place the fresh peaches into freshly washed canning jars. Be sure to check the opening of the jar for any nicks, cracks or rough edges, since any of these things may prevent your jar from sealing!If you choose to can your peaches in halves or quarters, layer them in the jar with the cavity side down and overlap the peaches in whatever way you can to fill your jar as full as possible.If you’ve diced your peaches, simply dump them into the jar. A funnel makes this super easy!Once a canning jar is full, carefully shake it to settle the contents so that you can fill it completely. I often take a dishrag and put it underneath the jar and then gently pound the jar against the dishrag a bit. It always amazes me how much extra space this creates!Add more peaches as needed to fill each jar to the base of the neck.
- Make a simple sugar syrup by combining a 2:1 ratio of water and sugar- so 2 cups of water to 1 cup sugar. Stir until the sugar is dissolved. I like to do this in a pitcher or measuring cup for easy pouring.
- Pour the syrup over the peaches in each jar and fill to the base of the threaded neck.Wipe the rim of each jar with a damp cloth to remove any peach/syrup residue that may be there. (If there is even a slight bit of peach or juice on it, it may not allow it to seal properly.)
- Once you have 7 canning jars filled, place 7 metal canning lids in a small pan. Cover with water; bring to a boil.Once the water boils, use a fork or lid wand to lift the jar lids out of the water- be careful not to burn yourself!- and place them on the jars. Secure each lid with a jar band/ring. (Heating the lids softens the rubber, allowing for a better seal. However, I read recently that some of the newer lids actually recommend that you don’t boil them, so you double check the instructions on your box of lids before doing this step.)I say 7 jars because that is the number of jars that a waterbath canner typically holds. Obviously, if you are canning fewer jars of peaches, adjust the number accordingly.
- Place the jars into the canner. Fill the canner with enough hot water to cover the jars by 1 to 2 inches. Turn the burner on medium-high heat.Once the water starts to boil, reduce the heat slightly and process for 30 minutes, making sure the water is boiling gently and steadily the whole time. (You may need to adjust heat to keep the boil going nicely, but really, as long as it is boiling, you are fine.)
- After processing for 30 minutes, turn the burner off. Remove the jars of canned peaches using jar lifter- you may want to have a dishrag in your other hand to catch any hot water that drips from the jars as you remove them- and place on an old towel, blanket or other padded surface. (The reason for doing this is to protect your countertop from the super hot jars.)Allow at least a little bit of air space around each jar, making sure not to have jars close enough to touch. Do not move until jars are completely cool.
- Jars should seal as they cool. You will typically hear a pinging sound as the vacuum seal is formed. Lids will be slightly concaved when sealed. To test the seal, lightly tap the center of the completely cooled jar lid. If it is firm and does not move, it should be sealed.If it pushes in, the jar didn’t seal properly. You can still use unsealed jars, just put them in the refrigerator and use them as soon as possible.
- After jars are completely cool, you can remove the rings. Jars should be wiped clean before storing.

Samantha
Hi there! If I were to use a quarter pint jar (for more of a fruit cup size for lunch), how much time would I process?
Lydia Beiler
Hi Samantha, I’m not entirely sure what the processing time would be as I’ve never known anyone to can peaches in that small of a jar. As it’s a bit of work to can things, I would recommend canning in larger jars and then divide the peaches into the quarter pint jars for your lunch when you are ready to use them. Once opened a jar of peaches will stay good for at least 4=5 days in the fridge, so that should give you a bit of time to get them eaten, especially if you can pint jarfuls. I hope that helps!
Barb Hadley
Do you use anything to keep the peaches from turning brown
Lydia Beiler
No, the sugar and the canning process keep that from happening.