
The absolute easiest way to can tomatoes! This step-by-step photo tutorial will show you how to can tomatoes in no time. No peeling, no coring- just cut out the stem and dice them up. It’s super easy, plus if you grow your own tomatoes, it’s a big money saver too!

There are affiliate links in this post. As an Amazon Associate, I earn from qualifying purchases. Please read my full disclosure policy.
I started canning diced tomatoes several years ago after having an “aha moment” one evening while preparing dinner. As I was opening a can of diced tomatoes that I needed for the recipe I was making, I suddenly wondered why in the world I never tried canning them myself. I mean how hard could it be?
I grew up helping my mom can tomato juice and tomato chunks. And every year since we’ve been married, I’ve canned tomato juice as well as things like salsa and marinara sauce, so I was quite familiar with the process of canning tomatoes.
I decided to give it a try and it worked like a charm! It was not only super simple, it has also saved me from needing to buy diced tomatoes from the store.
How do you can tomatoes? Let me help you learn the process!
Supplies for Canning Tomatoes
- Tomatoes, salt and bottled lemon juice
- Dishpan or containers to put the tomatoes in
- Knife (This one is my favorite for slicing tomatoes!)
- Cutting board (The groove on this one is awesome because it catches the juice, creating less mess.)
- Vidalia Chop Wizard (Not a necessity, but you can dice the tomatoes in about half the time if you use it.)
– This gadget is also awesome for dicing tomatoes, onions, and peppers for salsa and potatoes and carrots for soups. - Wide Funnel
- Damp cloth to wipe jar rims
- Water Bath Canner (or this Canning Rack may work depending on what size pot you already own)
- Canning jars with lids and rings
- Jar lifter
- Old towels or rags to set the hot jars on
How to Can Diced Tomatoes- a step-by-step tutorial

1. Wash tomatoes thoroughly.
Cut out the stem and any defects or blemishes.
Some people also peel the tomatoes, but I never do and we honestly have not noticed the peelings at all and I’m even funny about textures like that in food.
I figure, why bother with the extra step? Plus it’s a bit healthier too!

2. Cut up the tomatoes.
Slice tomatoes into about ½-inch thick slices, then dice them into whatever size you want. I love using the large dicing side of my Vidalia Chop Wizard for this!
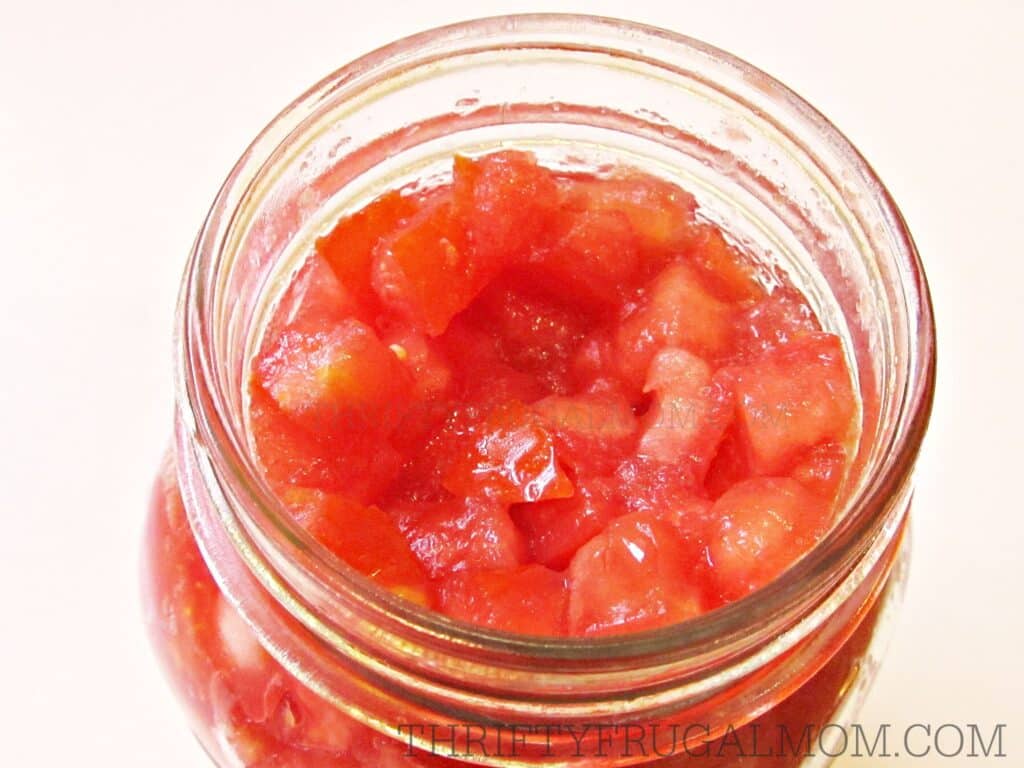
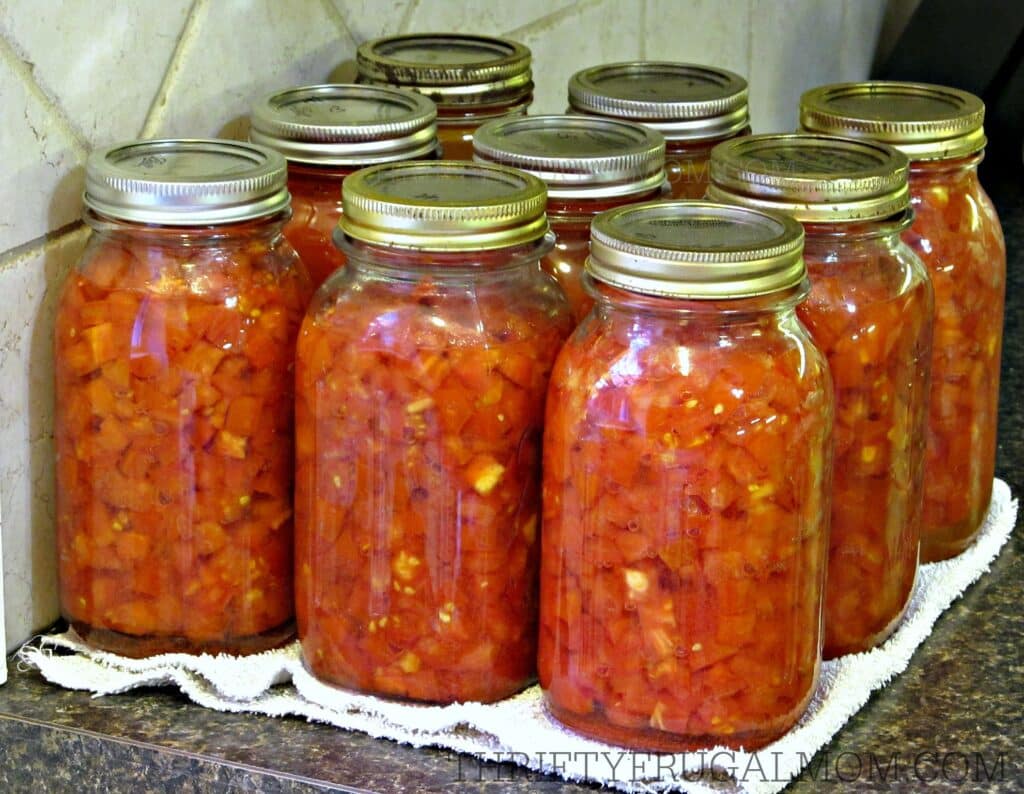
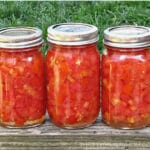
3. Place diced tomatoes into a clean canning jar.
A funnel makes this super easy. Gently shake the jar to settle the tomatoes so that you can fill it completely.
The tomatoes should be packed tightly to produce enough juice. It won’t hurt if you press down on them a bit to get the jar packed full- in fact, this is probably going to be necessary.
The jar should be full to the base of the neck.
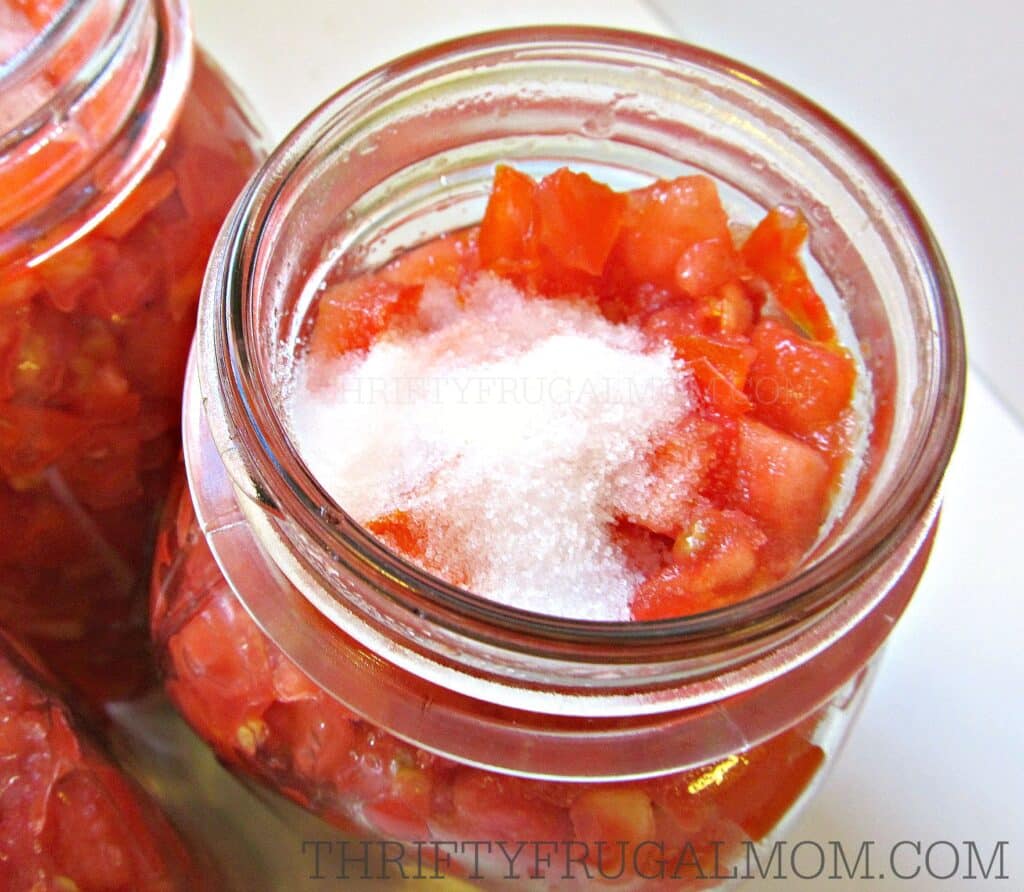
4. Add salt and bottled lemon juice.
For the salt, use ½ tsp. per pint and 1 tsp. per quart. You do not need to add salt when canning tomatoes, but I recommend it because I think it helps enhance the flavor.
For the lemon juice, use 1 Tbsp. per pint and 2 Tbsp. per quart.
Once the salt and lemon juice are added to the tomatoes, wipe the rim of each canning jar with a damp cloth to remove any tomato residue that may be there. (If there is even a slight bit of tomato juice on it, it may not allow it to seal properly.)
I updated the original post to include the instructions to add lemon juice after several readers commented and said that to be safe, you really should add it.
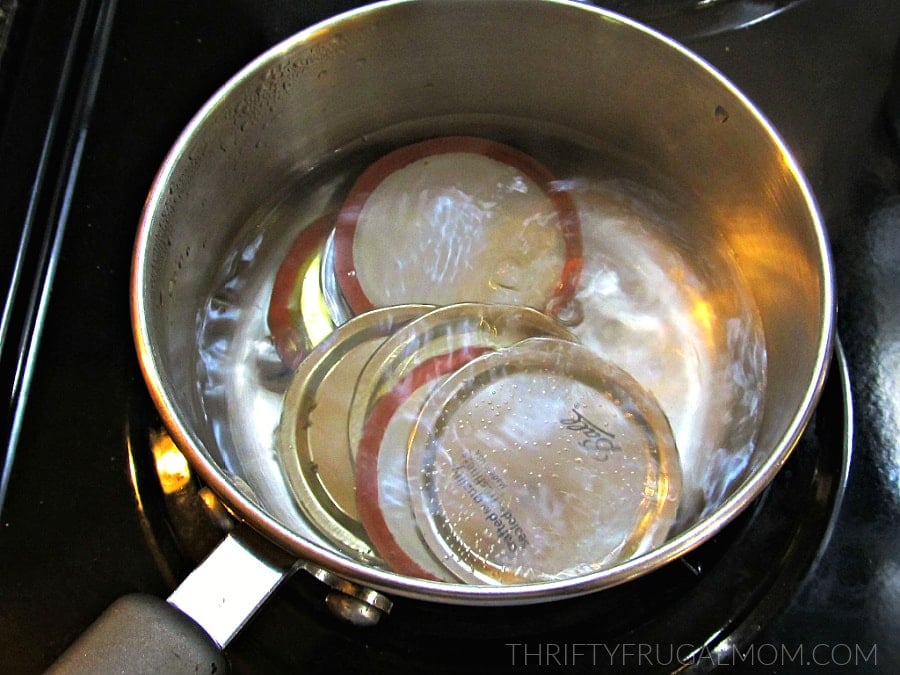
5. Prepare the canning lids. (This may be optional!)
Update: Some canning lid manufacturers now say that it’s not necessary to preheat the lids. So before doing this, check the instructions that came with the lids you are using.
Once you have 7 jars filled, place 7 metal canning lids in a small pan. Cover with water; bring to a boil.
When the water boils, use a fork or lid lifter to lift the jar lids out of the water and place them on the jars. Be careful not to burn yourself!
Secure each lid with a jar band/ring. (Heating the lids softens the rubber, allowing for a better seal.)
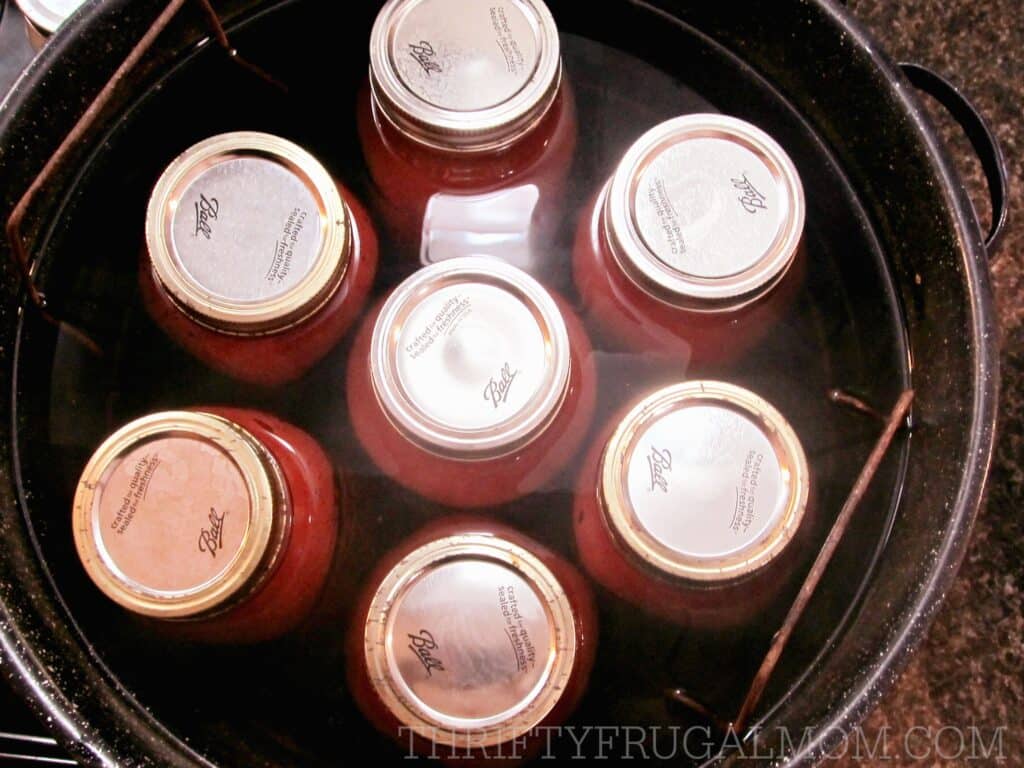
6. Place the filled jars of tomatoes in the canner.
Once jars are full and have the ring and lids on them, place them in the canner.
Then add hot water to the canner, enough to cover the jars by 1 to 2 inches. Cover the canner with a lid. Turn the burner to medium-high heat.
Once the water starts to boil, reduce the heat slightly and process for 45 minutes, making sure the water is boiling gently and steadily the whole time. (You may need to adjust the heat to keep the boil going nicely, but as long as it is boiling, you are fine.)
7. Remove the jars of canned tomatoes.
After processing the canned tomatoes for 45 minutes, turn the burner off.
Remove jars using a jar lifter- you may want to have a dishrag in your other hand to catch any hot water that drips from the jars as you remove them- and place on an old towel, blanket or another padded surface. (This is to protect your counter from the super hot jars.)
Allow at least a little bit of air space around each jar, making sure not to have jars close enough to touch. Do not move until the jars are completely cool.
Jars should seal as they cool and you will typically hear a snap or pinging sound as the vacuum seal is formed. The lids will be slightly concave when sealed.
To test the seal, once the jar has totally cooled you can lightly tap the center of the cooled jar lid. If it is firm and does not move, it should be sealed. If it pushes in, it didn’t seal properly. You can still use unsealed jars, just put them in the refrigerator and use them as soon as possible.
After the jars are completely cool, you can remove the rings. Jars should be wiped clean before storing them.
Enjoy!
HELPFUL TIP: 1 pint of canned diced tomatoes is equivalent to 1 (15 oz.) can of diced tomatoes.
Other canning recipes you might also enjoy:
How to Can Diced Tomatoes
Equipment
- Dishpan or containers to put the tomatoes in
- Knife
- Cutting board
- Vidalia Chop Wizard (Not a necessity, but you can dice the tomatoes in about half the time if you use it.)
- Wide Funnel
- Damp rag to wipe tops of jars
- Canner
- Canning jars with lids and rings
- Jar lifter
- Old towel, blanket or other padded surface to put hot jars on
Ingredients
- fresh tomatoes (approximately 2 3/4 lb. for 1 quart jar)
- salt (1 tsp. per quart or 1/2 tsp. per pint)
- bottled lemon juice (2 tbsp. per quart or 1 tbps. per pint)
Instructions
- Wash tomatoes thoroughly. Cut out the stem and any defects or blemishes. Some people also peel the tomatoes, but I never do and we honestly have not noticed the peelings at all- and I’m even funny about textures like that in food. I figure why bother with the extra step, plus it’s a bit healthier too!
- Slice tomatoes into about ½ inch thick slices, then dice them into whatever size you want. I love using the large dicing side of my Vidalia Chop Wizard for this!
- Place diced tomatoes into a clean canning jar- a funnel makes this super easy. Gently shake jar to settle tomatoes so that you can fill it completely. The tomatoes should be packed tightly in order to produce enough juice. It won't hurt if you press down on them a bit to get the jar packed full- in fact, this is probably going to be necessary. The jar should be full to the base of the neck.
- Add salt (½ tsp. per pint and 1 tsp. per quart) and bottled lemon juice (1 Tbsp. per pint and 2 Tbsp. per quart). Wipe rim of each jar with a damp cloth to remove any tomato residue that may be there. (If there is even a slight bit of tomato juice on it, it may not allow it to seal properly.)
- Update: Some canning lid manufacturers now say that it's not necessary to preheat the lids. So before doing this, check the instructions that came with the lids you are using. Once you have 7 jars filled, place 7 metal canning lids in a small pan. Cover with water; bring to a boil. Once the water boils, use a fork or lid lifter to lift the jar lids out of the water- be careful not to burn yourself!- and place them on the jars. Secure each lid with a jar band/ring. (Heating the lids softens the rubber, allowing for a better seal.)
- Place 7 jars in canner. Fill with enough hot water to cover the jars by 1 to 2 inches. Cover canner with a lid. Turn the burner on medium high heat. Once water starts to boil, reduce heat slightly and process for 45 minutes, making sure the water is boiling gently and steadily the whole time. (You may need to adjust heat to keep the boil going nicely, but really, as long as it is boiling, you are fine.)
- After processing for 45 minutes, turn the burner off. Remove jars using jar lifter- you may want to have a dishrag in your other hand to catch any hot water that drips from the jars as you remove them- and place on an old towel, blanket or another padded surface. (This is to protect your counter from the super hot jars.) Allow at least a little bit of air space around each jar, making sure not to have jars close enough to touch. Do not move until jars are completely cool.
- Jars should seal as they cool and you will typically hear a snap or pinging sound as the vacuum seal is formed. Lids will be slightly concave when sealed. To test the seal, once jar has totally cooled, lightly tap the center of the cooled jar lid. If it is firm and does not move, it should be sealed. If it pushes in, it didn’t seal properly. You can still use unsealed jars, just put them in the refrigerator and use them as soon as possible.
- After jars are completely cool, you can remove the rings. Jars should be wiped clean before storing them.

Christian Gauthier
how long do you process for pints? i see quart is being used in yours and just want to be sure before starting mine in pints.
thank you!
Lydia Beiler
Pint jars are processed for the same amount of time as quarts. Happy canning!
Rose
Hello,
When u don’t have enough juice from your tomatoes, do u add water or not???
Lydia Beiler
I never add water. The tomatoes always seem to juice a bit as they cook and it’s always fine.
Danny
Can you tell me what kind of salt are you using? Pickling salt, kosher salt or regular iodized table salt?
Lydia Beiler
I use regular table salt, but you can use any of the salts you mentioned.
Bonnie
Do you cover the canner when boiling?
Lydia Beiler
Yes, the canner should have the lid on once you put the jars in.
Tammy
Hi. When our tomatoes first coming ripe, there aren’t enough to can. Can I do everything up to canning and put them in the freezer until a bunch ripen then add them when I get enough to can? I do can, have for a while now. But our tomatoes are ripening here and there, not a lot at one time.
Thank
Tammy
Lydia Beiler
Yes, it’s a bit frustrating when the tomatoes ripen here and there, isn’t it? I’ve never tried freezing the tomatoes for this recipe before. My biggest concern would be that freezing them would make them softer and they wouldn’t hold their shape when you canned them. Perhaps you could try a few jars and see what you think? They would definitely still be edible, but might be more of a chunky tomato sauce once canned rather than diced tomatoes.
Renee
Can you can red & yellow tomatoes together?
Lydia Beiler
Yes, that should be fine since you are adding lemon juice to make sure there is sufficient acidity.
Mary
If your tomatoes are not all ripe at the same time can you can them and wait a few days to water bath can?
Or is that enough time for bacteria to start?
Lydia Beiler
To be honest, I’m not entirely sure, Mary. I’d probably just try to refrigerate the whole tomato instead. But I don’t know if it’s a problem to have them cut up ahead of time or not.
Amber C.
Is this water canning or is there pressure involved? If pressure, what weight do you recommend?
Lydia Beiler
Hey, Amber! It’s water bath canning, not pressure canning.
Remi G
How long does the tomatoes/jars last for once completed ? ( what is their shelf life)
Lydia Beiler
The quality should be good for at least a year, although I have had them longer than that before and they have been okay too. Over time, they do get a bit less firm but they are still very edible!
Debbie
I have made these before and they are delicious and easy to make,
I was wondering if you have ever added onions or peppers
Lydia Beiler
So glad you’ve enjoyed this home-canned diced tomato recipe, Debbie! Unfortunately, adding onions and peppers can change the acidity level and therefore it isn’t recommended to add them.
Tara
Hi Lydia, your post was so helpful to me as a new canner! THANK YOU! I just finished my very first batch of canned diced tomatoes. I knew I would be on a learning curve with this first batch…and I do have one question. My tomatoes really shrunk up. I have about 1.5 inches of water at the bottom of each pint jar. I thought I packed the tomatoes in…but should I be pressing them in more? How do you do it? I removed the seeds from the tomatoes before canning them…but I’m not sure I would do that next time. Maybe that would have helped to “bulk them up” if I had left the seeds alone. Any tips to help me with this next time?
Lydia Beiler
Go you for jumping in and getting started canning, Tara! I would guess that leaving the seeds in would help quite a bit, but to be fair, I sometimes have quite a bit of liquid at the bottom of the jars too. I think I sometimes maybe don’t press the tomatoes down as much as I should and I also think that the variety of tomato that I use makes a difference, as some tomatoes are not as firm of a variety and juicier, if that makes sense.