
The absolute easiest way to can tomatoes! This step-by-step photo tutorial will show you how to can tomatoes in no time. No peeling, no coring- just cut out the stem and dice them up. It’s super easy, plus if you grow your own tomatoes, it’s a big money saver too!

There are affiliate links in this post. As an Amazon Associate, I earn from qualifying purchases. Please read my full disclosure policy.
I started canning diced tomatoes several years ago after having an “aha moment” one evening while preparing dinner. As I was opening a can of diced tomatoes that I needed for the recipe I was making, I suddenly wondered why in the world I never tried canning them myself. I mean how hard could it be?
I grew up helping my mom can tomato juice and tomato chunks. And every year since we’ve been married, I’ve canned tomato juice as well as things like salsa and marinara sauce, so I was quite familiar with the process of canning tomatoes.
I decided to give it a try and it worked like a charm! It was not only super simple, it has also saved me from needing to buy diced tomatoes from the store.
How do you can tomatoes? Let me help you learn the process!
Supplies for Canning Tomatoes
- Tomatoes, salt and bottled lemon juice
- Dishpan or containers to put the tomatoes in
- Knife (This one is my favorite for slicing tomatoes!)
- Cutting board (The groove on this one is awesome because it catches the juice, creating less mess.)
- Vidalia Chop Wizard (Not a necessity, but you can dice the tomatoes in about half the time if you use it.)
– This gadget is also awesome for dicing tomatoes, onions, and peppers for salsa and potatoes and carrots for soups. - Wide Funnel
- Damp cloth to wipe jar rims
- Water Bath Canner (or this Canning Rack may work depending on what size pot you already own)
- Canning jars with lids and rings
- Jar lifter
- Old towels or rags to set the hot jars on
How to Can Diced Tomatoes- a step-by-step tutorial

1. Wash tomatoes thoroughly.
Cut out the stem and any defects or blemishes.
Some people also peel the tomatoes, but I never do and we honestly have not noticed the peelings at all and I’m even funny about textures like that in food.
I figure, why bother with the extra step? Plus it’s a bit healthier too!

2. Cut up the tomatoes.
Slice tomatoes into about ½-inch thick slices, then dice them into whatever size you want. I love using the large dicing side of my Vidalia Chop Wizard for this!
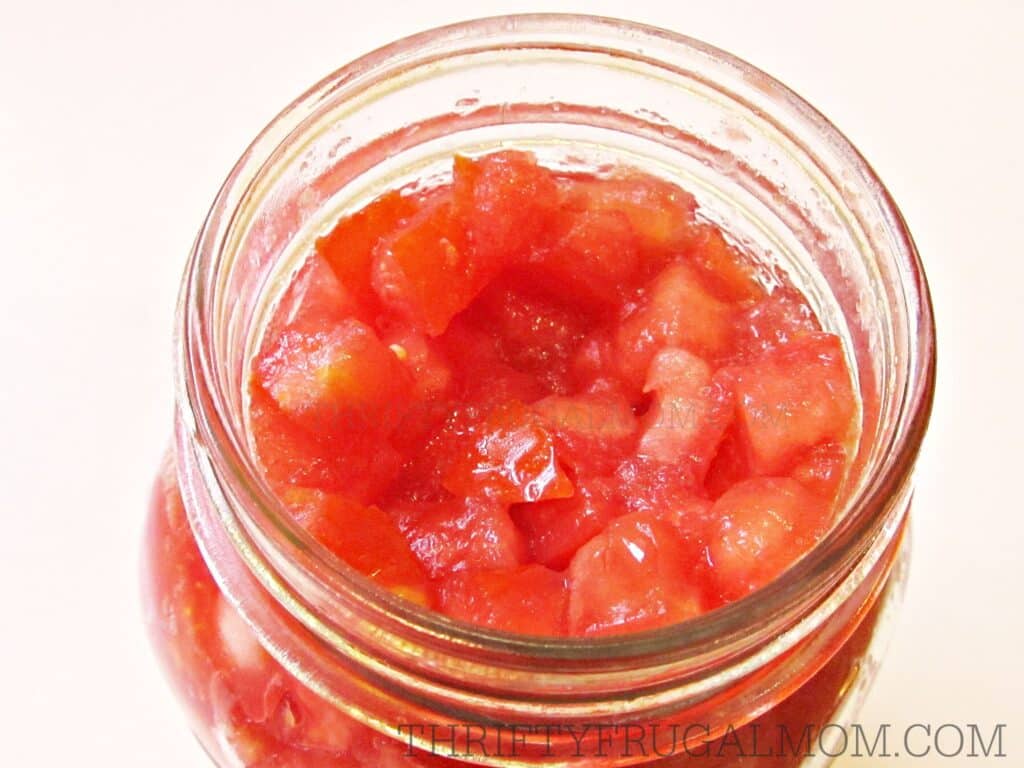
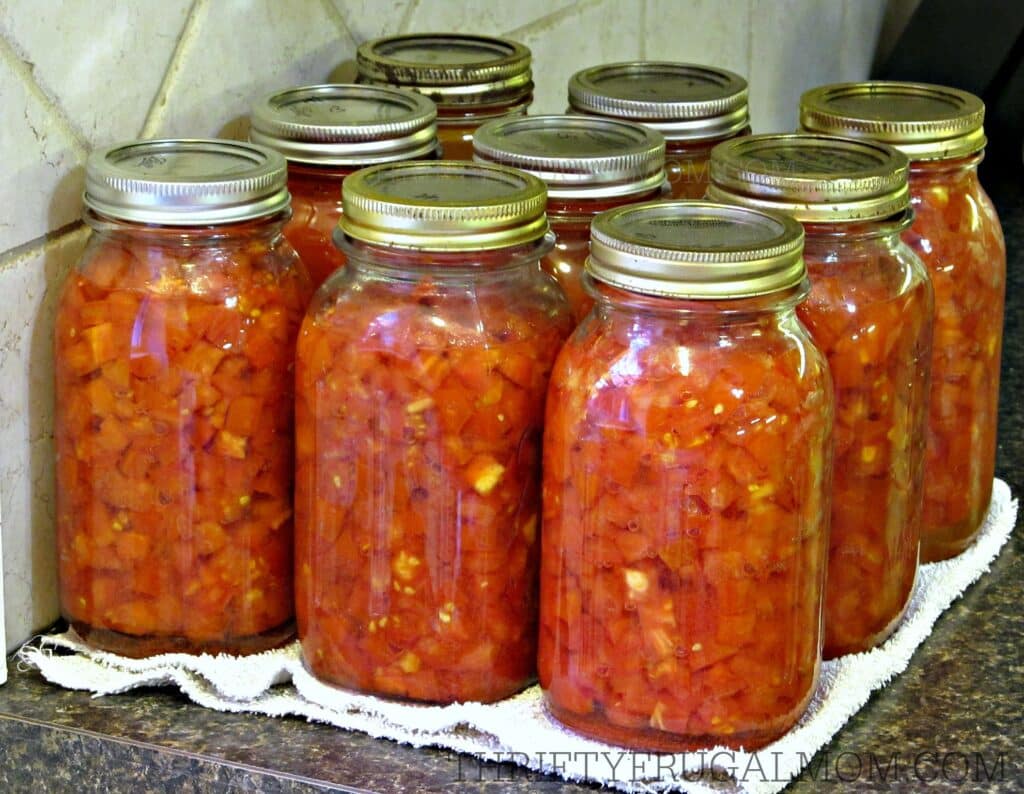
3. Place diced tomatoes into a clean canning jar.
A funnel makes this super easy. Gently shake the jar to settle the tomatoes so that you can fill it completely.
The tomatoes should be packed tightly to produce enough juice. It won’t hurt if you press down on them a bit to get the jar packed full- in fact, this is probably going to be necessary.
The jar should be full to the base of the neck.
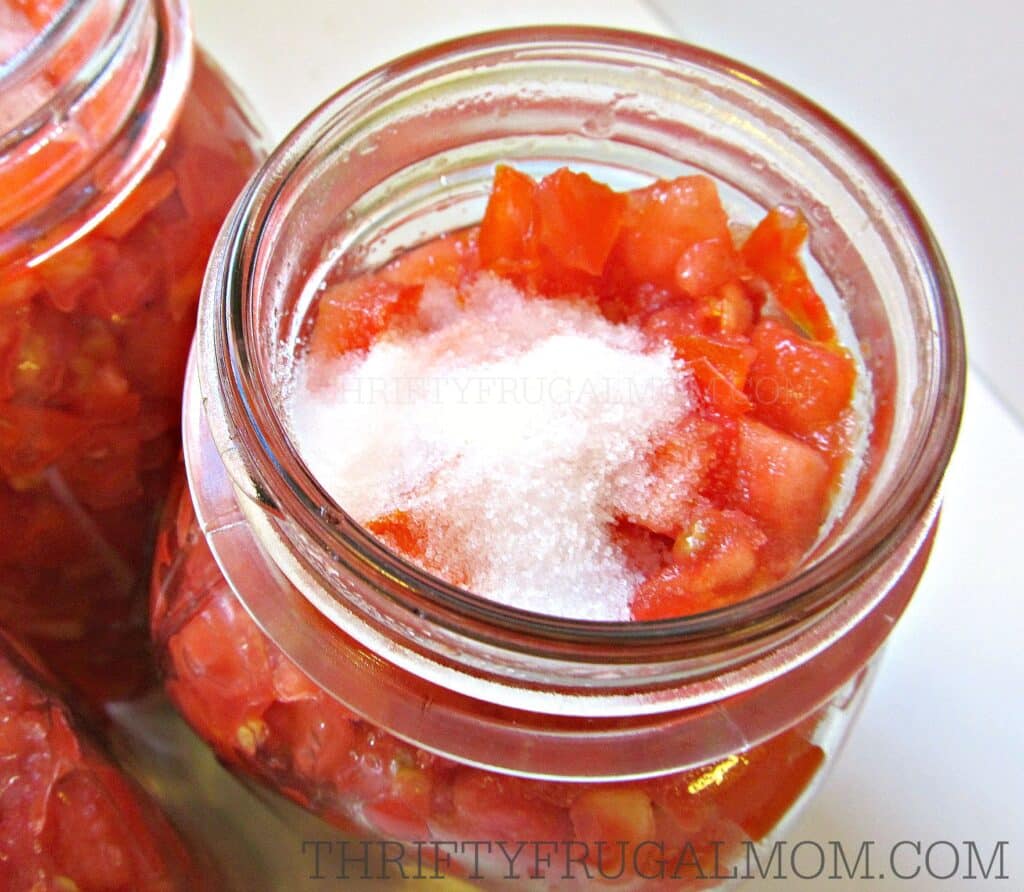
4. Add salt and bottled lemon juice.
For the salt, use ½ tsp. per pint and 1 tsp. per quart. You do not need to add salt when canning tomatoes, but I recommend it because I think it helps enhance the flavor.
For the lemon juice, use 1 Tbsp. per pint and 2 Tbsp. per quart.
Once the salt and lemon juice are added to the tomatoes, wipe the rim of each canning jar with a damp cloth to remove any tomato residue that may be there. (If there is even a slight bit of tomato juice on it, it may not allow it to seal properly.)
I updated the original post to include the instructions to add lemon juice after several readers commented and said that to be safe, you really should add it.
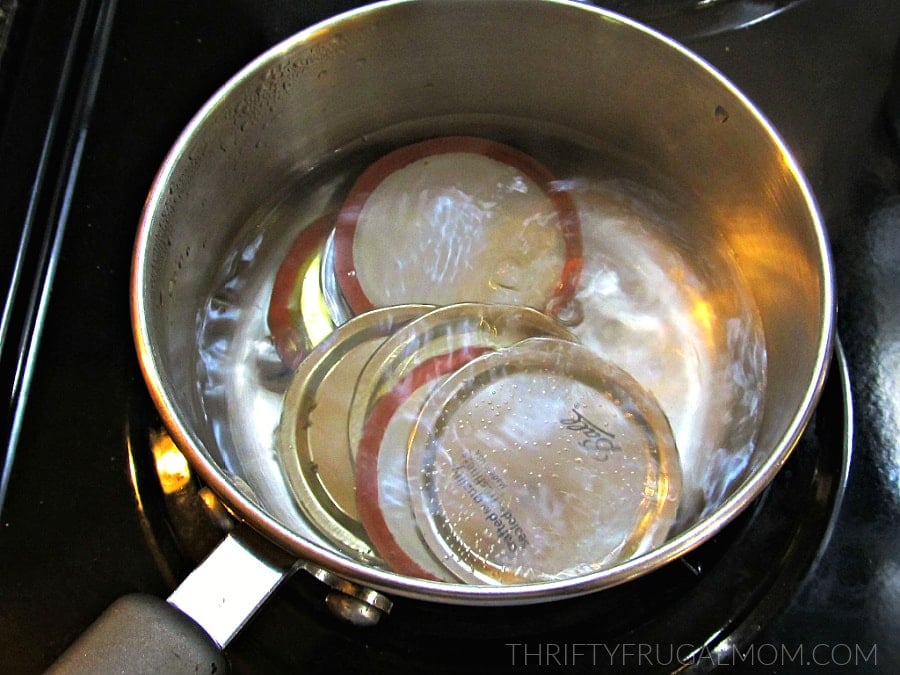
5. Prepare the canning lids. (This may be optional!)
Update: Some canning lid manufacturers now say that it’s not necessary to preheat the lids. So before doing this, check the instructions that came with the lids you are using.
Once you have 7 jars filled, place 7 metal canning lids in a small pan. Cover with water; bring to a boil.
When the water boils, use a fork or lid lifter to lift the jar lids out of the water and place them on the jars. Be careful not to burn yourself!
Secure each lid with a jar band/ring. (Heating the lids softens the rubber, allowing for a better seal.)
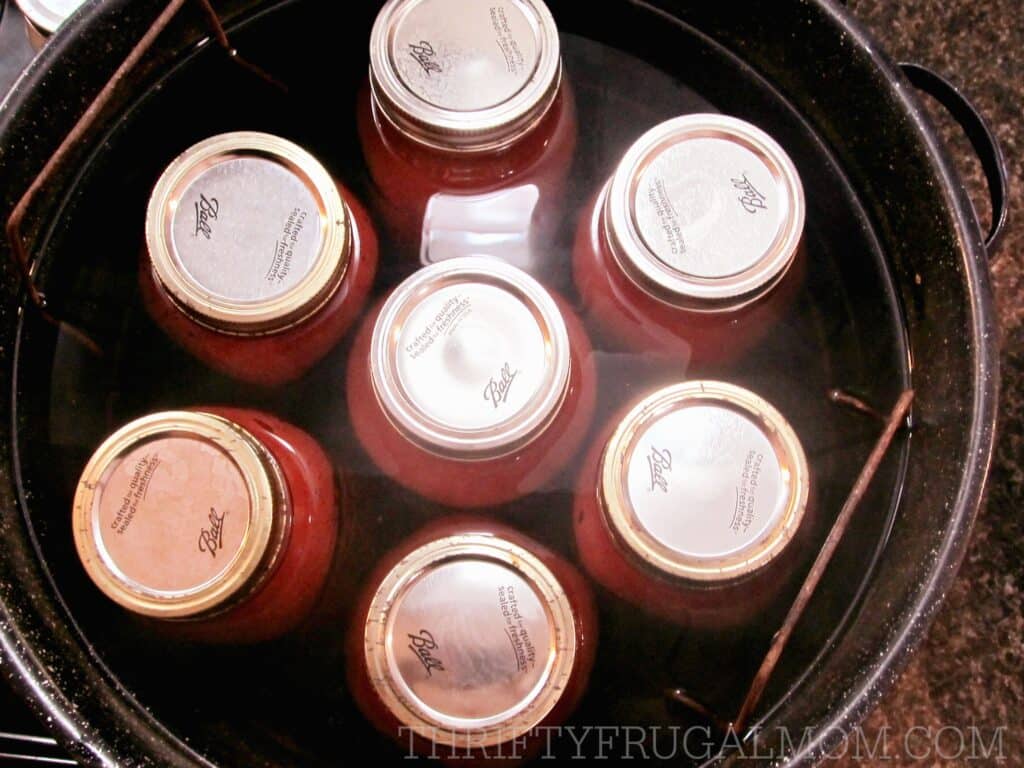
6. Place the filled jars of tomatoes in the canner.
Once jars are full and have the ring and lids on them, place them in the canner.
Then add hot water to the canner, enough to cover the jars by 1 to 2 inches. Cover the canner with a lid. Turn the burner to medium-high heat.
Once the water starts to boil, reduce the heat slightly and process for 45 minutes, making sure the water is boiling gently and steadily the whole time. (You may need to adjust the heat to keep the boil going nicely, but as long as it is boiling, you are fine.)
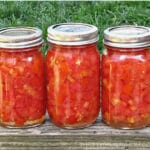
7. Remove the jars of canned tomatoes.
After processing the canned tomatoes for 45 minutes, turn the burner off.
Remove jars using a jar lifter- you may want to have a dishrag in your other hand to catch any hot water that drips from the jars as you remove them- and place on an old towel, blanket or another padded surface. (This is to protect your counter from the super hot jars.)
Allow at least a little bit of air space around each jar, making sure not to have jars close enough to touch. Do not move until the jars are completely cool.
Jars should seal as they cool and you will typically hear a snap or pinging sound as the vacuum seal is formed. The lids will be slightly concave when sealed.
To test the seal, once the jar has totally cooled you can lightly tap the center of the cooled jar lid. If it is firm and does not move, it should be sealed. If it pushes in, it didn’t seal properly. You can still use unsealed jars, just put them in the refrigerator and use them as soon as possible.
After the jars are completely cool, you can remove the rings. Jars should be wiped clean before storing them.
Enjoy!
HELPFUL TIP: 1 pint of canned diced tomatoes is equivalent to 1 (15 oz.) can of diced tomatoes.
Other canning recipes you might also enjoy:
How to Can Diced Tomatoes
Equipment
- Dishpan or containers to put the tomatoes in
- Knife
- Cutting board
- Vidalia Chop Wizard (Not a necessity, but you can dice the tomatoes in about half the time if you use it.)
- Wide Funnel
- Damp rag to wipe tops of jars
- Canner
- Canning jars with lids and rings
- Jar lifter
- Old towel, blanket or other padded surface to put hot jars on
Ingredients
- fresh tomatoes (approximately 2 3/4 lb. for 1 quart jar)
- salt (1 tsp. per quart or 1/2 tsp. per pint)
- bottled lemon juice (2 tbsp. per quart or 1 tbps. per pint)
Instructions
- Wash tomatoes thoroughly. Cut out the stem and any defects or blemishes. Some people also peel the tomatoes, but I never do and we honestly have not noticed the peelings at all- and I’m even funny about textures like that in food. I figure why bother with the extra step, plus it’s a bit healthier too!
- Slice tomatoes into about ½ inch thick slices, then dice them into whatever size you want. I love using the large dicing side of my Vidalia Chop Wizard for this!
- Place diced tomatoes into a clean canning jar- a funnel makes this super easy. Gently shake jar to settle tomatoes so that you can fill it completely. The tomatoes should be packed tightly in order to produce enough juice. It won't hurt if you press down on them a bit to get the jar packed full- in fact, this is probably going to be necessary. The jar should be full to the base of the neck.
- Add salt (½ tsp. per pint and 1 tsp. per quart) and bottled lemon juice (1 Tbsp. per pint and 2 Tbsp. per quart). Wipe rim of each jar with a damp cloth to remove any tomato residue that may be there. (If there is even a slight bit of tomato juice on it, it may not allow it to seal properly.)
- Update: Some canning lid manufacturers now say that it's not necessary to preheat the lids. So before doing this, check the instructions that came with the lids you are using. Once you have 7 jars filled, place 7 metal canning lids in a small pan. Cover with water; bring to a boil. Once the water boils, use a fork or lid lifter to lift the jar lids out of the water- be careful not to burn yourself!- and place them on the jars. Secure each lid with a jar band/ring. (Heating the lids softens the rubber, allowing for a better seal.)
- Place 7 jars in canner. Fill with enough hot water to cover the jars by 1 to 2 inches. Cover canner with a lid. Turn the burner on medium high heat. Once water starts to boil, reduce heat slightly and process for 45 minutes, making sure the water is boiling gently and steadily the whole time. (You may need to adjust heat to keep the boil going nicely, but really, as long as it is boiling, you are fine.)
- After processing for 45 minutes, turn the burner off. Remove jars using jar lifter- you may want to have a dishrag in your other hand to catch any hot water that drips from the jars as you remove them- and place on an old towel, blanket or another padded surface. (This is to protect your counter from the super hot jars.) Allow at least a little bit of air space around each jar, making sure not to have jars close enough to touch. Do not move until jars are completely cool.
- Jars should seal as they cool and you will typically hear a snap or pinging sound as the vacuum seal is formed. Lids will be slightly concave when sealed. To test the seal, once jar has totally cooled, lightly tap the center of the cooled jar lid. If it is firm and does not move, it should be sealed. If it pushes in, it didn’t seal properly. You can still use unsealed jars, just put them in the refrigerator and use them as soon as possible.
- After jars are completely cool, you can remove the rings. Jars should be wiped clean before storing them.

Cara
Great tip about not peeling – I’m definitely going to try that next time. I just had to respond to the comment asking about adding peppers and onions. If you add anything extra to tomatoes they HAVE to be pressure canned for safety. Tomatoes are the only vegetable (actually they’re a fruit, but anyway…) acidic enough for water bath canning – and adding other ingredients changes the pH making it more alkaline and therefore more hospitable to the really nasty bacteria. So pressure can or don’t add extras. It’s just not worth it! Happy Canning
ThriftyFrugalMom
Thanks for that info, Cara! I was thinking that it wouldn’t be any different than salsa, but duh, with salsa you add other ingredients too. Appreciate the input.
Mary
My jars were floating in my canner am I supposed to add a little water to the jars?
ThriftyFrugalMom
No, they should create their own juice, so you don’t need to add water. The jars shouldn’t have been floating. Did they seal okay? Do you have a rack in your canner? And did you only put enough water in the canner to just come to the neck of the jars or just barely to the top? Those are the only things that I can think.
ella ruth
If your jars were floating, did you have a full canner? If not put a empty jar in so that it takes up space. Fill it with water.
Michelle
This was a great post considering I just canned 12 jars over the weekend. I know now that I need a new canner because mine only fits jars safely…it took awhile to get them all canned properly. Thanks I will try for a new canner next year!
ThriftyFrugalMom
Thankfully, canners are pretty cheap. Actually, sometimes you can find them used too for almost nothing. Maybe you’ll get lucky! 😉
Chrism
There are a few more steps you really should be taking here. You NEED to add 2Tablespoons of lemon juice to each quart jar or 1Tablespoon to each pint. (you won’t taste it). But this will prevent botulism from developing. Tomatoes are less acidic than fruits so if you do not add the lemon juice, you should be pressure canning them. (You can also use citric acid by Ball)
Also, use a rubber spatula to go up and down around the jar to remove air-bubbles. This will prevent too much air in your jars and lid failures.
You do not need to boil the lids. Boiling can actually cause the sealant to come off and cause seal failures. Wash them and put them in WARM water to soften the seals. Ball is actually saying now that you don’t even need to heat them at all now. (they will sterilize in the water bath just like the contents of the jar)
Your jars should be hot before canning. This will prevent jar breakage in the canner. I put my canning jars in the dishwasher and run a cycle and take them out to use during the dry cycle.
Please take canning safety seriously. If you have any seal failures, put the food in the fridge and use it up. If you have any seal failures after storage, throw it out. Anything off, throw it out.
For proper canning step-by-step, check out a copy of The Ball Blue Book, or any state cooperative extension service website.
ThriftyFrugalMom
Thanks for your tips! I updated the instructions to include the tip about the lemon juice. 🙂
Leandra MacDonald
Just another safety note: jars should be covered by an inch or more of water while in the water bath canner.
AJ
My grandmothers, mother, and I canned tomatoes exactly as ThriftyFrugalMom has described, without adding lemon juice or pressure canning. Never ever had a problem with botulism. Just make sure your equipment, jars, lids, etc are sterile and that your tomatoes are washed properly. We all removed the tomato skins by dipping them in boiling water until the skins cracked, plunging them in cold water, then the peels come right off. That also helps to make sure they are very clean.
ThriftyFrugalMom
Yes, clean, sterile jars etc. are obviously a must!
Marian Murphy
I have been canning tomatoes for 50 years and have never used lemon juice nor have I ever hot water bathed them. Plenty of acid in them and it is a totally unnecessary step.
ThriftyFrugalMom
That’s a lot of canning you’ve done, Marian! My hats are off to you! My mom and grandma never used lemon juice either and pretty sure my grandma didn’t water bath her tomatoes. Regarding the lemon juice, I personally don’t think it’s a big risk to not add it either. But after some readers mentioned it, I researched things a bit. Apparently some of the newer varieties of tomatoes have been bred to be less acidic, which is why it is now recommended to add the lemon juice. My guess is that heirloom varieties would still be the same acidity as they’ve always been and wouldn’t need the lemon juice, but I don’t know that for sure! At any rate, I feel like I need to make people aware of what’s recommended and then they can make an informed decision as to whether or not they do it that way. 🙂
Stacey Thureen
Thank you for sharing about how to can diced tomatoes. Looks like fun and I loved the images that corresponded! 🙂
Michelle
hi, just wondering if u could add chopped peppers and onions to the mix and can that way? Thanks
ThriftyFrugalMom
You mean kind of like Rotel? I wouldn’t know why not. The only thing I can think of is that the peppers might get mushy. You could also google Homemade Rotel or something like that too and see what you can find!