
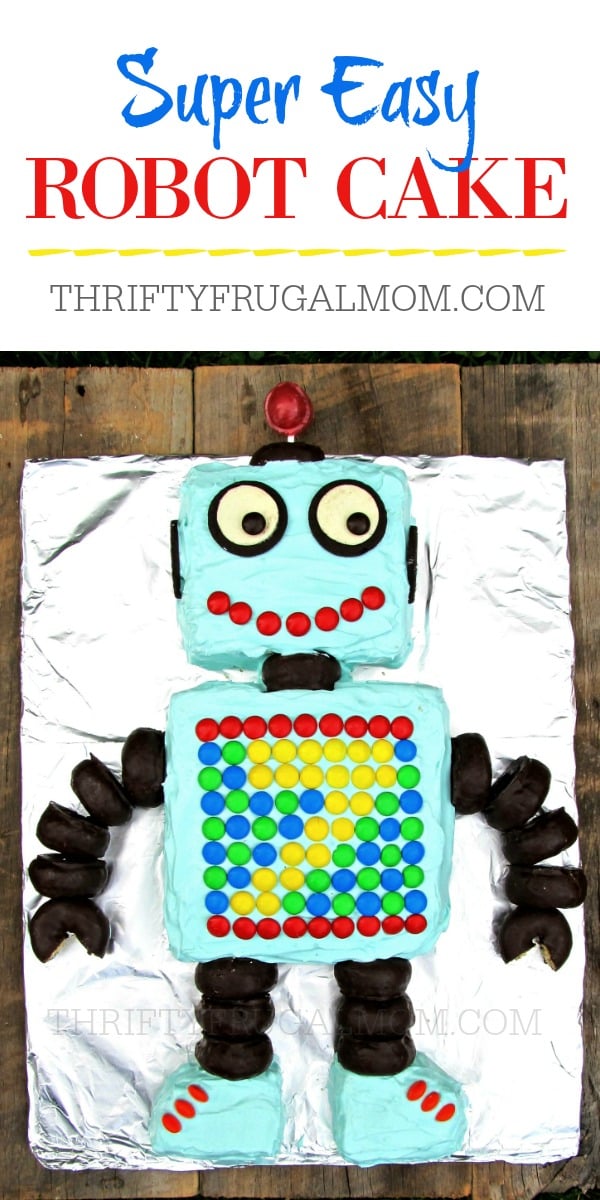
Learn how to make this fun, easy robot cake. It’s perfect for birthdays and is made from a simple 9 x 13 cake. And isn’t it the cutest robot ever?!
There are affiliate links in this post – please read my full disclosure policy.
For his 7th birthday, our son wanted a robot cake. Well, actually he’s the indecisive type and that was what he finally settled on after lots and lots of deliberating.
And after getting numerous of his great ideas vetoed by me because I’m no birthday cake making expert and can’t handle anything that’s too complicated. (Am I the only mom that does that?!)
But when he finally did decide that a robot birthday cake is what I should make, I was kind of excited, because it sounded like a fun idea…and it was!
And didn’t our Mr. Robot turn out to be quite cute? We sure thought so!
Want to make your own easy robot cake? All you need is a basic 9 x 13 cake pan plus a few other simple tools and ingredients and you’ll be set to make a cake that is sure to bring a smile to any birthday child’s face!
Let me show you how!
How to Make a Robot Cake
Supplies Needed:
- 9 x 13 Cake Pan- I really like this one
- Serrated Knife- I used my favorite bread knife
- Cake Board– optional, but handy to place the cake on
- Pancake Turner– to move cake pieces
- Mixing Bowl– I have the Pampered Chef version of this and use it all.the.time!
- Food coloring- I prefer the food coloring gels because they mix in nicely
- Small Sized Blade Ultra Spatula– makes it easy to frost the cake nicely
Recipe Ingredients:
- cake mix or homemade cake recipe of your choice
- Icing of your choice- I love this buttercream frosting recipe
- 2 Oreo cookies
- 18 chocolate-covered mini donuts
- lollipop
- M&M’s
Recipe Directions:
1. Mix up the cake and bake in a 9 x 13 cake pan, according to the recipe you use. Once the cake has cooled, invert the pan and carefully remove the cake from the pan.
Flipping it onto parchment paper or saran wrap will help reduce the mess.
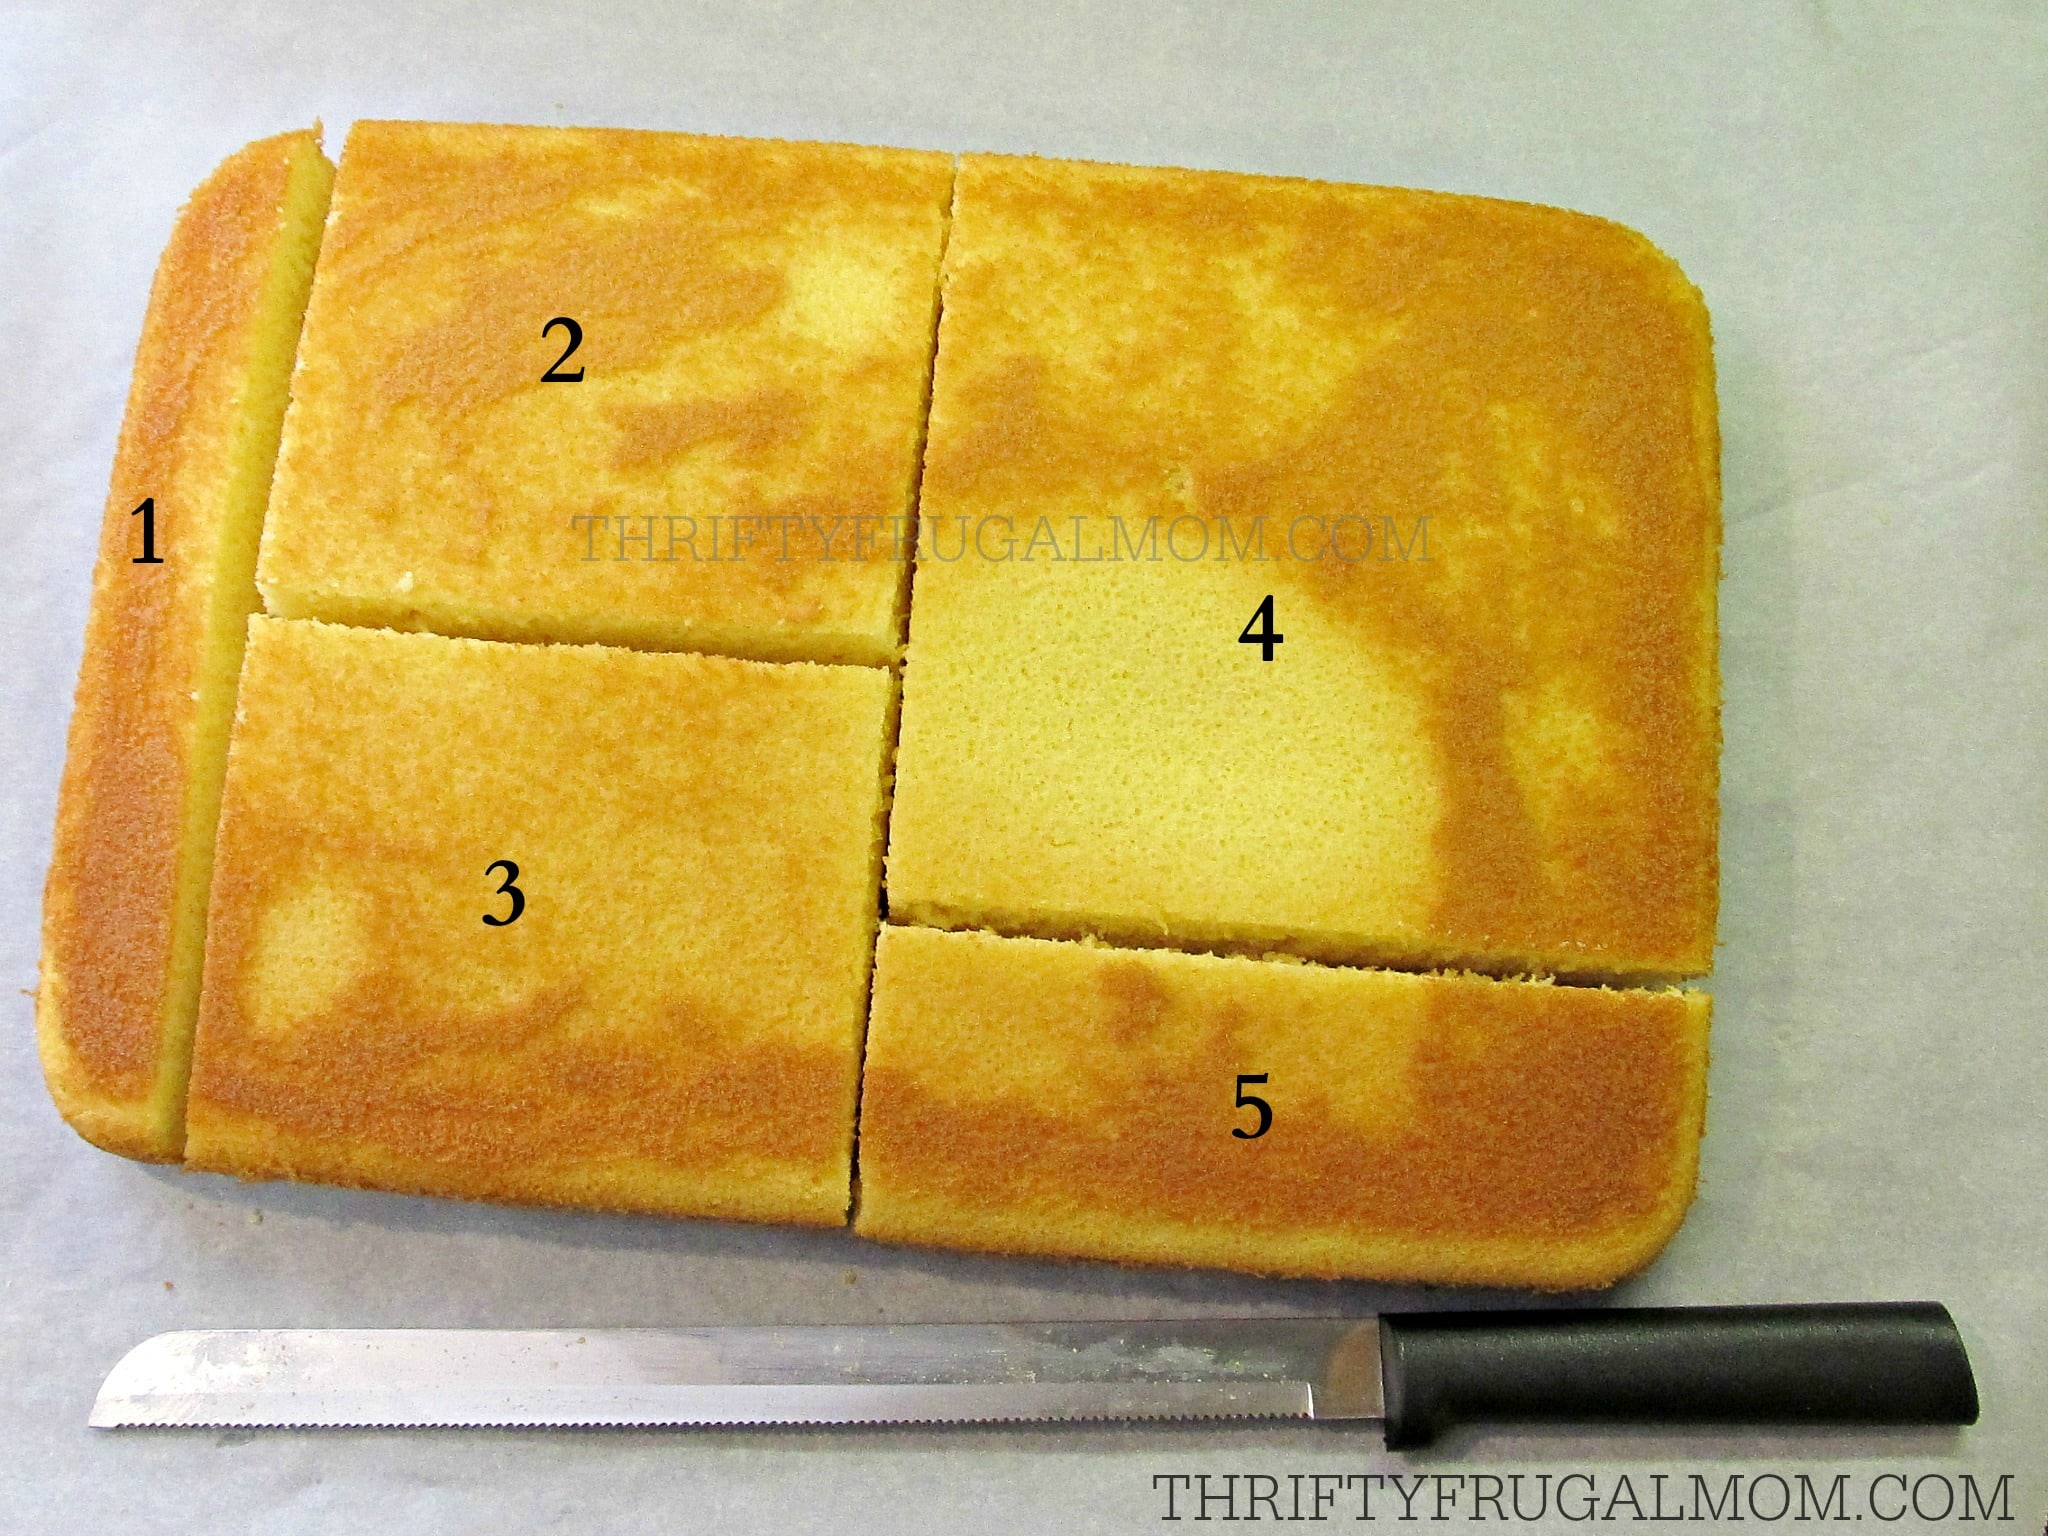
2. Using a serrated knife, cut the cake into 5 pieces as shown.
3. Arrange cake on a cake board -I covered mine with tin foil-, using piece #2 for the robot’s head and piece #4 for the body. Place a chocolate-covered doughnut between the 2 pieces to create a neck.
Tip: Using a pancake turner to move pieces around works really well!
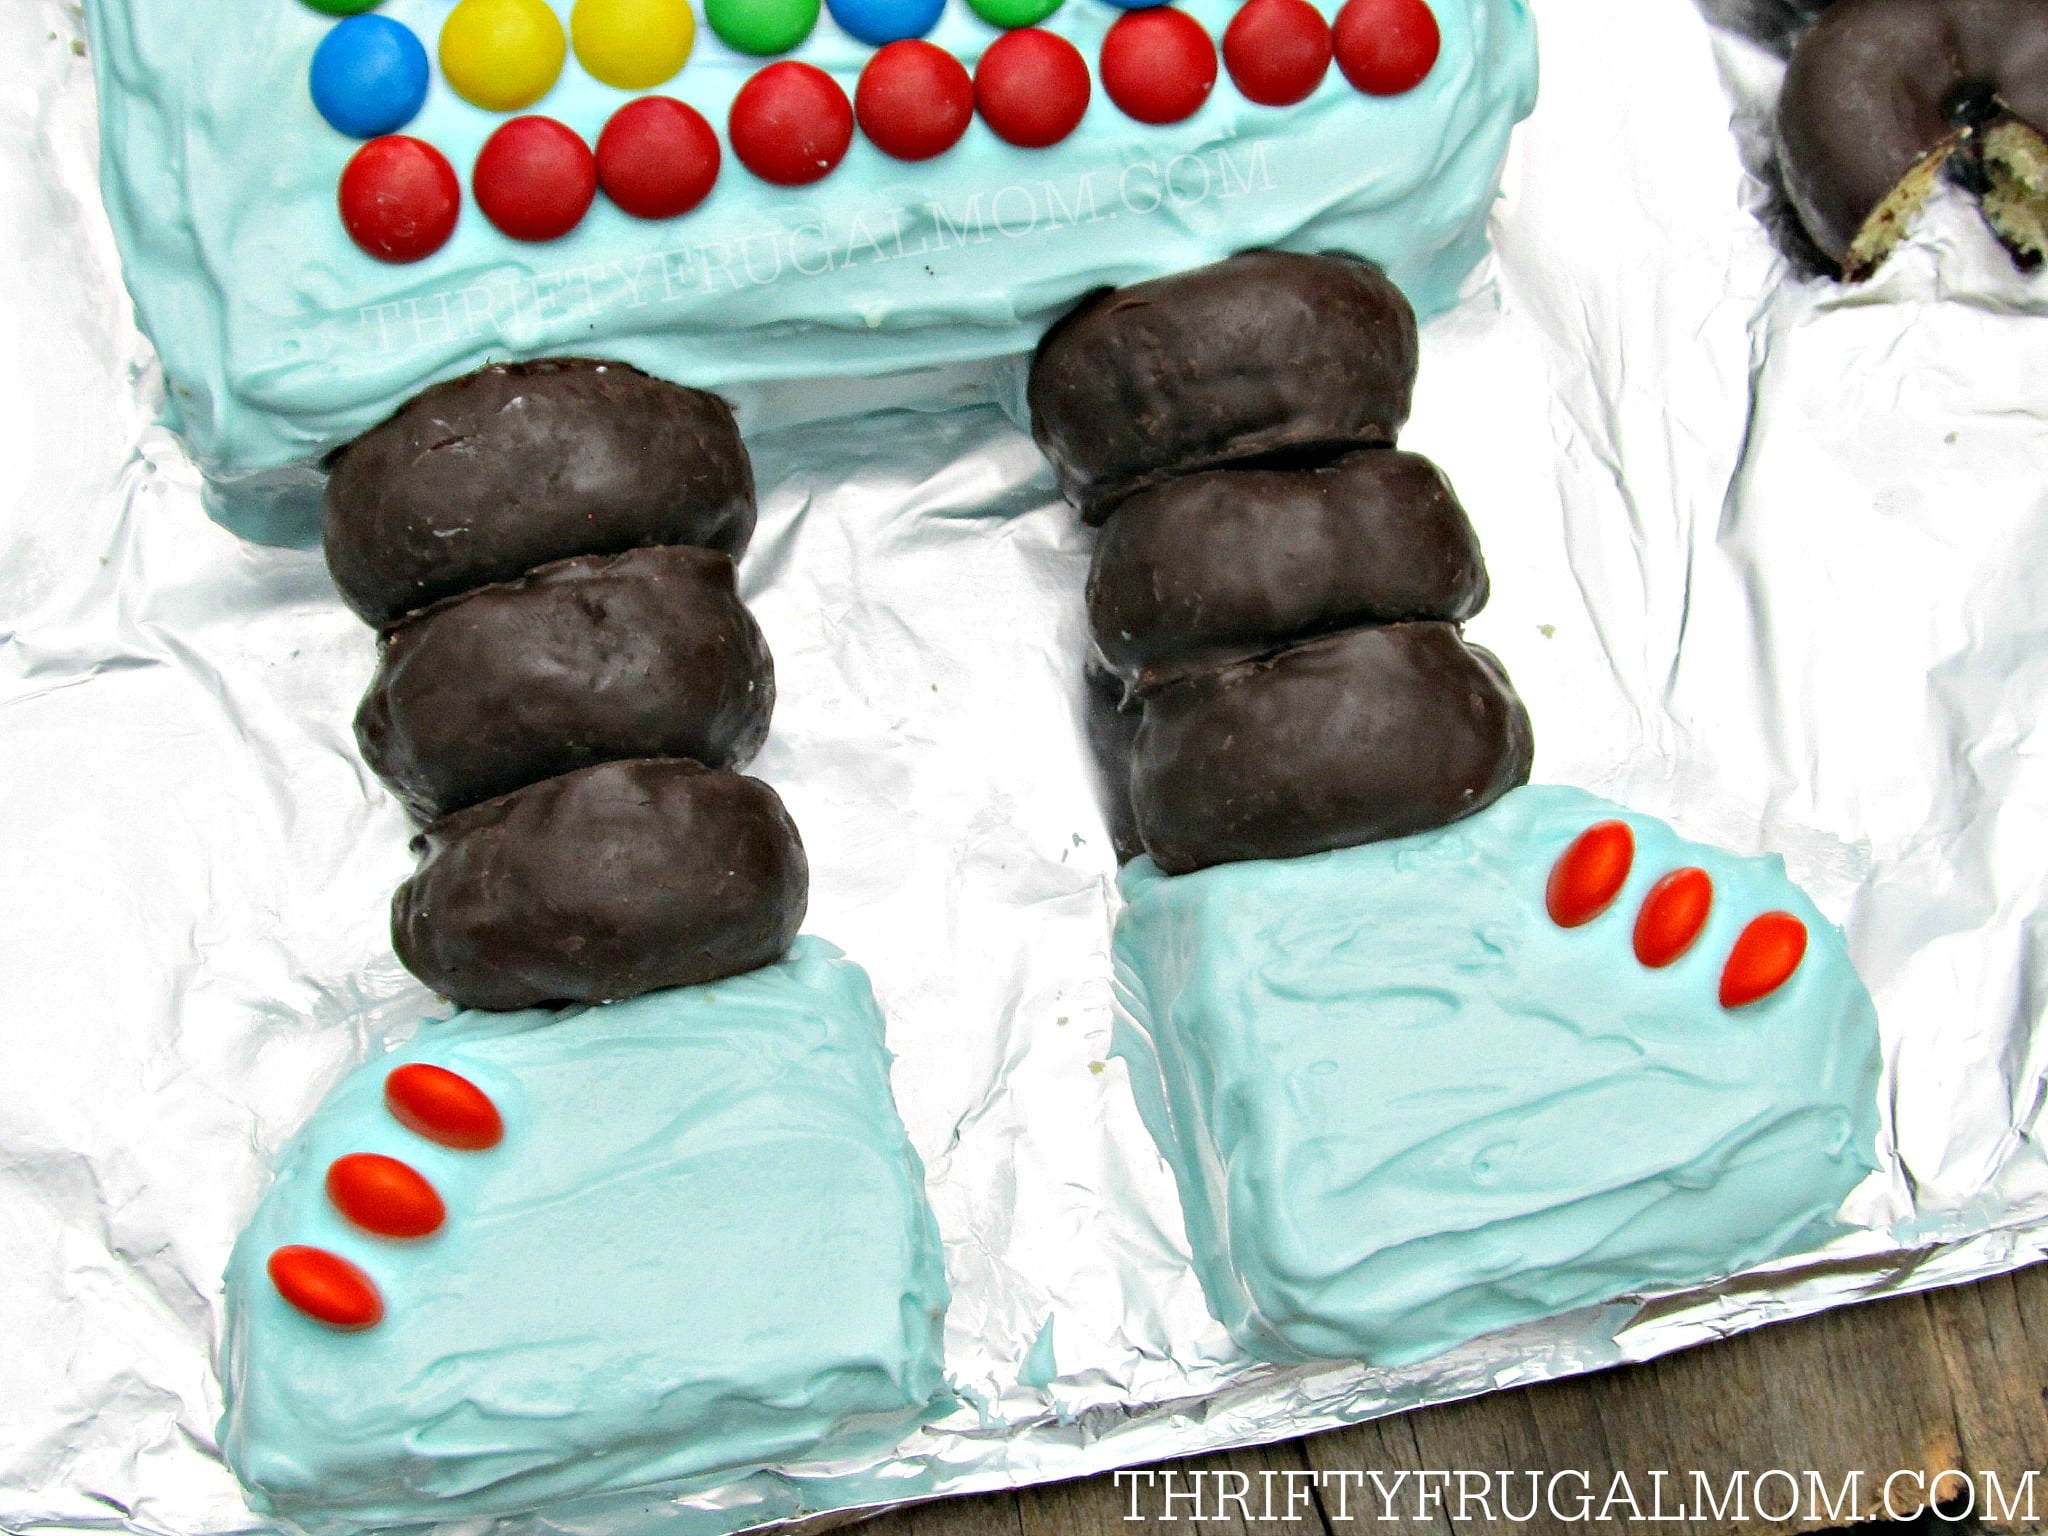
4. Cut piece #5 into feet. I trimmed off the rounded end part and then cut what was left in half. Then I simply trimmed off one corner of each half to make a shoe shape. Place 6 chocolate-covered doughnuts below the body to create legs, then position the shoe pieces at the end.
(You will not need pieces #1 and #3. I went ahead and frosted them and we enjoyed them for dessert.)
5. Using your mixing bowl, mix up your frosting, then add food coloring to get the desired shade and color.
If you use dark-colored M&M’s for decoration, you will want to keep the frosting color light.
6. Remove the doughnut “neck” and “legs”, then frost the cake. I like to do a really thin first coat of frosting to “seal” in the crumbs and then go over it all again with a thicker second coating.
Carefully push the doughnut “neck” and “legs” back into place, touching up the frosting as needed.
7. Gently push 3 M&M’s into each shoe, creating “buttons”.
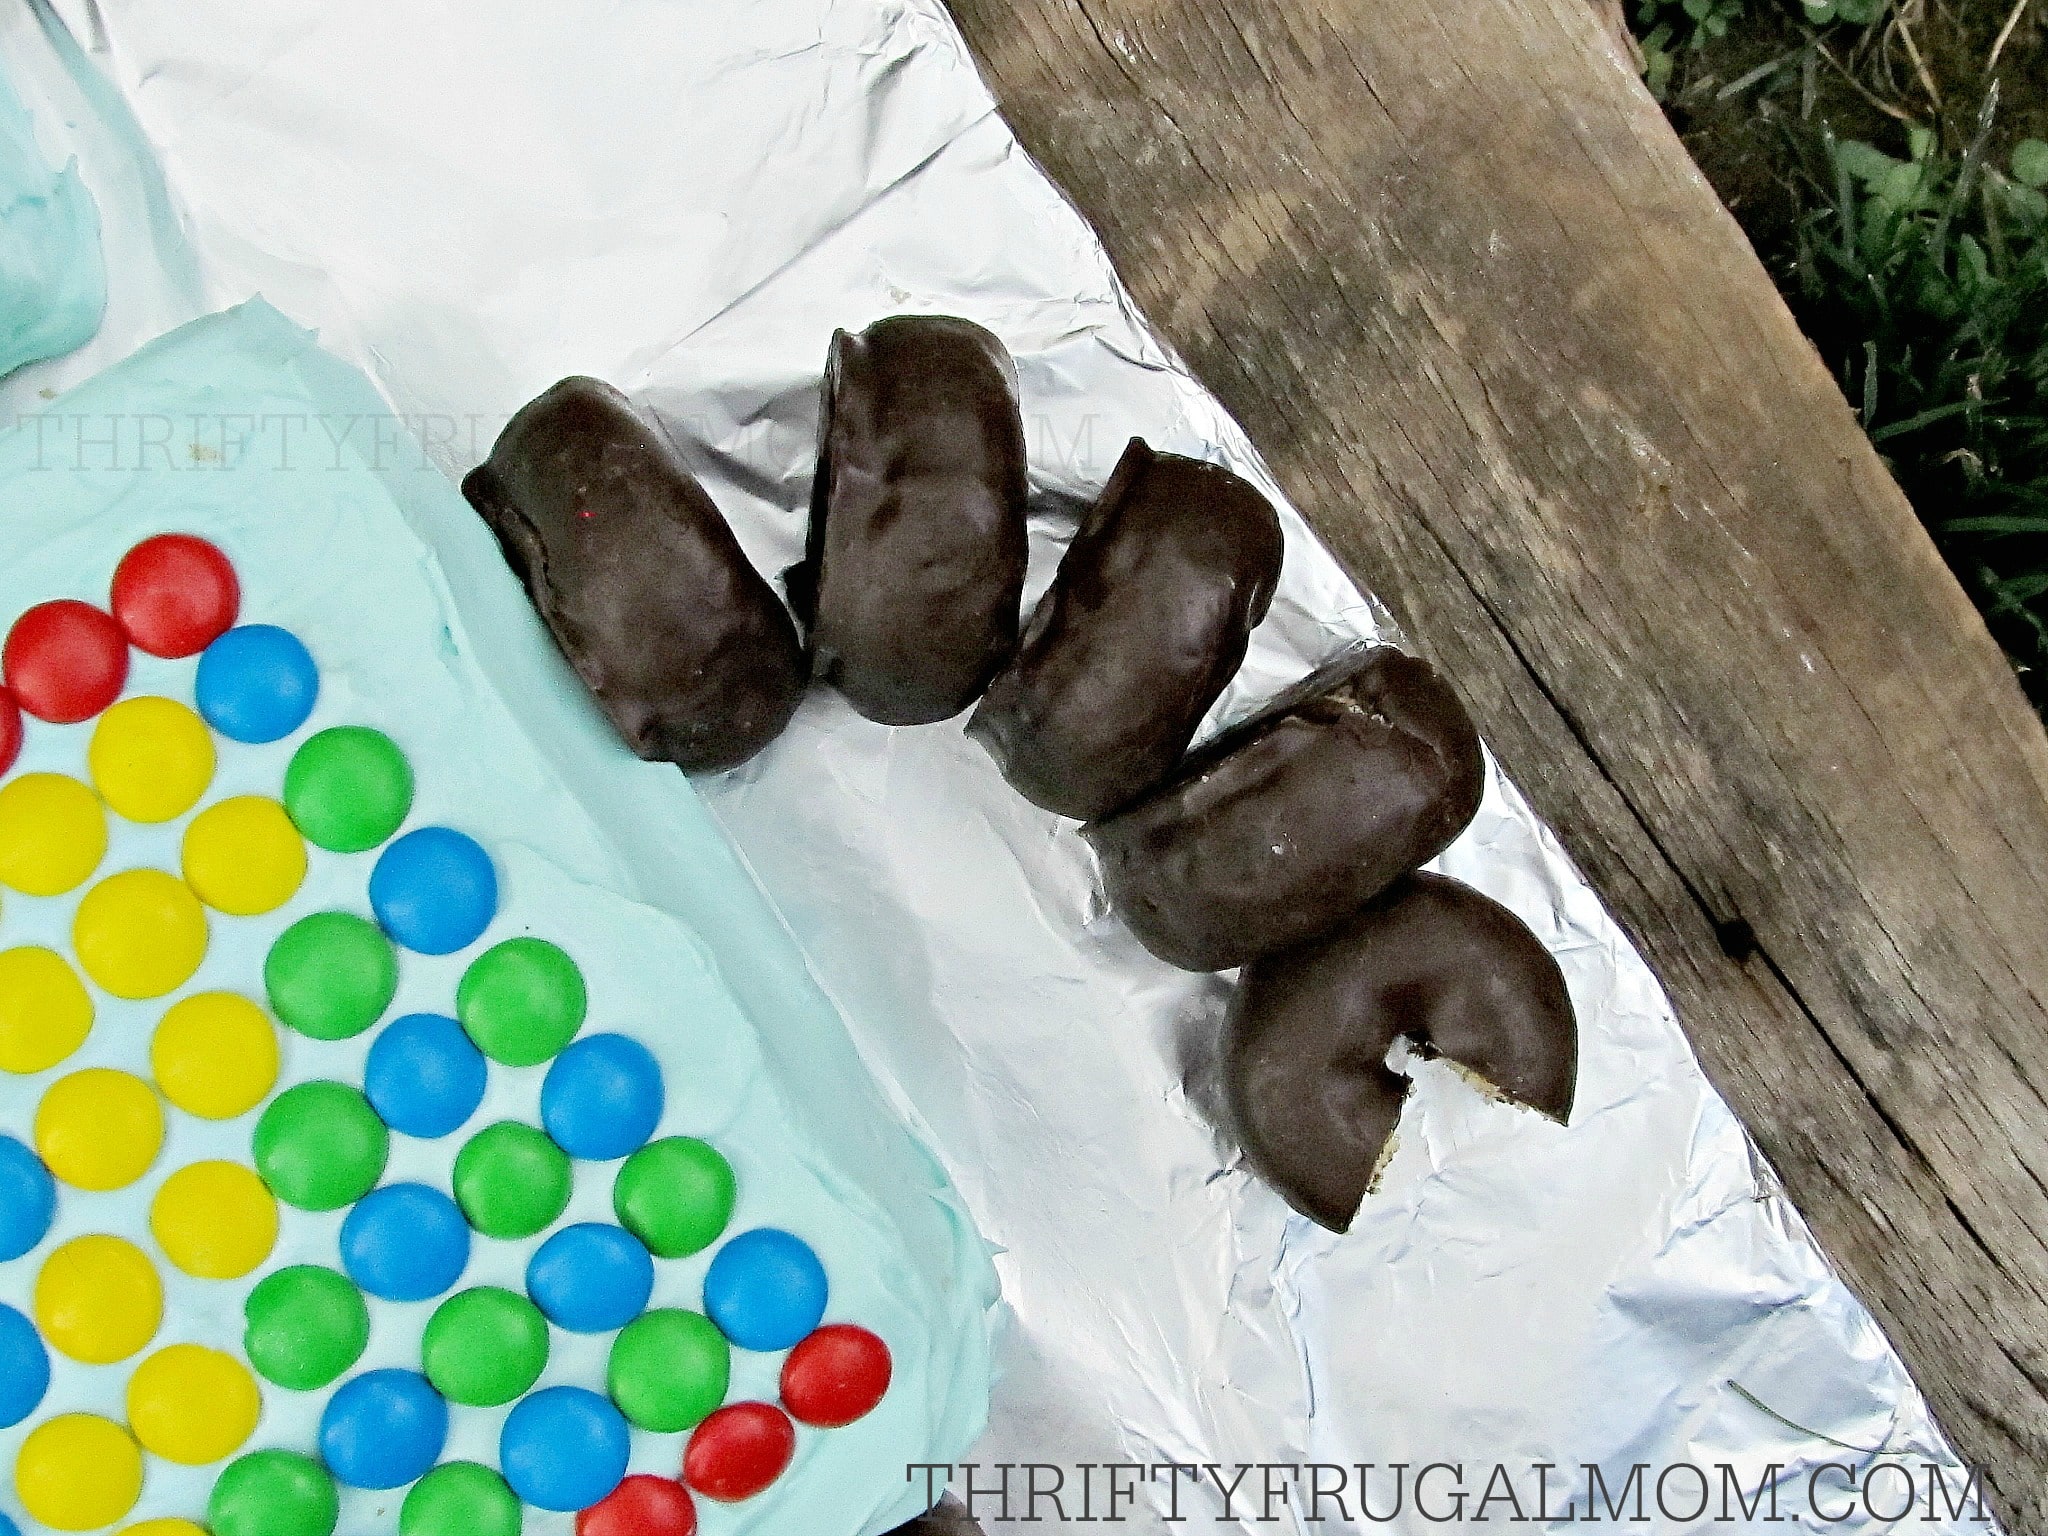
8. Take 2 doughnuts and cut out a small notch to create a hand as shown in the picture above. Then arrange 10 doughnuts, 5 on either side, to create arms, placing the “hand” doughnuts at the end.
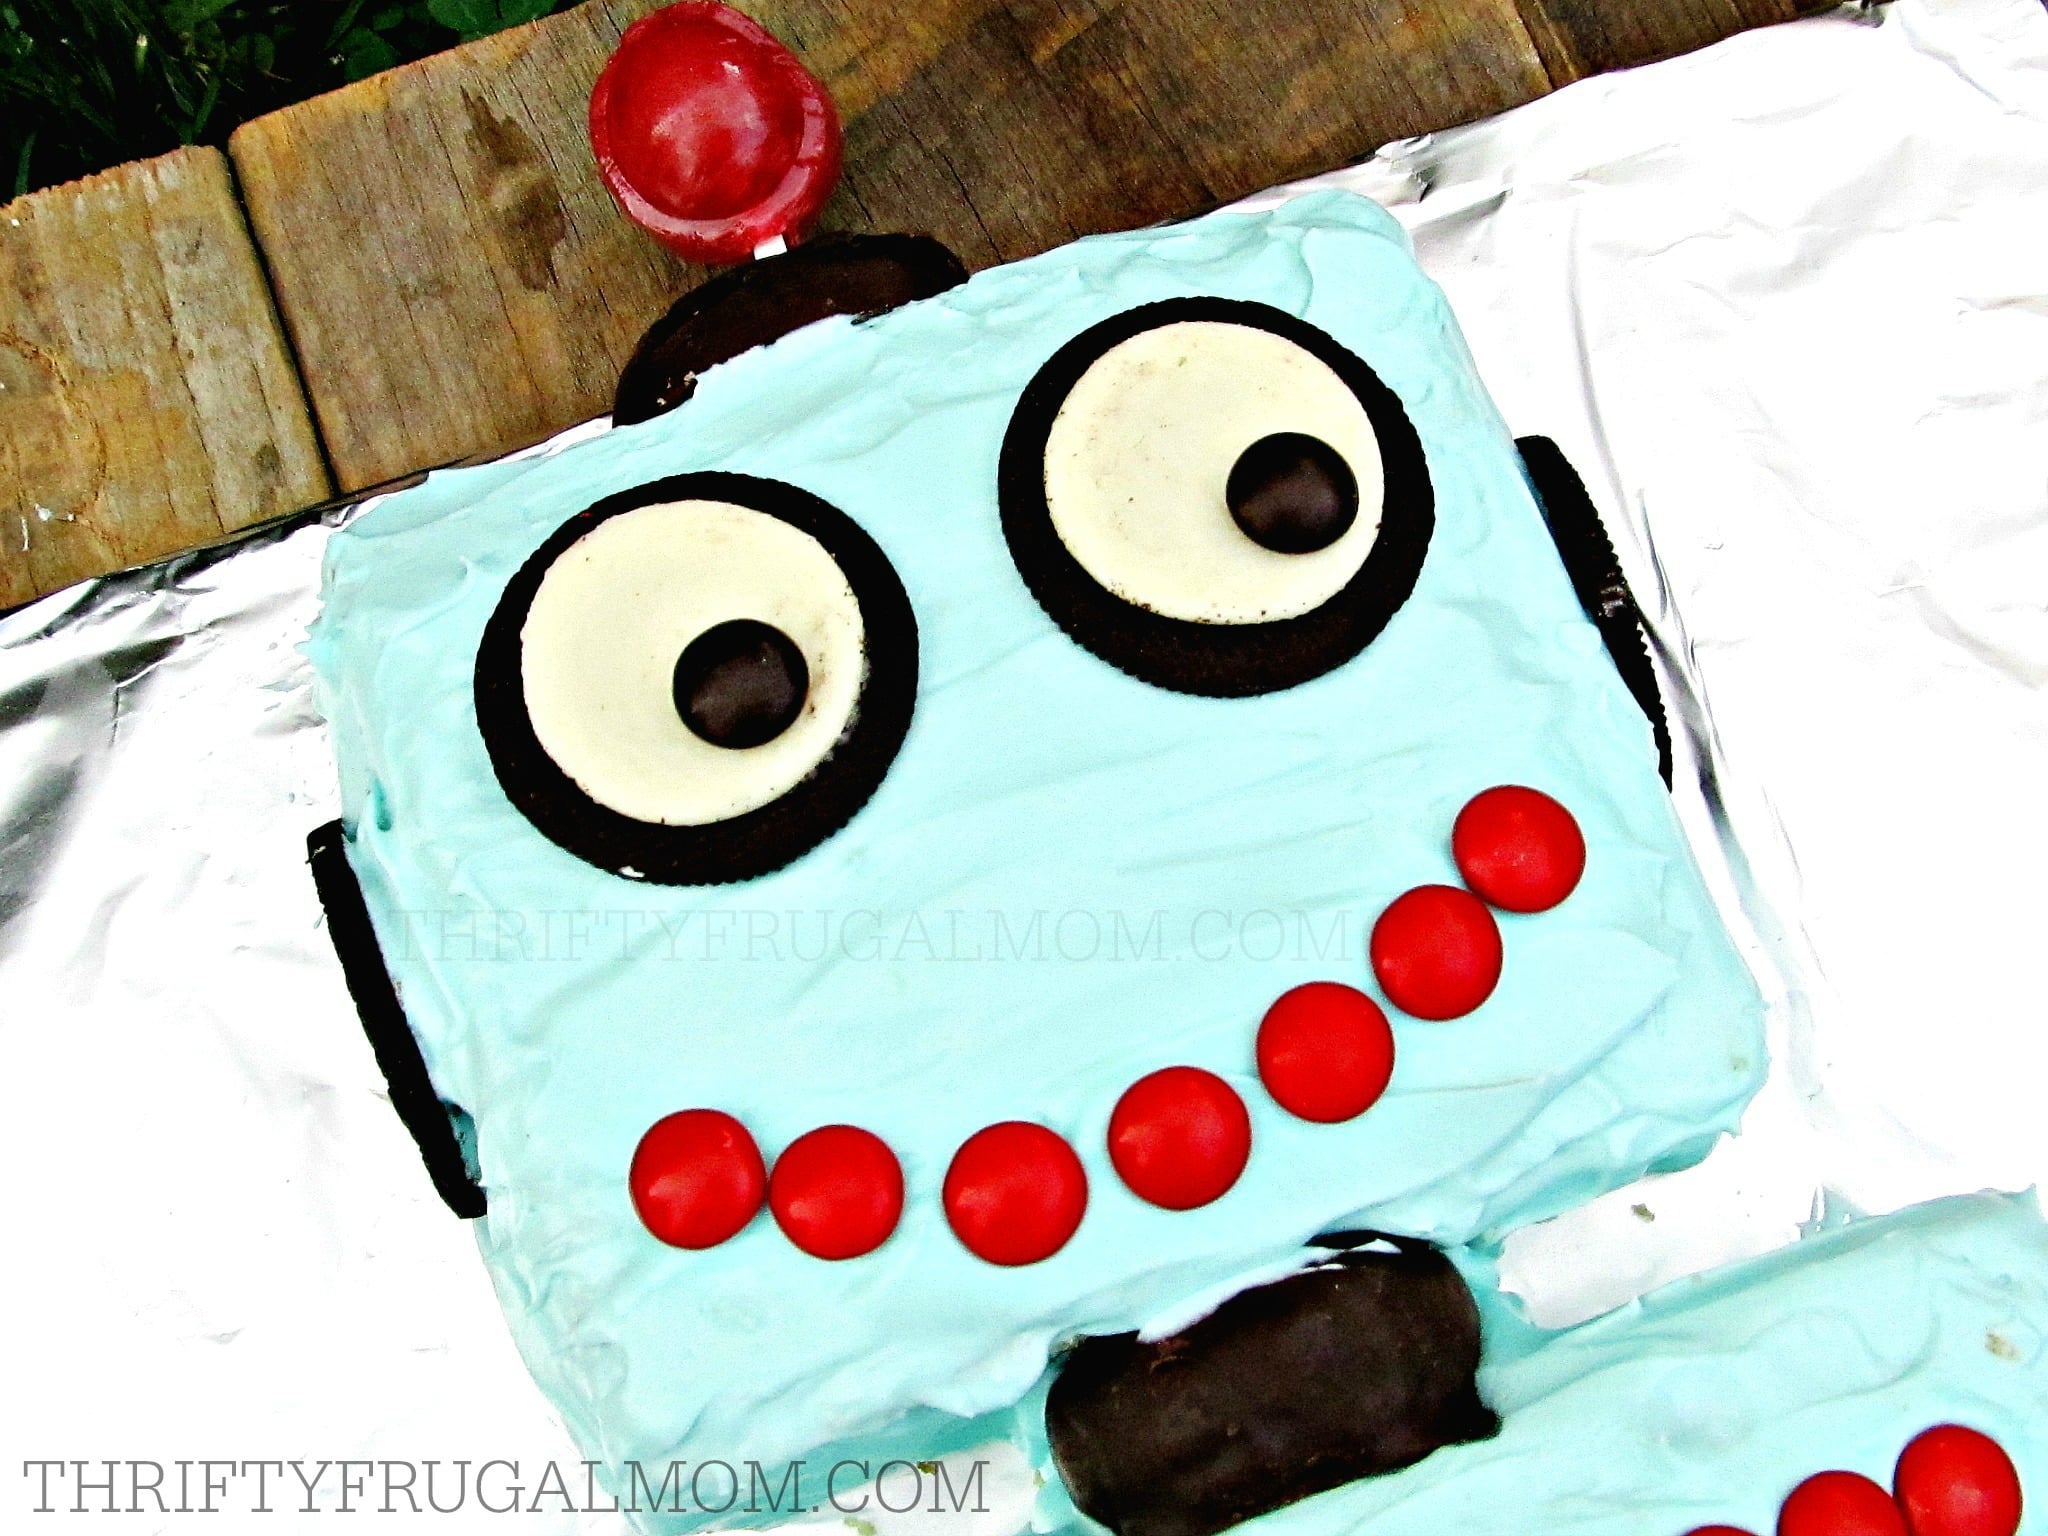
9. Decorate the robot’s head. To make the eyes, carefully pull Oreos apart, leaving all icing intact on one cookie, then add a brown M&M. The remaining Oreo cookie halves will become the ears.
Shape a smile out of M&M’s. Finally, add a doughnut with a lollipop pushed through the center to the top of the head.
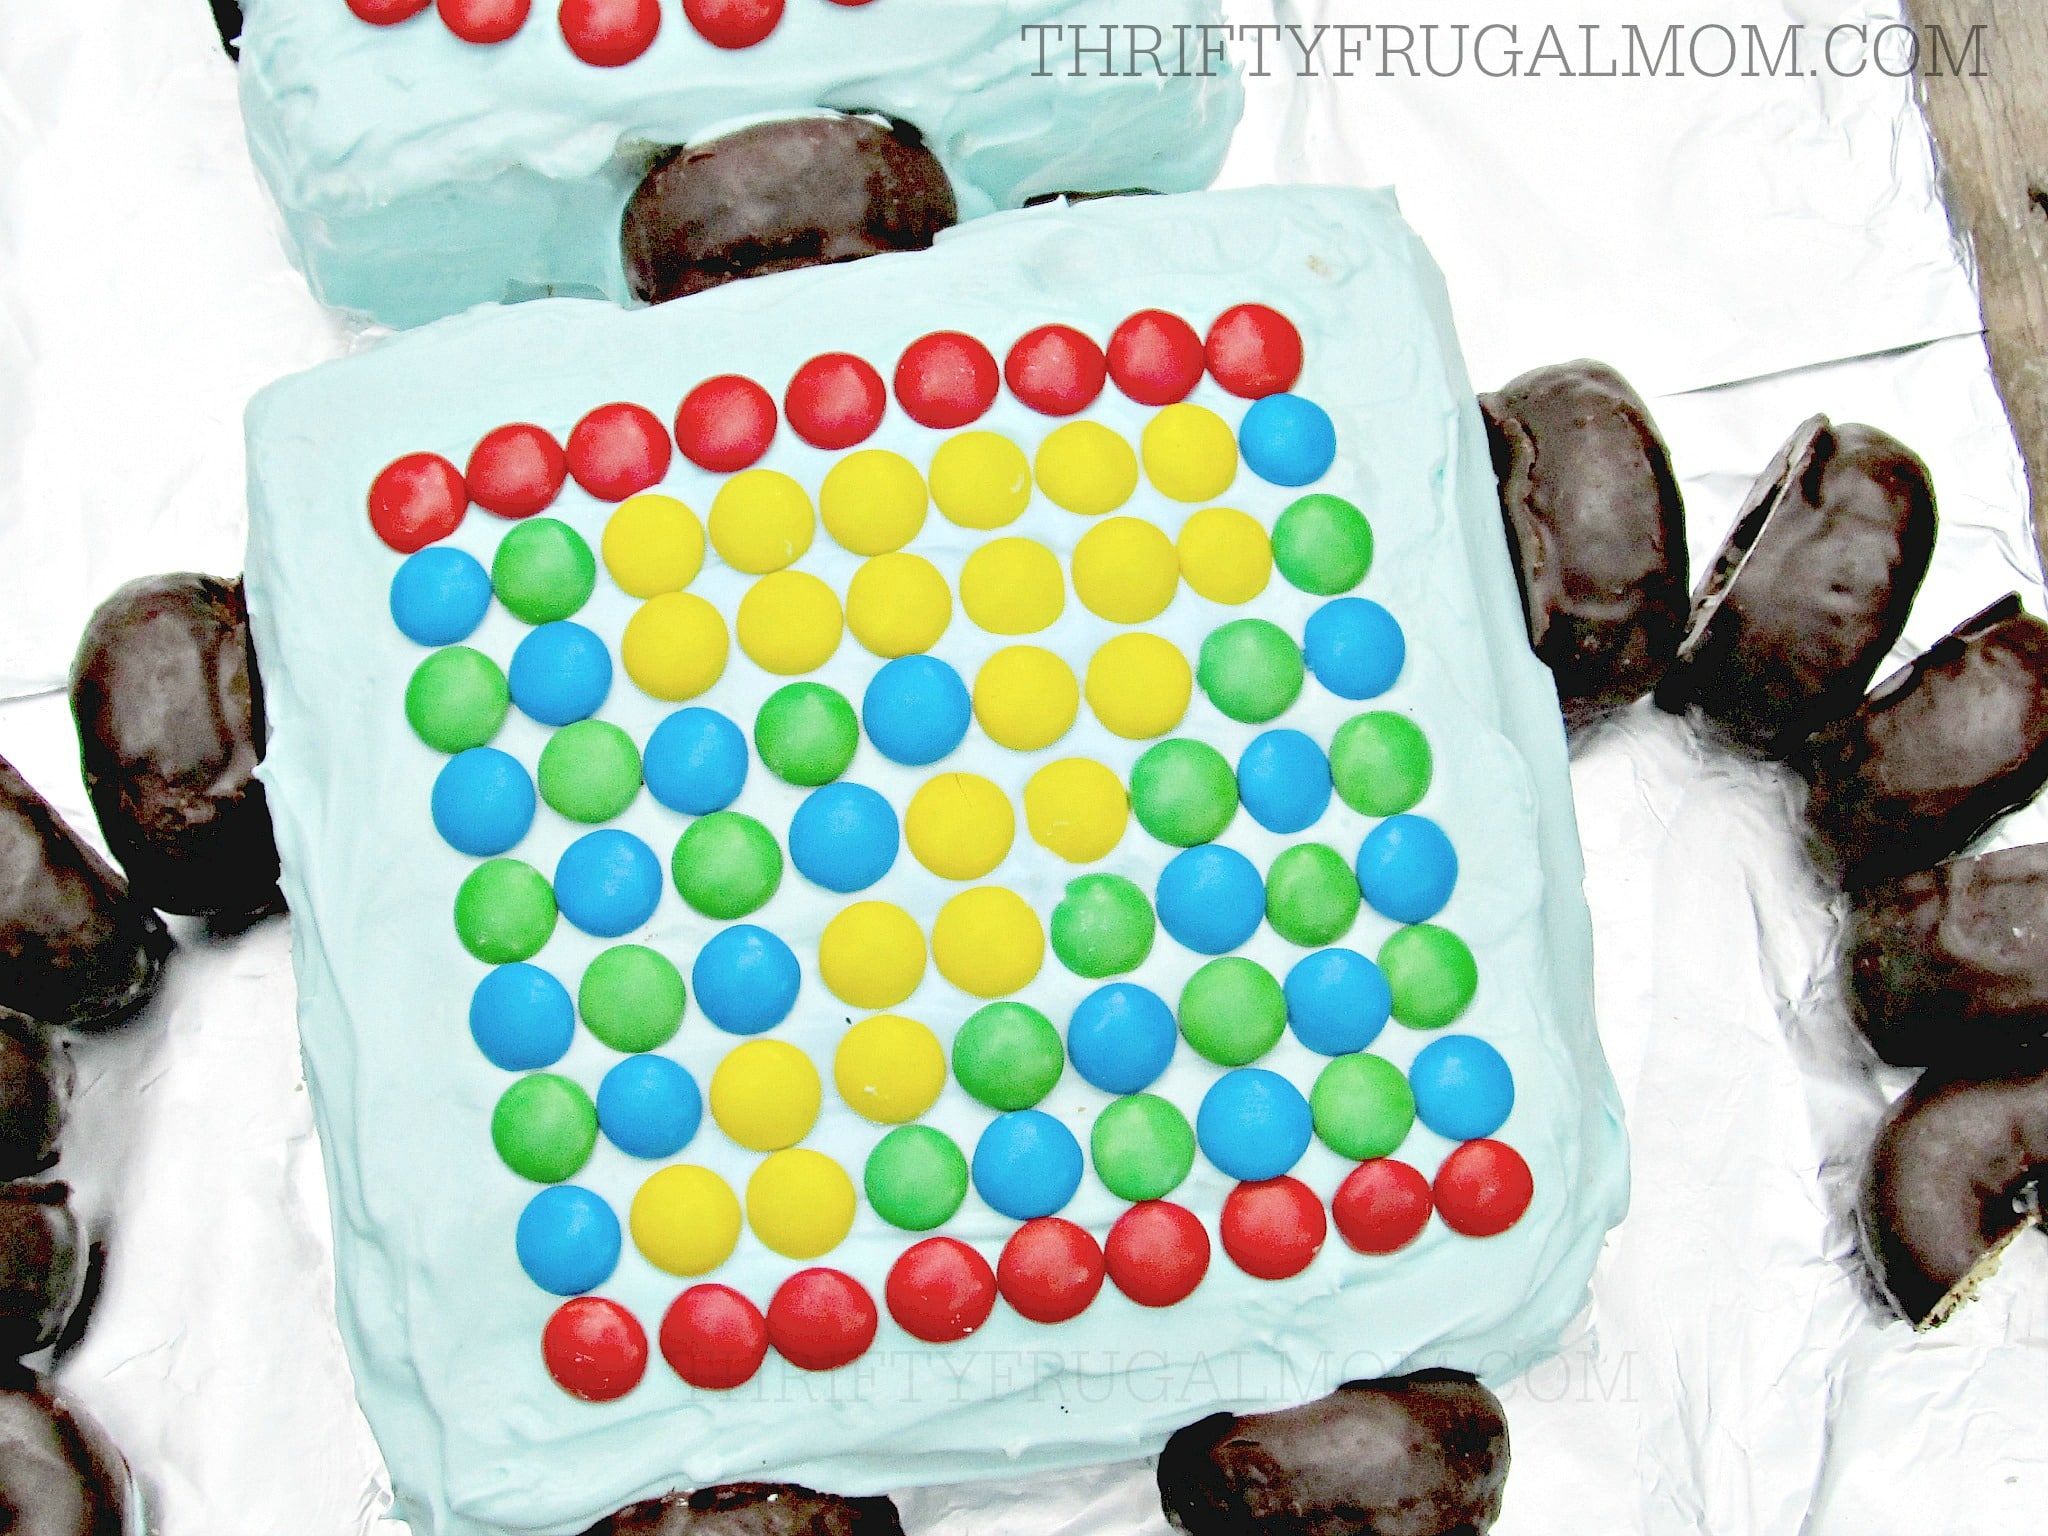
10. Decorate the body, using different colored M&M’s to create your design. I found it helpful to arrange my M&M’s in the pattern I wanted, before putting them on the cake.
Additional Helpful Tips:
- Lining your pans with parchment paper makes the cake easier to remove.
- I like to wrap my cakes in plastic wrap and then freeze for several hours before frosting them. This makes it easier to frost because there are fewer crumbs due to the cake being frozen.
- If you are planning to feed a lot of people, you probably will want to make an additional non-decorated cake since this easy robot cake ends up actually not using a whole 9 x 13 cake.
You’ll also enjoy:

Natalie
Hi, love the robot design!
Can you say what size cake board was used?
Thanks!
Lydia Beiler
I’m really sorry, Natalie, but it’s been several years since I made this and I actually just used some heavy-duty cardboard (cut down from a big box) and covered that with foil. Unfortunately, I didn’t think to measure the size, which I really should have as I know it would be useful to know!
Julie
Hi, are some of the donuts cut in half? Either using whole or halves, the numbers don’t add up.
Lydia Beiler
You are so right, Julie! Very sharp of you to catch that as this is a recipe that has been on my site for several years and no one ever noticed that mistake. 🙂 Thank you! I updated it with the correct amount which is 18.
Julie
Thank you so much! Can’t wait to make this cake for my grandson! It’s adorable!
Helen
What are pieces #1 and #3 for?
Lydia Beiler
Those are extra pieces as mentioned in step #4. So you can do whatever you want with them!🙂
Emily Dunn
How do you keep the donuts together ? Do you use toothpicks ?
Thanks! Excited to make this for my son’s 5th birthday.
Lydia Beiler
It’s been several years since I made this, but I’m pretty sure I only used a bit of frosting where needed. The legs are snug enough that they stay in place. For the arms, I think I just dabbed a bit of frosting on the bottom of the doughnuts and then “glued” them to the board that way.
Happy birthday to your son! I hope the cake helps make it a memorable day for him!
Amy Russell
Your veto comment cracked me up. I can’t show him ideas (turning 6) unless I know I can do it. He loves all the fancy ones – not gonna happen bud. But I can do this – thanks!
Lydia Beiler
Yes, my kids think far more of my cake making and decorating abilities than I do and think I can pretty much perform magic and make anything. Thankfully there are simple birthday cakes like this one that save the day and make me still look amazing while being super easy! Happy birthday to your little guy and I hope the cake is a big hit!