Thrifty Frugal Mom

Where food, family and finances meet.

  • Home
  • Welcome!
    • Contact
  • Frugal Living
    • Money Saving Tips
    • Frugal Gift Ideas
    • Meal Plans: What We Eat on $200 a Month
    • Our $200 Grocery Budget {Series}
    • Our $200 Grocery Budget: What I Spent & Saved
  • Frugal Recipes
    • Main Dishes
    • Soups
    • Make Your Own
    • Desserts
    • Snacks
    • Beverages
    • Canning & Freezing
  • Homemaking
    • Frugal Remodeling | Home Decor
    • Organization
  • Family
    • Baby
    • Kids

How to Can Diced Tomatoes (a step-by-step tutorial)

by 144 Comments

Pin206.1K
Tweet
Share917
Yum1
Email
207.0K Shares
Jump to Recipe Print Recipe

The absolute easiest way to can tomatoes!  This step-by-step photo tutorial will show you how to can tomatoes in no time. No peeling, no coring- just cut out the stem and dice them up.  It’s super easy, plus if you grow your own tomatoes, it’s a big money saver too!
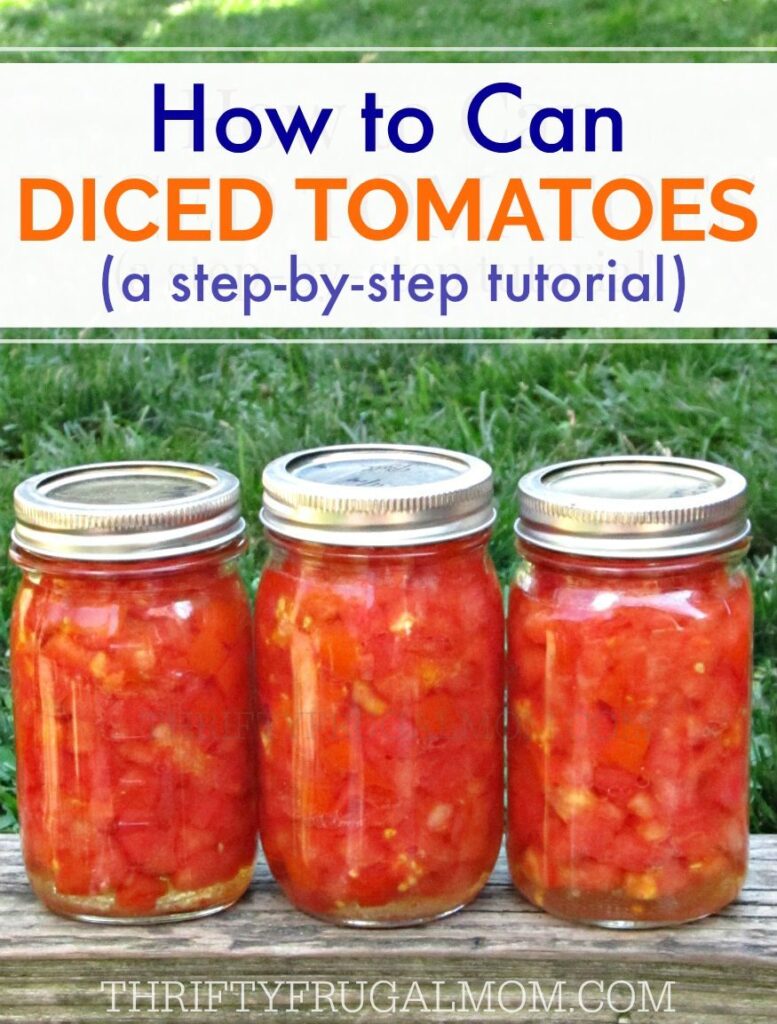
How to Can Diced Tomatoes

I started canning diced tomatoes several years ago after having an “aha moment” one evening while preparing dinner.  As I was opening a can of diced tomatoes that I needed for the recipe I was making, I suddenly wondered why in the world I never tried canning them myself.  I mean how hard could it be?

I grew up helping my mom can tomato juice and tomato chunks.  And every year since we’ve been married, I’ve canned tomato juice as well as things like salsa and marinara sauce, so I was quite familiar with the process of canning tomatoes.

I decided to give it a try and it worked like a charm!  It was not only super simple, it has also saved me from needing to buy diced tomatoes from the store.

How do you can tomatoes?  Let me help you learn the process!

Supplies for Canning Tomatoes:

There are affiliate links in this post. As an Amazon Associate, I earn from qualifying purchases. Please read my full disclosure policy.

  • Tomatoes, salt and lemon juice
  • Dishpan or containers to put the tomatoes in
  • Knife (This one is my favorite for slicing tomatoes!)
  • Cutting board (The groove on this one is awesome because it catches the juice, creating less mess.)
  • Vidalia Chop Wizard (Not a necessity, but you can dice the tomatoes in about half the time if you use it.)
    – This gadget is also awesome for dicing tomatoes, onions, and peppers for salsa and potatoes and carrots for soups.
  • Wide Funnel
  • Damp rag to wipe jar rims
  • Water Bath Canner
  • Canning jars with lids and rings
  • Jar lifter
  • Old towels or rags to set the hot jars on

(If you are new to canning and need to buy both the jar lifter and a funnel, it’s cheaper to get this Ball Canning Utensil Set.)

How to Can Diced Tomatoes- a step-by-step tutorial
how do you can tomatoes
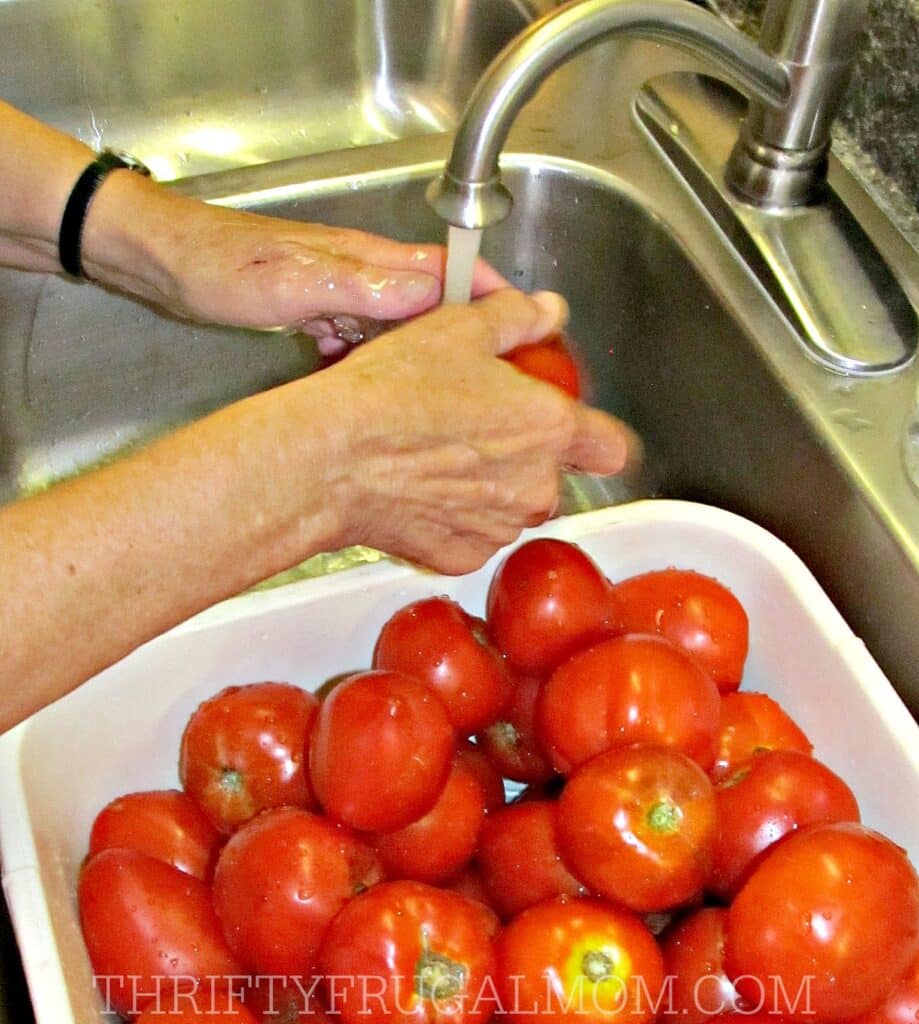
1.  Wash tomatoes thoroughly.  

Cut out the stem and any defects or blemishes.

Some people also peel the tomatoes, but I never do and we honestly have not noticed the peelings at all- and I’m even funny about textures like that in food.

I figure why bother with the extra step, plus it’s a bit healthier too!

canning tomatoes with skins

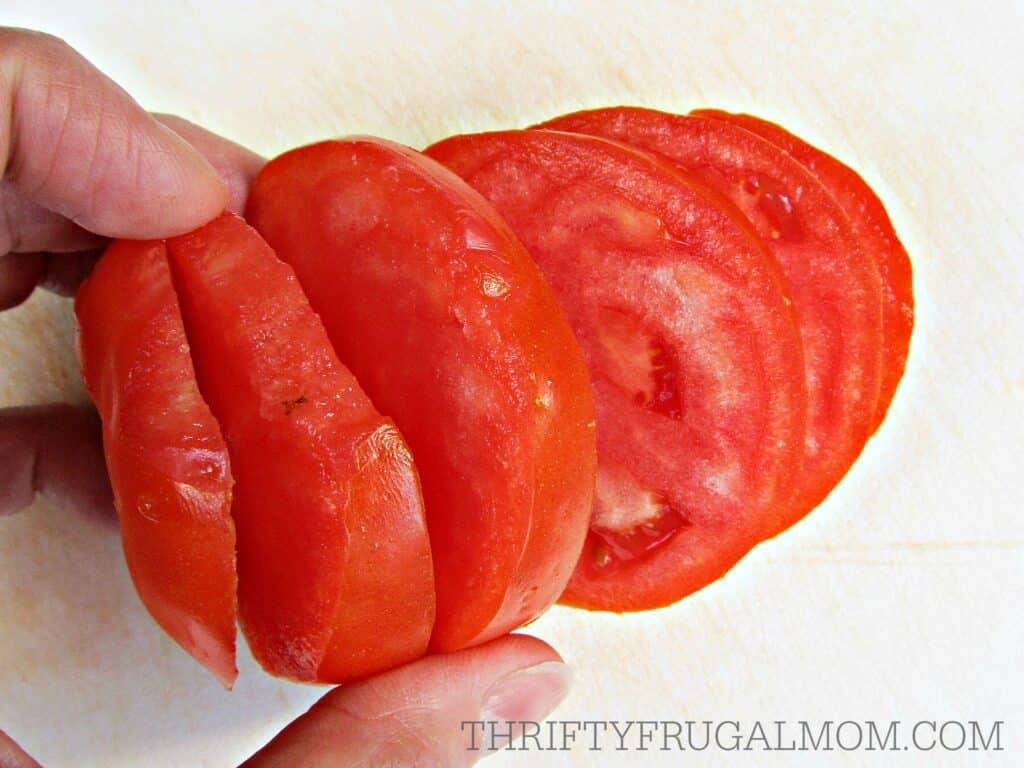
2.  Cut up the tomatoes.

Slice tomatoes into about ½ inch thick slices, then dice them into whatever size you want.  I love using my Vidalia Chop Wizard for this!

how to can tomatoes

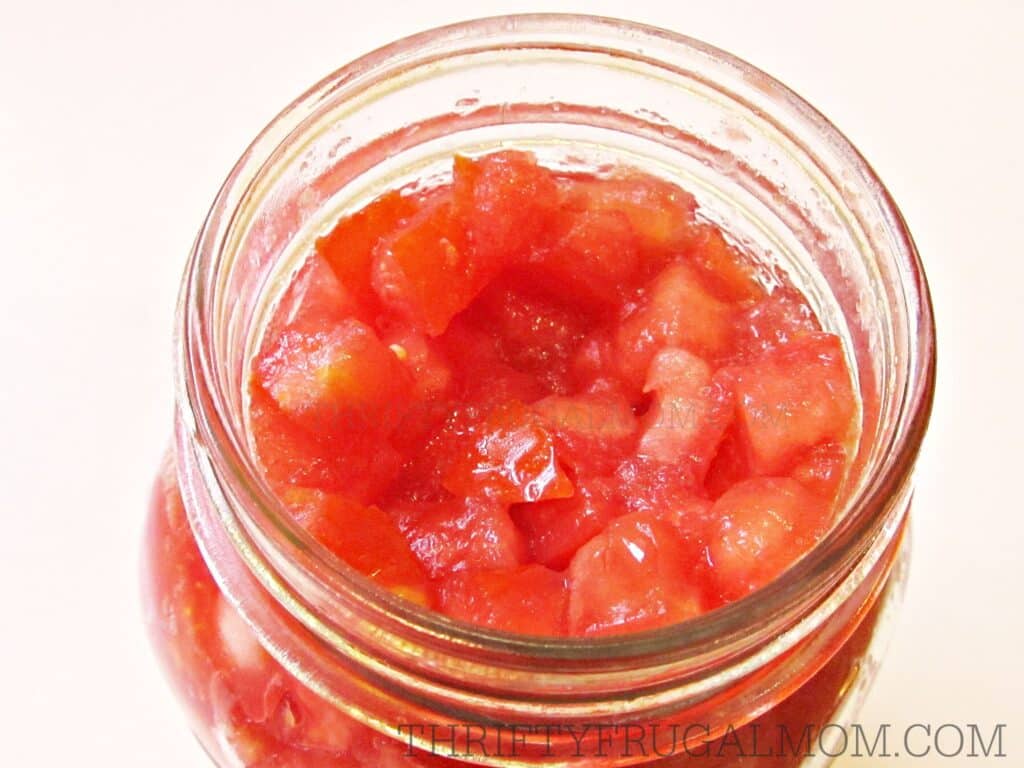
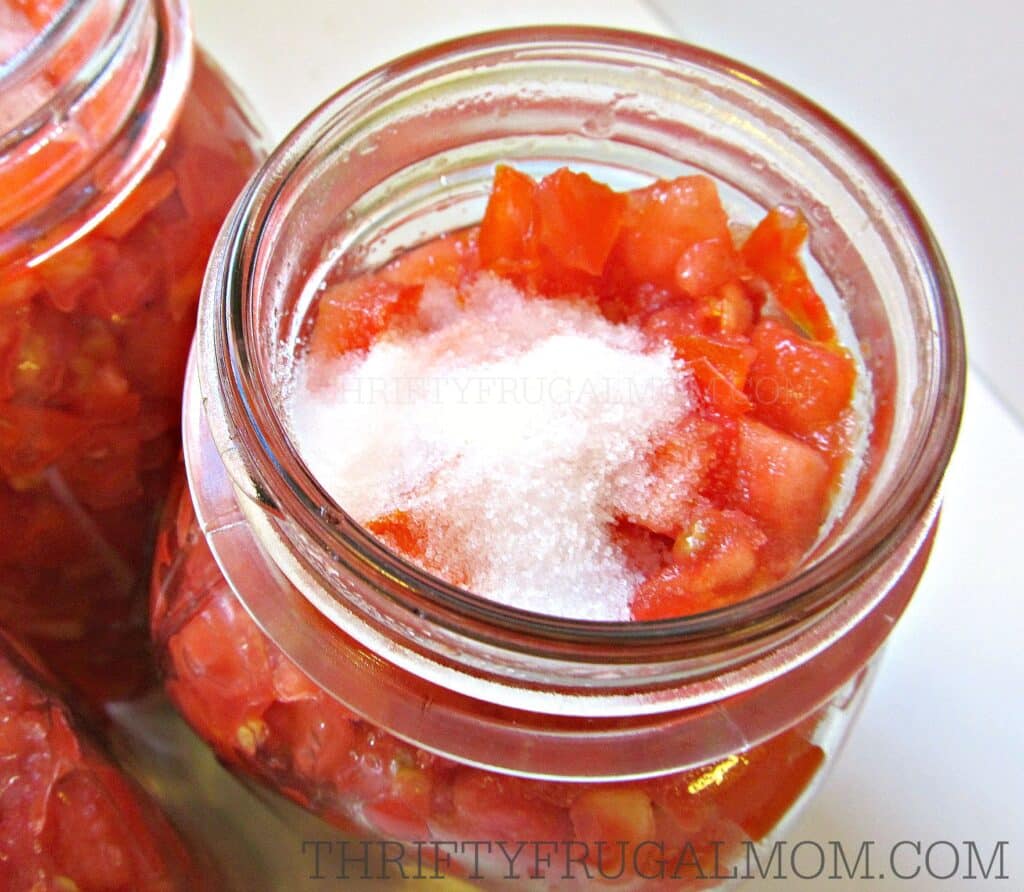
3.  Place diced tomatoes into a clean canning jar.

A funnel makes this super easy.  Gently shake the jar to settle tomatoes so that you can fill it completely.  The tomatoes should be packed tightly in order to produce enough juice. It won’t hurt if you press down on them a bit to get the jar packed full- in fact, this is probably going to be necessary.

The jar should be full to the base of the neck. 
canned tomatoes recipe

4.  Add salt and bottled lemon juice.

For the salt, use ½ tsp. per pint and 1 tsp. per quart.  You do not need to add salt when canning tomatoes, but I recommend it because I think it helps enhance the flavor.

For the lemon juice, use 1 Tbsp. per pint and 2 Tbsp. per quart.

Once the salt and lemon juice are added to the tomatoes, wipe the rim of each canning jar with a damp cloth to remove any tomato residue that may be there.  (If there is even a slight bit of tomato juice on it, it may not allow it to seal properly.)

I updated the original post to include the instructions to add lemon juice after several readers commented and said that to be safe, you really should add it.    
canning jar lids in boiling water in pan on stove

5. Prepare the canning lids.

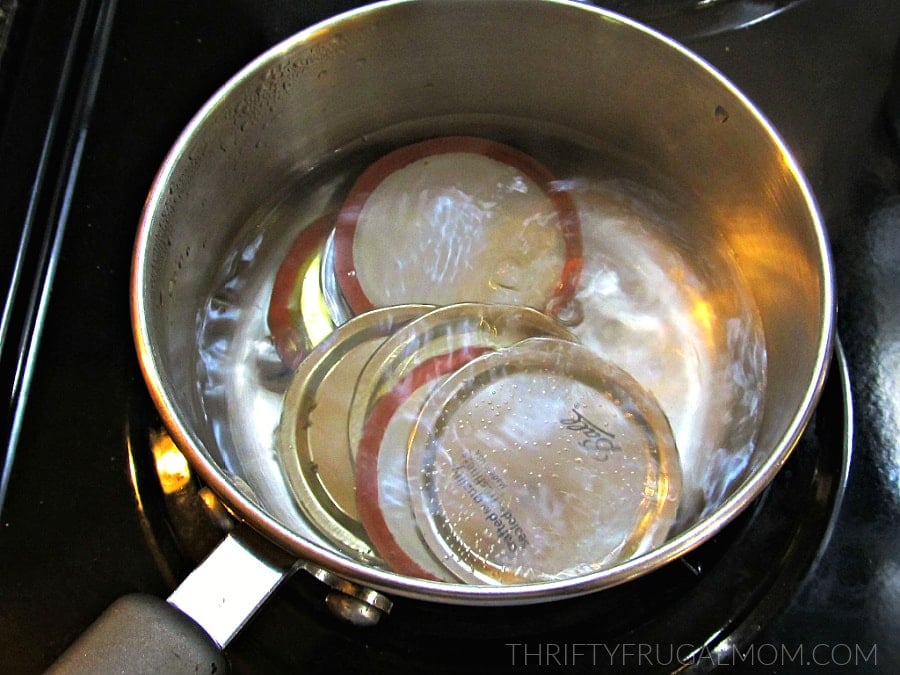
Once you have 7 jars filled, place 7 metal canning lids in a small pan.  Cover with water; bring to a boil.

When the water boils, use a fork or lid lifter to lift the jar lids out of the water and place them on the jars.  Be careful not to burn yourself!

Secure each lid with a jar band/ring.  (Heating the lids softens the rubber, allowing for a better seal.)
diced tomatoes recipe

6.  Place the filled jars of tomatoes in the canner.  

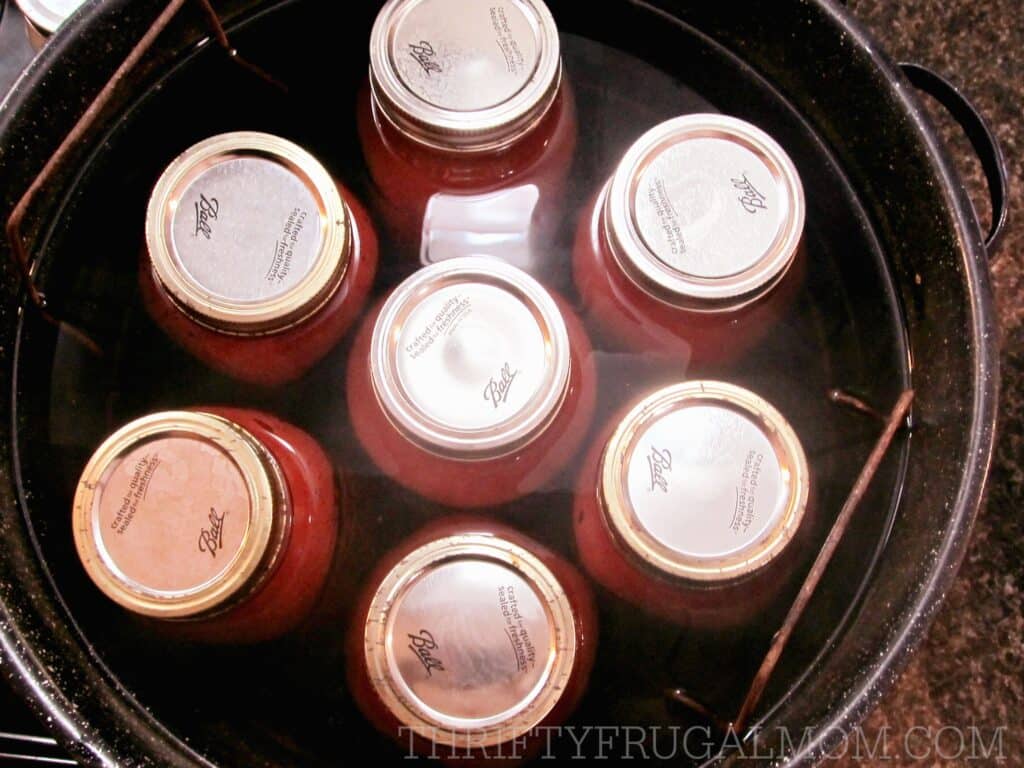
Once jars are full and have the ring and lids on them, place them in the canner.

Then add hot water to the canner- just enough to almost cover the jars.  Turn the burner on medium high heat.

Once water starts to boil, reduce heat slightly and process for 45 minutes, making sure the water is boiling gently and steadily the whole time.  (You may need to adjust heat to keep the boil going nicely, but really, as long as it is boiling, you are fine.)
how to can diced tomatoes

7.  Remove the jars of canned tomatoes.

After processing the canned tomatoes for 45 minutes, turn the burner off.

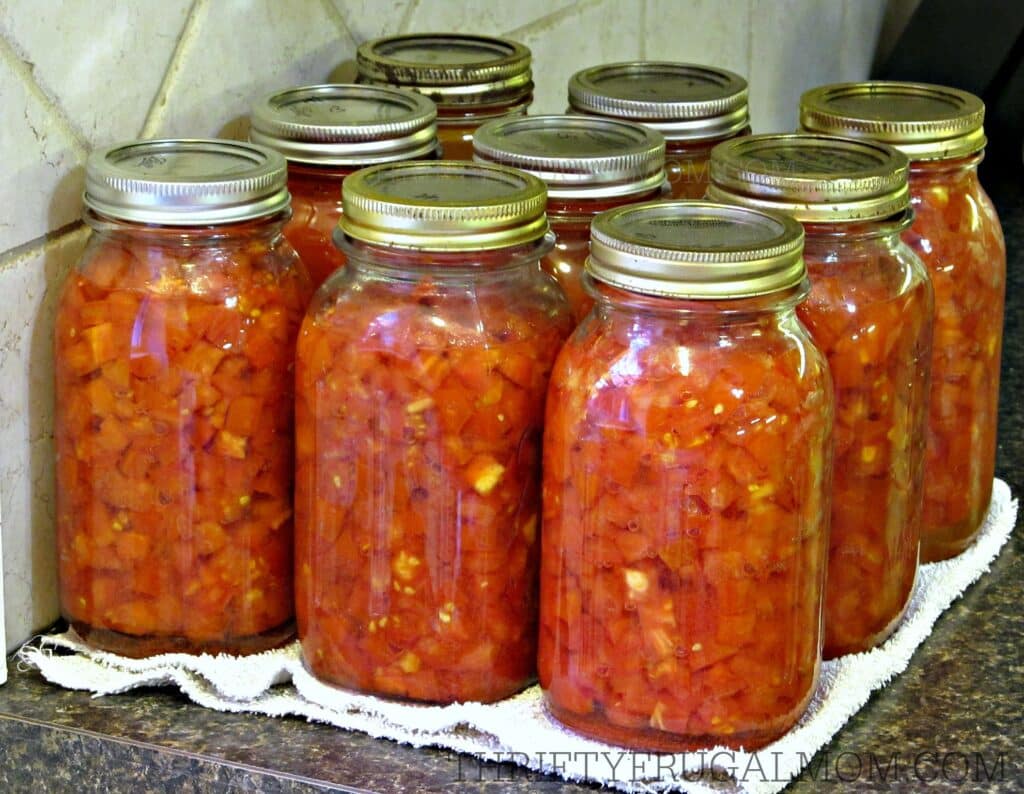
Remove jars using jar lifter- you may want to have a dishrag in your other hand to catch any hot water that drips from the jars as you remove them- and place on an old towel, blanket or another padded surface.  (This is to protect your counter from the super hot jars.)

Allow at least a little bit of air space around each jar, making sure not to have jars close enough to touch.  Do not move until jars are completely cool.

Jars should seal as they cool and you will typically hear a snap or pinging sound as the vacuum seal is formed.  The lids will be slightly concave when sealed.

To test the seal, once jar has totally cooled you can lightly tap the center of the cooled jar lid.  If it is firm and does not move, it should be sealed.  If it pushes in, it didn’t seal properly.  You can still use unsealed jars, just put them in the refrigerator and use them as soon as possible.

After jars are completely cool, you can remove the rings.  Jars should be wiped clean before storing them.

Enjoy!

HELPFUL TIP: 1 pint of canned diced tomatoes is equivalent to 1 (15 oz.) can of diced tomatoes.

Other canning recipes you might also enjoy:

  • How to Can Tomato Juice
  • How to Can Peaches
  • How to Can Homemade Applesauce
  • How to Can Dill Pickles
  • How to Freeze Green Beans
  • How to Freeze Blueberries
Print Recipe
4.63 from 27 votes

How to Can Diced Tomatoes

Canning diced tomatoes is super easy! This easy recipe will teach you how to can tomatoes in no time!
Author: Lydia @ ThriftyFrugalMom.com
Prevent your screen from going dark

Equipment

  • Dishpan or containers to put the tomatoes in
  • Knife
  • Cutting board
  • Vidalia Chop Wizard (Not a necessity, but you can dice the tomatoes in about half the time if you use it.)
  • Wide Funnel
  • Damp rag to wipe tops of jars
  • Canner
  • Canning jars with lids and rings
  • Jar lifter
  • Old towel, blanket or other padded surface to put hot jars on

Ingredients

  • fresh tomatoes (approximately 2 3/4 lb. for 1 quart jar)
  • salt (1 tsp. per quart or 1/2 tsp. per pint)
  • bottled lemon juice (2 tbsp. per quart or 1 tbps. per pint)

Instructions

  • Wash tomatoes thoroughly.  Cut out the stem and any defects or blemishes.  Some people also peel the tomatoes, but I never do and we honestly have not noticed the peelings at all- and I’m even funny about textures like that in food.  I figure why bother with the extra step, plus it’s a bit healthier too!
  • Slice tomatoes into about ½ inch thick slices, then dice them into whatever size you want.  I love using my Vidalia Chop Wizard for this!
  • Place diced tomatoes into a clean canning jar- a funnel makes this super easy.  Gently shake jar to settle tomatoes so that you can fill it completely.  
    The tomatoes should be packed tightly in order to produce enough juice. It won't hurt if you press down on them a bit to get the jar packed full- in fact, this is probably going to be necessary.
    The jar should be full to the base of the neck.
  • Add salt (½ tsp. per pint and 1 tsp. per quart) and bottled lemon juice (1 Tbsp. per pint and 2 Tbsp. per quart).  Wipe rim of each jar with a damp cloth to remove any tomato residue that may be there.  (If there is even a slight bit of tomato juice on it, it may not allow it to seal properly.)
  • Once you have 7 jars filled, place 7 metal canning lids in a small pan.  Cover with water; bring to a boil.  Once the water boils, use a fork or lid lifter to lift the jar lids out of the water- be careful not to burn yourself!- and place them on the jars.  Secure each lid with a jar band/ring.  (Heating the lids softens the rubber, allowing for a better seal.)
  • Place 7 jars in canner.  Fill with enough hot water to almost cover the jars.  Turn the burner on medium high heat.  Once water starts to boil, reduce heat slightly and process for 45 minutes, making sure the water is boiling gently and steadily the whole time.  (You may need to adjust heat to keep the boil going nicely, but really, as long as it is boiling, you are fine.)
  • After processing for 45 minutes, turn the burner off.  Remove jars using jar lifter- you may want to have a dishrag in your other hand to catch any hot water that drips from the jars as you remove them- and place on an old towel, blanket or another padded surface.  (This is to protect your counter from the super hot jars.)  Allow at least a little bit of air space around each jar, making sure not to have jars close enough to touch.  Do not move until jars are completely cool.
  • Jars should seal as they cool and you will typically hear a snap or pinging sound as the vacuum seal is formed.  Lids will be slightly concave when sealed.  To test the seal, once jar has totally cooled, lightly tap the center of the cooled jar lid.  If it is firm and does not move, it should be sealed.  If it pushes in, it didn’t seal properly.  You can still use unsealed jars, just put them in the refrigerator and use them as soon as possible.
  • After jars are completely cool, you can remove the rings.  Jars should be wiped clean before storing them.

Notes

1 pint of canned diced tomatoes is equivalent to 1 (15 oz.) can of diced tomatoes.


Pin206.1K
Tweet
Share917
Yum1
Email
207.0K Shares

Filed Under: Canning & Freezing, Recipes

« How We Survived a 40 Hour Family Road Trip with Kids
Our $225/Mo. Grocery Budget: My Weekly Grocery Haul for Our Family of 6 »

Comments

  1. Jessica Lasseter says

    August 10, 2015 at 3:50 PM

    Learning how to make my own diced tomatoes and can them was on my goal list this year, and I completely forgot about it! I just happened to come across your post and it was providential. Thanks!

    Reply
    • ThriftyFrugalMom says

      August 10, 2015 at 9:18 PM

      Oh, that’s awesome, Jessica! Hope you are still able to do it. It’s not hard, especially once you get the tomatoes diced.

      Reply
      • Jessica says

        April 2, 2020 at 5:35 PM

        This seems easy enough! Do you not need to add any other liquid, does it fill up that much (like store bought canned diced tomatoes) just from the juice when you dice them?

        Reply
        • Lydia Beiler says

          April 3, 2020 at 7:18 AM

          It is super easy, Jessica! And you are right, you don’t need to add any other liquid since the juice from the tomatoes will come out when cooking and fill it up just fine.

          Reply
          • Becky says

            July 12, 2020 at 2:16 PM

            What is the self life after processed?

          • Lydia Beiler says

            July 13, 2020 at 6:28 AM

            They’re good for at least a year, but as long as the seal is good on them they actually will be good for longer, they just might get a little more soft over time.

  2. Be says

    August 10, 2015 at 7:58 PM

    It’s been many years since I’ve done any canning but your tutorial pictures are reminding me of the good old days and are almost putting me in the mood to do some canning again! Your recipe looks pretty easy to do and looks tasty too.

    Reply
    • ThriftyFrugalMom says

      August 11, 2015 at 7:51 AM

      Yes, I’m all about easy! 🙂

      Reply
      • Janet says

        September 10, 2017 at 11:55 AM

        What would cause your tomato juice to be real dark red.

        Reply
        • ThriftyFrugalMom says

          September 10, 2017 at 11:01 PM

          Are you asking about the tomato juice in my picture or are you asking because you’ve canned tomato juice yourself and it was dark red and you were puzzled as to why it was so dark? If it’s my juice, it’s a combination of 2 things. The lighting in my kitchen made it look a bit darker than it really is, but I’ve found homemade tomato juice is also often darker than store bought. I don’t know if it’s the type of tomatoes that are used or if it’s because the tomatoes that I use are typically quite ripe and nice and dark red and the store bought stuff is made with less ripe tomatoes or what. The other thing is that I juice mine pretty hard and so it is thicker than store bought canned tomato juice too, which might make it darker. At any rate, my juice is often just a bit lighter than the picture shows, so still fairly dark. Hope that answered your question!

          Reply
          • Seminte says

            October 10, 2017 at 12:34 AM

            What kind of tomatoes do you like to use? I grew Roma variety especially for caning as I think it is the best for that purpose.

          • ThriftyFrugalMom says

            October 10, 2017 at 12:30 PM

            Roma tomatoes are great, especially for making tomato juice or spaghetti sauce since they are more meaty and not as juicy! For things like these canned diced tomatoes or salsa, I’m fine with using a regular tomato since the meatiness of the tomato isn’t really something that matters as much, although I have used them for making diced tomatoes occasionally too. If I’m growing my own, I usually pick an heirloom variety like Brandywine. But many times I just buy them from a semi-local tomato grower that sells their seconds for really cheap and so I obviously just take whatever they have available.

  3. Melanie Redd says

    August 13, 2015 at 8:04 AM

    I’m always impressed with articles and ideas like this one! Thanks for sharing these suggestions. Your pictures are great, and I love the idea of dicing my own tomatoes.

    Reply
    • ThriftyFrugalMom says

      August 19, 2015 at 9:25 AM

      Thanks, Melanie! There’s something about preserving my own food that just makes me feel good. And when it’s as easy as this, it makes it even more fun!

      Reply
  4. Robyn says

    August 17, 2015 at 2:23 PM

    I found a really handy magnetic lid lifter at walmart for under a dollar. It works great for getting the lids out of the water! I will be canning tomatoes today!

    Reply
    • ThriftyFrugalMom says

      August 19, 2015 at 9:12 AM

      I’ve heard that there is such a thing, Robyn. I grew up helping my mom can and we always used a fork to get the lids out so to me it’s just easier that way. But the magnetic thing would probably be handy, especially if you are concerned about burning yourself with the water!

      Reply
    • ella ruth says

      June 17, 2016 at 9:18 AM

      I used to use a fork but found the lid lifter at walmart and love it.

      Reply
      • ThriftyFrugalMom says

        June 18, 2016 at 2:56 PM

        I’ve heard lots of people say they love the lid lifter too, Ella Ruth! I guess I should try one to see what the fuss is about. 🙂

        Reply
  5. Kay says

    August 17, 2015 at 11:33 PM

    Have you used this recipe/method before? I loved how easy it was and have made a few batches now following this method. You had me at “no peeling”;)! I have had two family members now question me about the safety of the method (or really, question me about canning tomatoes in general- especially without pressure canning). I even added a tablespoon of vinegar to each pint jar to make it more acidic to reduce concerns of botulism. I just wanted to follow up to see if this is a tried or tested method or get any input on canning safety.

    Reply
    • ThriftyFrugalMom says

      August 19, 2015 at 9:19 AM

      I know! When I discovered that you didn’t notice the peel when you do the little dices like this, I was more than happy not to need to worry about it!

      I’ve canned diced tomatoes for 3 years and my mom has canned larger chunks using this method for 47 years! 🙂 We’ve been totally fine- but at the same time, I don’t claim to be an expert and realize that everyone has different views on the whole subject of canning.

      I looked at the Ball’s FreshPreserving.com site and this is what they said:

      Tomatoes have a pH (acid) level that is just above the line dividing high-acid foods and low-acid foods. It is important for the safety and quality of tomato recipes that the proper acid level is maintained. Since many factors can decrease the natural acidity in tomatoes, the addition of bottled lemon juice or citric acid helps ensure the correct acidification. Bottled lemon juice must be used because its acid level is consistent, unlike fresh lemons.

      Recipes that include an adequate amount of vinegar (5% acidity) do not require additional acidification, such as salsa, tomato chutney, and pickled tomatoes.

      Hope that helps!

      Reply
      • crystal says

        November 5, 2017 at 4:53 PM

        How long after jarring them are they good for one week two weeks a month 3 months 6 months a year?

        Reply
        • ThriftyFrugalMom says

          November 6, 2017 at 9:07 AM

          They’re good for at least a year. I’ve had some longer than that and they’ve been fine too. So handy!

          Reply
          • Lee longo says

            September 25, 2018 at 7:20 PM

            I did some tomatoes with the skin on last year and I found they were not the first ones I felt like using. I liked the skinless better. You have to try this method of removing the skins if you have never done it like this before.
            I took a whole box of tomatoes from the farm and emptied them in my sink. Rinsed & sorted them quickly.
            I poured a canning pan full of water over them and waited till the skin split. About ten minutes.
            I drained the sink, let them cool a bit and cored and skinned them in less than a half hour. It was amazing. No pulp left on the skin either. The farm attendant shared this with me. Feel free to share. Thanks for your channel. I had good luck last year with your recipes.

          • ThriftyFrugalMom says

            October 2, 2018 at 11:49 AM

            Thanks for that tip for removing skins easily. I’ve heard of dumping the tomatoes into boiling water, but this sounds much easier…enough so, that I’m tempted to give it a try next year!

  6. Connie says

    August 23, 2015 at 4:30 PM

    I’m trying my hand at canning right now! so easy! Wondering, what is the shelf life for tomatoes? I’m sure they won’t sit too long on my shelf but would like to know for my own knowledge!

    Reply
    • ThriftyFrugalMom says

      August 24, 2015 at 10:41 AM

      That’s great, Connie! And I love that you’ve found it to be easy because I think often people get scared away from canning because it seems complicated, when overall, it’s really not that way. I don’t know the official answer too your question about how long tomatoes are “good”, but I can tell you that I recently discovered a couple of jars that were 2 years old (yes, I apparently didn’t do a good job of rotating my jars!) and they were just fine when I used them. Hope that helps and happy canning!

      Reply
  7. Michelle says

    August 24, 2015 at 10:52 AM

    hi, just wondering if u could add chopped peppers and onions to the mix and can that way? Thanks

    Reply
    • ThriftyFrugalMom says

      August 31, 2015 at 10:59 AM

      You mean kind of like Rotel? I wouldn’t know why not. The only thing I can think of is that the peppers might get mushy. You could also google Homemade Rotel or something like that too and see what you can find!

      Reply
  8. Stacey Thureen says

    August 26, 2015 at 8:36 AM

    Thank you for sharing about how to can diced tomatoes. Looks like fun and I loved the images that corresponded! 🙂

    Reply
  9. Chrism says

    August 29, 2015 at 7:58 AM

    There are a few more steps you really should be taking here. You NEED to add 2Tablespoons of lemon juice to each quart jar or 1Tablespoon to each pint. (you won’t taste it). But this will prevent botulism from developing. Tomatoes are less acidic than fruits so if you do not add the lemon juice, you should be pressure canning them. (You can also use citric acid by Ball)

    Also, use a rubber spatula to go up and down around the jar to remove air-bubbles. This will prevent too much air in your jars and lid failures.

    You do not need to boil the lids. Boiling can actually cause the sealant to come off and cause seal failures. Wash them and put them in WARM water to soften the seals. Ball is actually saying now that you don’t even need to heat them at all now. (they will sterilize in the water bath just like the contents of the jar)

    Your jars should be hot before canning. This will prevent jar breakage in the canner. I put my canning jars in the dishwasher and run a cycle and take them out to use during the dry cycle.

    Please take canning safety seriously. If you have any seal failures, put the food in the fridge and use it up. If you have any seal failures after storage, throw it out. Anything off, throw it out.

    For proper canning step-by-step, check out a copy of The Ball Blue Book, or any state cooperative extension service website.

    Reply
    • ThriftyFrugalMom says

      August 31, 2015 at 11:04 AM

      Thanks for your tips! I updated the instructions to include the tip about the lemon juice. 🙂

      Reply
      • Leandra MacDonald says

        June 16, 2016 at 11:18 AM

        Just another safety note: jars should be covered by an inch or more of water while in the water bath canner.

        Reply
      • AJ says

        July 27, 2017 at 6:44 AM

        My grandmothers, mother, and I canned tomatoes exactly as ThriftyFrugalMom has described, without adding lemon juice or pressure canning. Never ever had a problem with botulism. Just make sure your equipment, jars, lids, etc are sterile and that your tomatoes are washed properly. We all removed the tomato skins by dipping them in boiling water until the skins cracked, plunging them in cold water, then the peels come right off. That also helps to make sure they are very clean.

        Reply
        • ThriftyFrugalMom says

          July 31, 2017 at 10:05 PM

          Yes, clean, sterile jars etc. are obviously a must!

          Reply
        • Marian Murphy says

          October 2, 2019 at 9:52 AM

          I have been canning tomatoes for 50 years and have never used lemon juice nor have I ever hot water bathed them. Plenty of acid in them and it is a totally unnecessary step.

          Reply
          • ThriftyFrugalMom says

            October 2, 2019 at 11:22 AM

            That’s a lot of canning you’ve done, Marian! My hats are off to you! My mom and grandma never used lemon juice either and pretty sure my grandma didn’t water bath her tomatoes. Regarding the lemon juice, I personally don’t think it’s a big risk to not add it either. But after some readers mentioned it, I researched things a bit. Apparently some of the newer varieties of tomatoes have been bred to be less acidic, which is why it is now recommended to add the lemon juice. My guess is that heirloom varieties would still be the same acidity as they’ve always been and wouldn’t need the lemon juice, but I don’t know that for sure! At any rate, I feel like I need to make people aware of what’s recommended and then they can make an informed decision as to whether or not they do it that way. 🙂

  10. Michelle says

    August 31, 2015 at 1:50 PM

    This was a great post considering I just canned 12 jars over the weekend. I know now that I need a new canner because mine only fits jars safely…it took awhile to get them all canned properly. Thanks I will try for a new canner next year!

    Reply
    • ThriftyFrugalMom says

      August 31, 2015 at 5:20 PM

      Thankfully, canners are pretty cheap. Actually, sometimes you can find them used too for almost nothing. Maybe you’ll get lucky! 😉

      Reply
  11. Mary says

    September 1, 2015 at 4:05 PM

    My jars were floating in my canner am I supposed to add a little water to the jars?

    Reply
    • ThriftyFrugalMom says

      September 1, 2015 at 6:06 PM

      No, they should create their own juice, so you don’t need to add water. The jars shouldn’t have been floating. Did they seal okay? Do you have a rack in your canner? And did you only put enough water in the canner to just come to the neck of the jars or just barely to the top? Those are the only things that I can think.

      Reply
    • ella ruth says

      June 17, 2016 at 9:22 AM

      If your jars were floating, did you have a full canner? If not put a empty jar in so that it takes up space. Fill it with water.

      Reply
  12. Cara says

    September 2, 2015 at 10:39 AM

    Great tip about not peeling – I’m definitely going to try that next time. I just had to respond to the comment asking about adding peppers and onions. If you add anything extra to tomatoes they HAVE to be pressure canned for safety. Tomatoes are the only vegetable (actually they’re a fruit, but anyway…) acidic enough for water bath canning – and adding other ingredients changes the pH making it more alkaline and therefore more hospitable to the really nasty bacteria. So pressure can or don’t add extras. It’s just not worth it! Happy Canning

    Reply
    • ThriftyFrugalMom says

      September 2, 2015 at 11:21 AM

      Thanks for that info, Cara! I was thinking that it wouldn’t be any different than salsa, but duh, with salsa you add other ingredients too. Appreciate the input.

      Reply
  13. Coensy says

    September 5, 2015 at 12:19 PM

    I just finished following your directions to the letter and included the lemon juice. I feel like I must have missed a step. When I pulled the jars out of the canner. I noticed that the jars look a little over half full now and it seems like there is too much air? Any suggestions as to what I may have done wrong or how to fix?

    Reply
    • ThriftyFrugalMom says

      September 7, 2015 at 7:22 AM

      I’m so sorry, Coensy! I know how frustrating it is to do something like this and feel like you followed the directions, but still didn’t have it work like you thought it should.

      Did you shake the jar to settle the contents like I mention in step #3? Or maybe you did that and just didn’t settle it enough? I usually put a rag or washcloth on the counter and then gently, but still somewhat firmly, tap the jar on the rag/washcloth to settle the contents. It will often give me close to 3/4 – 1 inch of space. Sometimes I’ll even do this twice with tomatoes because they are so soft and can squish together more.

      Because of all the juices, tomatoes also do reduce some when canned, especially if they were pretty ripe. The jars that I showed in the picture were made with greenhouse tomato seconds that I can buy from a local produce farm for cheap. They aren’t quite as juicy as the tomatoes I grow. When I did some later with a few of my own home-grown very ripe tomatoes, the contents “shrank” significantly more.

      The only other thing I can think of is that you may not have filled it quite as full? I usually fill it right up to the base of the neck, allowing about 3/4 to 1 inch headspace.

      I think as long as they sealed okay for you, that they will be fine. Here’s what the National Center for Home Food Preservation says about too much headspace:

      If too much headspace is allowed, the food at the top is likely to discolor. Also, the jar may not seal properly because there will not be enough processing time to drive all the air out of the jar.

      Hope that helps!

      Reply
  14. Annette Woodbury says

    September 12, 2015 at 11:54 AM

    Thanks for your ‘do not peel first’ tip. I used it and saved lots of time. I would love to can my own Marin are sauce. Do you plan to share your method? I believe it has to be processed in a pressure canner, but I have been unable to find a recipe or method so far.

    Reply
    • ThriftyFrugalMom says

      September 14, 2015 at 10:53 AM

      So glad that tip saved you time! It’s been a big lifesaver for me too. I didn’t need to make any Marinara Sauce this year since I had plenty left from last year, so I won’t be sharing my recipe until next year. And no, it doesn’t have to be pressure canned as long as you add bottled lemon juice to help the acidity. If you do a search on Pinterest or Google, you should be able to find some Marinara recipes. (I just did that and there were quite a few. I would link to a couple, but I wasn’t sure exactly what type of marinara you were looking for.) Hope that helps!

      Reply
  15. Adrienne Nelson says

    September 14, 2015 at 9:52 AM

    https://www.lehmans.com/p-4871-magnetic-lid-lifter.aspx

    I purchased a magnetic wand at Fleet Farm for removing lids and rings from the boiling water. Best. Invention. Ever. I noticed my fork or tongs were scratching the underside of the lids. This is my favorite canning tool next to my funnel!

    Reply
    • ThriftyFrugalMom says

      September 26, 2015 at 9:48 PM

      Good to know, Adrienne! I know a lot of canning kits come with those little wands.

      Reply
  16. Tina says

    September 14, 2015 at 7:56 PM

    I can not use home canned products for my daycare so I have frozen most of the produce we have grown as a group this year. Will t h ese freeze up ok? Or will they just be mush? Thanks

    Reply
    • ThriftyFrugalMom says

      September 14, 2015 at 9:54 PM

      First of all, I think it’s just great that you grow produce with your daycare kids. What a great way to teach them practical things!

      In answer to your question…I’ve only ever frozen really small amount of canned tomatoes (you know, when I had just a tiny bit left that was going to spoil otherwise) and I have only used those in soups. But I think that freezing them diced like this would probably make them much too mushy to use in most recipes that call for canned diced tomatoes. They would probably work fine for something like Tomato Basil Parmesan Soup though, since there you kind of want them soft anyway. Hope that helps!

      Reply
  17. Jenna says

    September 28, 2015 at 4:57 PM

    Hi! Super excited to try this! Will it mess this up to add dried spices (basil, oregano, garlic salt??)

    Reply
    • ThriftyFrugalMom says

      September 28, 2015 at 8:21 PM

      Hmm….I don’t think that should be a problem since it wouldn’t be any different than adding spices to homemade tomato/spaghetti sauce. Hope it goes fabulously for you!

      Reply
  18. Jess says

    December 17, 2015 at 3:29 PM

    Thanks so much for sharing this tutorial! I really want to get into canning this summer and I’ll be using this post to walk me through the process! My husband will be so happy…he’s an enthusiastic gardener and his dream is to grow tons of tomatoes and can them! I’ll have him can with me!

    Reply
    • ThriftyFrugalMom says

      December 17, 2015 at 9:05 PM

      Oh wow, then you should be good to go if you have a hubby that loves to garden! In my opinion, this is one of the easiest things to do with tomatoes….I love doing juice and salsa as well, but both of them take a bit more work than this, so if you are just getting started preserving, this is a great thing to try. Hope you have a bumper crop of tomatoes next summer! 🙂

      Reply
  19. Cindy says

    June 28, 2016 at 2:39 PM

    Why do you suggest to remove the bands after boiling for 40 min? Is it really necessary? Unless I am misunderstanding what the bands are?

    Reply
    • ThriftyFrugalMom says

      June 28, 2016 at 3:17 PM

      Cindy, there is just no reason to let the rings on. Once the lids have sealed, you can unscrew the ring part and then use them again for other canning projects. (It’s much cheaper to just buy the canning lids without the rings. While the lids are to only be used once, the rings can be used until they get rusty and break.) Does that make sense? Or are you still confused?

      Ps. The lid is the part that covers the jar opening, the ring/band is the part that screws onto the jar and holds down the lid which helps it seal while being canned.

      Reply
  20. Katie says

    July 2, 2016 at 2:48 PM

    Some of the recipes I’ve seen for canning tomatoes say to core the tomatoes. Is this not necessary? I am all for omitting that step!

    Reply
    • ThriftyFrugalMom says

      July 2, 2016 at 3:13 PM

      I’ve never cored tomatoes for anything, Katie, so my opinion is that you don’t need to. 🙂 Honestly, I’m not sure why you’d need to cut anything out anyway, because it should all be edible, right? Obviously if there is a hard spot or something, you’ll want to remove that, but I think that probably goes without saying.

      Reply
  21. Sabrina says

    July 28, 2016 at 9:41 PM

    Thank you so much for sharing. I had not tried canning tomatoes yet because I didn’t want to take the time to peel them. I did miss the update on adding lemon juice until after I had the jars in the canner. Are my tomatoes going to spoil because of this?

    Reply
    • ThriftyFrugalMom says

      July 29, 2016 at 10:40 AM

      Yes, I love not needing to peel them too! So much less hassle. And sorry that you missed that little update about the lemon juice. It’s really your call as to whether you want to use them or not. I have never added it and my Mom never did either when she canned tomato chunks, but it is advised. Here’s what Ball’s FreshPreserving.com site says:

      Tomatoes have a pH (acid) level that is just above the line dividing high-acid foods and low-acid foods. It is important for the safety and quality of tomato recipes that the proper acid level is maintained. Since many factors can decrease the natural acidity in tomatoes, the addition of bottled lemon juice or citric acid helps ensure the correct acidification. Bottled lemon juice must be used because its acid level is consistent, unlike fresh lemons.

      Recipes that include an adequate amount of vinegar (5% acidity) do not require additional acidification, such as salsa, tomato chutney, and pickled tomatoes.

      Hope that helps!

      Reply
  22. Stephanie says

    August 14, 2016 at 2:02 PM

    This is a great post! I’m in my 30s and do a lot of other homesteading things but have been a bit frightened off by canning so far! I found a canning class (peaches) which I took the other day and am now officially obsessed. 😉

    I’m wondering how much money canning tomatoes will save me in the long-run? The canned tomatoes we currently buy are $1 or $2 for a can. I don’t like buying those because I can’t imagine they’re very healthy (and I hate that I have to throw out the tins), but when we’re on a budget they do the job. I’m not sure how much a flat of canning tomatoes cost but with 4-5 tomatoes needed for a single jar, it seems like this could end up costing us a lot. Any idea how much each jar works out to?

    Thanks! I’m really excited to buy all the equipment and get started! 😀

    Reply
    • ThriftyFrugalMom says

      August 15, 2016 at 9:11 PM

      Oh, I love that you took a canning class. Way to go! And canning peaches is so fun. I’m hoping to get mine canned here in the next week. If I remember to, I’m going to take pictures to do a tutorial on that too. But, who knows how well I’ll do at remembering between taking care of my 4 kiddos and trying to can! 🙂

      I honestly have no idea how much each jar costs. If you don’t grow your own tomatoes or aren’t able to get them really inexpensively, then it likely isn’t much, if any, of a money saver. I’m able to get a 5 gallon bucket of second quality tomatoes for $3 from a local greenhouse. Obviously that makes it super worth it!

      Not sure if that helps you out or not, but that’s the best I can tell you. And kudos to overcoming your fear and getting started with canning. It’s rather addicting! 😉

      Reply
  23. Courtney says

    August 21, 2016 at 12:15 PM

    Just curious do you know approximately how many pounds of tomatoes equals a certain number of jars?

    Reply
    • ThriftyFrugalMom says

      August 22, 2016 at 8:51 PM

      Courtney, I’m sorry, but I don’t know. I always just use however many tomatoes I have that need to be used up or else I just buy a large amount and fill jars until I get the amount of jars I want. Obviously perhaps this year I should do a bit of calculating and update the post so that I can be a bit more helpful! 🙂

      Reply
  24. Jennifer says

    August 23, 2016 at 9:46 AM

    I’m not sure if it’s been mentioned in the above comments but now they recommend not boiling the seals anymore, they say just place then in some hot water. Thanks for the recipe, we have a lot of over flow of tomatoes this year so instead of them going back I am going to jar them instead.

    Reply
    • ThriftyFrugalMom says

      August 23, 2016 at 2:47 PM

      Jennifer, I heard that recently too, although I think maybe it varies on what brand of seals/lids you use? And hurray for and overabundance of tomatoes. That’s a fun “problem” to have. The great thing about these diced tomatoes is that they are super easy and quick to do, at least if you have the Vidalia Chop Wizard that I mention using in my post.

      Reply
  25. Jenna gibso says

    August 23, 2016 at 6:51 PM

    Hi does it matter on time for canning if pints or quarts. It just says 40 minutes

    Reply
    • ThriftyFrugalMom says

      August 25, 2016 at 3:51 PM

      I always just do 40 minutes for quarts or pints. I’m guessing you could probably do the pints for just 30 or 35 minutes though since they typically don’t need quite as much time as quarts.

      Reply
  26. Dani says

    September 22, 2016 at 7:19 PM

    Is this just normal table salt?

    Reply
    • ThriftyFrugalMom says

      September 22, 2016 at 10:50 PM

      Yes, just good old table salt. 🙂

      Reply
  27. Deb G says

    September 27, 2016 at 7:51 PM

    Thanks for the idea of dicing the tomatoes with the chopper. I’ve thought about getting one of those things for a while, so because of your article, I finally did. I’ve canned tomatoes without peeling before and it’s been good. Dicing them like this will make it even better.

    I pressure can my tomatoes so adding an acid isn’t necessary. I think it’s also easier.

    Actually, they will store for years and years (indefinitely). The problem is that they lose quality starting after the first year, but they don’t spoil if they were canned properly. I’m glad your 2-year-old tomatoes tasted good.

    The USDA has now approved steam canning. I much prefer it to water bath if I don’t use the pressure canner.

    Reply
    • ThriftyFrugalMom says

      September 27, 2016 at 8:43 PM

      I think you will love your chopper, Deb! I’ve had so many people try it and love it. And yes, canned food definitely does lose a bit of quality after it sits for a long time. So far, peaches have been the thing that I’ve noticed it happening with the most. After a year, they tend to start getting a bit softer than they are initially. And steam canning? I’ve never heard of it. I’ll have to check it out!

      Reply
  28. Cynthia says

    October 10, 2016 at 10:19 AM

    Thank you, this is a great easy way to put away the remainder of my tomatoes.
    I’m wondering if the water bath time is the same for quarts & pints. I did pints today & will do the 40 min this time to be on the safe side

    Reply
    • ThriftyFrugalMom says

      October 10, 2016 at 2:49 PM

      Glad that this could help you find a way to use up the last of those tomatoes! And yes, I do the pints the same amount of time as I do the quarts. I think according to the “pros”, you’d only need to do them for 35 min. but I just always do the full 40 min. Happy canning!

      Reply
  29. Judy Holub says

    October 28, 2016 at 12:27 PM

    I tried your recipe name Mexican dressing and it was great. I have been looking for homemade dressing without the added ingredients that I don’t know what they are. I use stevia for the sugar, cider vinegar, sea salt, combination of 3 oils, olive oil, avocado oil and walnut oil, and Walden Farms Amazin Mayo from Sprouts store which does not have soybean oil. Its a keeper, hummy for the tummy!

    Reply
    • Arvemia Wilburn says

      June 1, 2018 at 11:55 PM

      I hear that Instant Pot is intending to make a pot that will be safe for canning. I will soon be 85 and have canned off and on all my life.

      Reply
  30. Cheryl says

    May 23, 2017 at 7:28 PM

    Why would you have to add lemon juice to tomatoes, they are already have acid. I used to can whole tomatoes and never even heard of that, now I cook my sauce and can it. We have a squeeze strainer it separates out the seeds and skin. I used to turn it by hand till hubby took over that part and he installed a motor!

    Reply
    • ThriftyFrugalMom says

      May 29, 2017 at 11:07 AM

      Cheryl, my grandmother, mom and I all have canned tomatoes for years and never added lemon juice either. But after several readers commented saying that lemon juice needed to be added to make sure a safe level of acidity is maintained, I researched it and discovered that it is now recommended to add lemon juice for that reason. From my understanding, most tomatoes are acidic enough that it’s not a problem, but it’s considered a safety precaution. (If tomatoes are canned and there’s not enough acidity, bad bacteria could form causing sickness.)

      And I love that your hubby got creative with your squeeze strainer and made it motorized! 🙂

      Reply
  31. Cindy says

    June 13, 2017 at 9:28 PM

    How do you think the diced tomatoes would work in a tomato juice rather than water?

    Reply
    • ThriftyFrugalMom says

      June 13, 2017 at 10:44 PM

      You actually don’t add any water to the jars before you can the tomatoes. As the tomatoes cook they create juice naturally. In fact, if I drain the tomatoes before I use a jar, I often collect the drained juice and use it in place of tomato juice in recipes. Hope that helps!

      Reply
  32. Susan says

    July 17, 2017 at 9:36 AM

    After canning for the directed 45 minutes I read that this cold pack canning needs 85 minutes of processing time. This made me nervous so I put my jars in the fridge and will cook with them this week. What is your opinion?

    Reply
    • ThriftyFrugalMom says

      July 17, 2017 at 10:46 AM

      Susan, my opinion is that if you added the lemon juice and the jars sealed that they are totally fine. This is the method that my grandma, mom and I all have used for years and from my understanding, there is no safety issue with it and no need to can them longer. But that is just my opinion and you need to do what you feel comfortable doing, obviously.

      Reply
      • Susan says

        July 17, 2017 at 11:38 AM

        Thanks so much! They have the lemon juice and are seal d. They sure do look lovely! This was my first canning experience and I needed a little reassurance. I appreciate your response.

        Reply
  33. Bridget Connolly says

    August 3, 2017 at 6:57 AM

    I’m so doing this tonight!!! Thank you for this straight forward recipe. I’ve been reading about canning tomatoes recently, and wanted to share something that I learned. Tomatoes are naturally acidic, but over the years they have been bred to be sweeter and less acidic, to be more appealing to customers. That may be why so many people have had success canning them without the addition of lemon juice in the past, but to be safe it makes sense to add it now. I wonder if anyone has recorded the pH of tomatoes in, say, the 50s to compare to current-day? I would be fascinated. It also makes sense why old-school marinara recipes call for sugar, to balance the flavor, but I find that it isn’t needed.

    Reply
    • ThriftyFrugalMom says

      August 3, 2017 at 7:50 AM

      Bridget, that is so fascinating and makes so much sense! Now you have me wondering if you only use heirloom tomatoes if you still have enough acidity to be okay since they wouldn’t have been changed at all. So interesting. Thanks for sharing!

      Reply
  34. Cheryl says

    July 14, 2018 at 11:09 AM

    I just found this recipe and will be using it! I know someone already asked about the salt and you said it was regular table salt, but I was wondering if canning salt would work as well?
    My husband and I have a “truck patch” this year and my kitchen looks like a produce shed….lol. I’m constantly looking for ways to put up produce that I haven’t been able to sell. Any ideas would be welcome…

    Reply
    • ThriftyFrugalMom says

      July 14, 2018 at 12:34 PM

      I feel just a little jealous of that truck patch! Or maybe I should say the results of the truck patch. 🙂 I know how much hard work that kind of thing is!

      As for your question, I never have used canning salt but did a little research and it appears like it’s basically salt that doesn’t cloud your canned goods, so from what I can tell, yes, you should be able to use it in place of regular salt. Happy canning!

      Reply
  35. Harold says

    July 26, 2018 at 11:13 PM

    Do you put any water in with the tomatoes before you can them?

    Reply
    • ThriftyFrugalMom says

      July 27, 2018 at 9:31 AM

      No, no water is needed! The tomatoes naturally produce juice as they can.

      Reply
  36. Kristin says

    July 29, 2018 at 9:26 AM

    Do you have to have a lid on when water bath canning??

    Reply
    • ThriftyFrugalMom says

      July 29, 2018 at 10:00 PM

      The lid on the canner? No, I’m sure you wouldn’t need to, but if the lid is off, heat will escape and you’ll essentially be wasting energy.

      Reply
  37. Inge voigt says

    August 1, 2018 at 11:47 AM

    I have always preserved jams in my owen, do You think that i could use that method instead if i only let the cans stay in the owen for 45 minutes at 100°c

    Reply
    • ThriftyFrugalMom says

      August 14, 2018 at 11:37 AM

      I wouldn’t recommend it at all. I know people do oven canning, but it’s technically not a safe approved method of canning, especially not for tomatoes, which can get botulism if not canned properly. (Jam is different because it’s not an acidic food, so therefore pretty much can’t get botulism either.)

      Reply
  38. Jen says

    August 15, 2018 at 12:56 PM

    I did not see quantity of tomatoes to use for this recipe. How many do you use?

    Reply
    • ThriftyFrugalMom says

      August 15, 2018 at 2:39 PM

      Hi Jen! Actually, the quantity doesn’t really matter. Basically, you just need enough tomatoes to fill as many jars as you want to can. So you can do just 2 jars… or 102! 🙂 I typically just buy a bunch of tomatoes (or use whatever I’ve grown) and dice them up, filling jars as I go. Hope that helps!

      Reply
  39. Loretta says

    August 19, 2018 at 11:11 PM

    What do you think about adding a little olive oil & minced garlic?

    Reply
    • ThriftyFrugalMom says

      August 25, 2018 at 10:10 AM

      I’m not sure if adding oil to canned things before canning them is okay. I’d probably just wait and add that until after it’s canned, when you go to use the tomatoes. But the garlic should be fine!

      Reply
  40. Neisha says

    August 22, 2018 at 12:28 PM

    I have a crazy amount of tomatoes and am looking to make anything tomato. I love your recipe and how super easy it is!!! I use diced tomatoes a lot so I’ll be making these a few more times.

    Reply
    • ThriftyFrugalMom says

      August 29, 2018 at 10:42 AM

      Jealous of that crazy amount of tomatoes that you have. 🙂 And isn’t this recipe just the easiest?! It always quickly makes me feel successful!

      Reply
  41. Stephanie says

    August 29, 2018 at 11:59 AM

    For heating the lids, you can also buy a magnetic “lid lifter” to get the lids out of the hot water. It’s a gadget, but I really like having it because you never have to touch the lids with your hands. Just lift out a lid, press it on a clean town to get rid of any excess moisture, and place it on the jar.

    Reply
    • ThriftyFrugalMom says

      September 4, 2018 at 9:44 AM

      I think you are talking about this little gadget! I know a lot of people love them. 🙂

      Reply
  42. Jennifer says

    August 30, 2018 at 2:21 PM

    Thank you so much! This was super helpful!!

    Reply
    • ThriftyFrugalMom says

      September 4, 2018 at 10:01 AM

      Happy to hear it, Jennifer! Enjoy your tomatoes! 🙂

      Reply
  43. Kristi says

    September 12, 2018 at 9:34 PM

    What about the seeds? I have canned tomatoes for using as soup and it’s driven me crazy noticing the seeds. Or do you find you don’t notice them when using them for diced tomatoes in fuller recipes ?

    Reply
    • ThriftyFrugalMom says

      September 13, 2018 at 10:57 AM

      I’m funny about seeds in food too…can’t stand them typically! But with this, I don’t mind them because like you said, the recipes are fuller and there’s other things that mask the seeds. For tomato soup though, I prefer to use tomato juice that has the seeds strained out.

      Reply
  44. Jason says

    October 3, 2018 at 10:36 PM

    should i add water or just put them in the boiling water with no extra liquid in the jars?

    Reply
    • ThriftyFrugalMom says

      October 4, 2018 at 12:16 AM

      You don’t need to add any extra liquid to the jars…just the tomatoes. They will create juice as they cook. Also, just to clarify, the filled jars actually go in the canner when it’s still cool and then you bring it to a boil. Happy canning!

      Reply
  45. Becky says

    February 4, 2019 at 11:43 AM

    Good morning I came across your post on canning diced Tomatoes. I will be doing this today however I saw you had used quart size jars and you stated to process for 45 minutes. What is the suggested time for small jar the size of jelly jars?

    Reply
    • ThriftyFrugalMom says

      February 4, 2019 at 2:54 PM

      Becky, smaller jars should be okay to process for 35 minutes instead of 45. Happy canning!

      Reply
  46. Kathy says

    April 12, 2019 at 10:34 PM

    What is a ‘canner’? Is it jus t a large pot?

    Reply
    • ThriftyFrugalMom says

      April 13, 2019 at 12:17 AM

      Kind of. But it has a rack to place the jars in so they don’t rattle together and break while boiling (see this). It’s not really recommended to can without the rack, although I think you can maybe purchase the rack separately if you have a pot that it would fit in.

      Reply
  47. Skye says

    June 9, 2019 at 9:48 AM

    I canned 7 jars last night. They are all sealed. There is a bunch of liquid on the bottom, is this normal?

    Reply
    • ThriftyFrugalMom says

      June 9, 2019 at 11:50 AM

      Yay, great job! And yes, liquid at the bottom is normal. Some of my jars end up with more liquid at the bottom than the ones in the picture. I think that some varieties of tomatoes just produce more juice. Also, if the jar isn’t filled as full as it could be, it seems to create more juice too. Making sure to fill the jar, then gently thumping it against a dishcloth or rag to settle the contents and then filling it to the jar’s neck again with tomatoes, should help!

      Reply
  48. Debbie says

    June 18, 2019 at 6:58 AM

    I just made pint jars of diced tomatoes. They are in the water bath now. I’m a beginner. I’ve only canned a few times in several years. I’m always nervous being very careful to do everything right. I have the Vidalia chopper which I use a lot. It makes chopping so much easier. I got a deal on tomatoes. So far I’ve made spaghetti sauce and now the diced tomatoes. Do you have instructions for crushed tomatoes and salsa?

    Reply
    • ThriftyFrugalMom says

      June 23, 2019 at 6:09 PM

      Those Vidalia choppers are amazing! And how fun that you are getting into canning! Diced tomatoes are probably one of the easiest things to can, so this was a good choice. I have never canned crushed tomatoes. I think the times would be similar to diced tomatoes, but not sure. And no salsa recipe either. I’ve tried a couple over the years but so far haven’t found one that we just really love. When I do, I’ll definitely have to share it!

      Reply
  49. Hannah says

    August 12, 2019 at 11:37 AM

    Thanks for the tutorial! I hope to can some diced tomatoes today and it’s nice seeing pictures of the process from someone else.

    Reply
    • ThriftyFrugalMom says

      August 17, 2019 at 6:01 PM

      Glad it was helpful, Hannah! And hope your tomato canning was a success! 🙂

      Reply
  50. Yvonne says

    August 21, 2019 at 5:50 PM

    Could I add spices if I wanted to ?? That won’t mess them up will it ?

    Reply
    • ThriftyFrugalMom says

      August 21, 2019 at 11:15 PM

      Yes, it should totally work to add spices!

      Reply
  51. Catharine says

    September 18, 2019 at 10:56 AM

    I’m concerned about the processing time of 45 minutes that you have in your tutorial as Bell and Kerr state 85 minutes for raw packed which is what this recipe is. Have I missed something? Just wanting everyone to have safe food.

    Reply
    • ThriftyFrugalMom says

      September 18, 2019 at 7:10 PM

      No worries, Catherine! The National Center for Home Food Preservations actually states 45 minutes. You can find the info on their website if you care to look it up! 🙂

      Reply
  52. Alisa says

    October 24, 2019 at 4:16 PM

    Oh wow!! I didn’t realize how easy it would be to can tomatoes! We have to use canned tomatoes in many of our recipes at home, but I would love to have my own that are fresh! Thanks for these great pictures to show the process! This has been very helpful.

    Reply
    • ThriftyFrugalMom says

      October 26, 2019 at 5:48 AM

      So glad you found it helpful, Alisa! If you grow your own tomatoes or are able to get tomatoes cheap, it’s a great way to save money and so easy to do!

      Reply
  53. Sandra says

    March 23, 2020 at 2:11 PM

    5 stars
    I LOVE this recipe! Your directions are so clear and easy to follow, I never know how water to put in the pot, your photos are perfect.

    Reply
    • Lydia Beiler says

      April 3, 2020 at 7:19 AM

      Glad that it was helpful, Sandra!!

      Reply
  54. Patricia @ Grab a Plate says

    April 3, 2020 at 10:40 AM

    5 stars
    What a great post for me! My mom always used to can tomatoes and I never learned how! I’ll use this as a guide! Excellent!

    Reply
    • Lydia Beiler says

      April 4, 2020 at 2:41 PM

      Luckily, it’s super easy. You’ll have them canned in no time!

      Reply
  55. Corinne Schmitt says

    April 6, 2020 at 9:41 AM

    5 stars
    So glad I found this. I bought everything I need to start canning over two years ago and it’s been sitting in a closet. I was afraid to actually do it. Decided I’d start with tomatoes and your instructions make the whole process really clear. Thank you!

    Reply
    • Lydia Beiler says

      April 15, 2020 at 12:07 PM

      Oh yes! Do put those canning supplies to use this summer, Corinne! This recipe is a great one to start with because it’s exceptionally easy and pretty difficult to mess up. So happy that it can be a help!

      Reply
  56. Laura says

    July 5, 2020 at 7:32 PM

    Is it ok to use fresh lemon juice? I have 2 lemons to use up.

    Reply
    • Lydia Beiler says

      July 6, 2020 at 6:09 AM

      Yes, that should be fine!

      Reply
  57. Keri says

    August 6, 2020 at 4:25 PM

    5 stars
    I’ve used this recipe twice in the past two weeks and love it. Lydia’s step-by-step instructions were perfect.

    I had a related question that I asked her via Facebook Messenger, she was kind enough to look around for the information I wanted and gave me some great pointers.

    Thanks, Lydia, for the easy tips and well-done recipe.

    Reply
    • Lydia Beiler says

      August 6, 2020 at 5:49 PM

      You are so very welcome, Keri! So happy that you’ve been able to preserve your tomatoes this way. It really is a joy to be able to help people learn this skill!

      Reply
  58. Linda says

    August 6, 2020 at 4:57 PM

    Can you use a pressure canner for this receipe instead of a water bath? if so, how long? and any differences in the process?

    Reply
    • Lydia Beiler says

      August 6, 2020 at 5:47 PM

      Yes, you should be able to pressure can these. I’m sorry, but I don’t know how long or at what amount of pressure you’d can them at though- you’d need to refer to your user manual and see what it says for tomatoes. And no, the process would still be the same. You would simply use the pressure canner for the canning part and adjust the time etc. accordingly.

      Reply
  59. Nancy says

    August 24, 2020 at 1:50 PM

    I have canned tomatoes for year. I have only used pickling salt. And, I have never had a jar go bad. I make sure my jars are hot and my lids are in boiling water before adding the tomatoes. The lemon juice would change the flavour. Wouldn’t it?

    Reply
    • Lydia Beiler says

      August 26, 2020 at 3:50 PM

      Interesting! I never heard of pickling salt until just recently and come from a long line of home canners. No, the lemon juice doesn’t change the flavor at all. I was a bit skeptical too but have been doing it the last several years and I haven’t noticed any difference.

      Reply
  60. Charlotte says

    September 9, 2020 at 11:32 AM

    I have been canning for a few years now but have never cold packed. I packed my jars before processing for 40 minutes and in one of the jars the tomatoes have settled and there is about an inch of air space between the tomatoes and the lid with no liquid covering the tops of the tomatoes. Jar sealed but is it safe? Is this something that has happened with you. This was a quick and easy process and would do it again. Thanks

    Reply
    • Lydia Beiler says

      September 11, 2020 at 1:31 PM

      Glad you liked the recipe, Charlotte! About the jar you mentioned…as long as it is sealed, it should still be fine. I would just use it first as the quality will deteriorate more quickly. Here’s another blogger that shares more about this problem and might help it make more sense. Hope that helps!

      Reply
  61. Heather says

    October 1, 2020 at 4:59 PM

    So I dice tomatoes and leave them raw, and do I put them in cold or hot mason jars? And then boil the jars for 45mins?

    Reply
    • Lydia Beiler says

      October 1, 2020 at 6:06 PM

      Yes, it’s raw tomatoes and you just use room temp mason jars and gently boil for 45 minutes. Hope that helps!

      Reply
  62. Sandra says

    February 4, 2021 at 3:11 PM

    5 stars
    What a great recipe! My grandmother canned fruits and veggies every summer but I have never known how to do it. Your instructions are clear and easy to follow. Thanks!

    Reply
    • Lydia Beiler says

      February 5, 2021 at 9:22 AM

      Thanks, Sandra! So fun that you had a grandmother that canned! And yes, canning can feel rather intimidating but it really is pretty easy for anyone to do.

      Reply

Leave a Reply Cancel reply

Your email address will not be published. Required fields are marked *

Recipe Rating


Welcome! I’m Lydia. I love to share easy homemade recipes, simple homemaking tips and great money saving ideas. I want to help you find ways to live well and enjoy life on a budget! Read more…

  • Email
  • Facebook
  • Instagram
  • Pinterest
  • Twitter

Built on the Genesis Framework · Powered by WordPress · Privacy Policy